
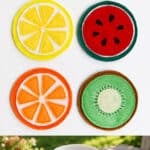
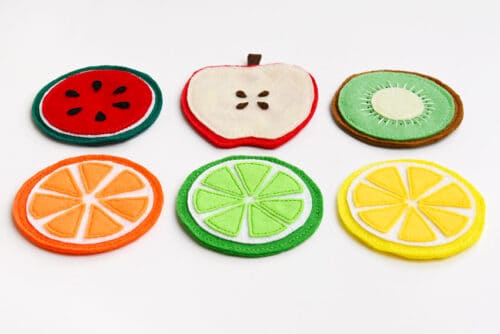
These felt fruit coasters are bright, cheerful, and such a fun way to add a handmade pop of colour to your table. With layers of colourful felt, simple stitching, and our printable patterns, you can make citrus slices, watermelon, kiwi, and apple coasters that look almost good enough to snack on.
This felt coaster craft is a great beginner sewing project, with easy shapes and lots of room to customize the colours and details. Make a matching set for summer drinks, a fruity kitchen accent, or a cute handmade gift for someone who loves colourful DIY decor!

This post contains affiliate links. If you use these links to buy something, we may earn a small commission at no extra cost to you. This helps support our website and allows us to keep creating fun, free content.
How to Make Felt Fruit Coasters
Materials:
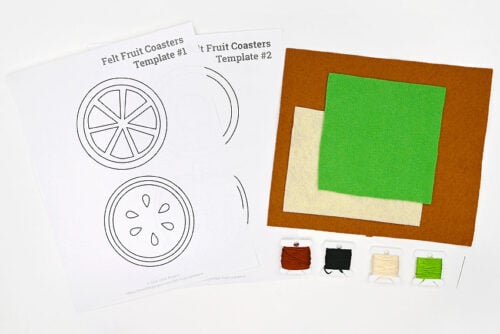
- Free Printable Felt Fruit Coasters Pattern
- Felt (brown, green, yellow — or other fruit colours)
- Sewing thread (or embroidery floss – cream, black, green, brown)
Equipment:
See the craft in action:
Instructions:
Step 1: Find what you need
- Gather your supplies and materials.

Step 2: Cut out the pieces
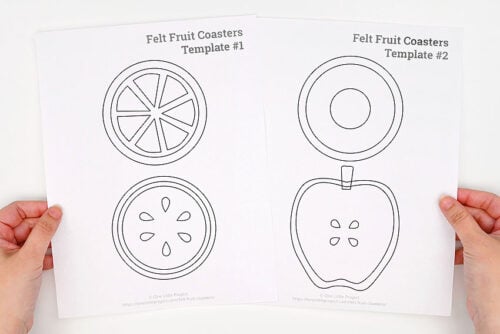
- Print one of our free fruit coaster templates. You can find the link in the materials list above, with more details below the tutorial.Choose your fruit and then cut out the pieces.
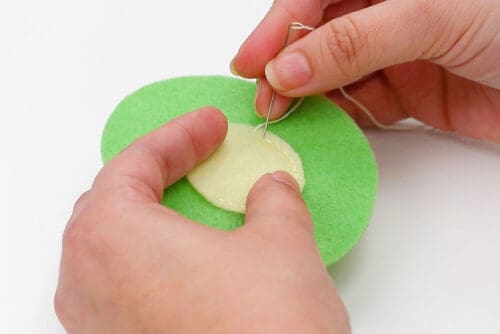
- Cut the template pieces from felt. For all of the coasters you’ll need 2 of the largest circle.For our kiwi coaster we’ve used brown felt for the base, green for the smaller circle, and cream for the small center.

Step 3: Sew the fruit details
- Begin by placing the small circle in the center of the green one. Sew them together with embroidery floss, using a backstitch.To make a backstitch, bring your needle up a little ahead of your last stitch, then go back down where the previous stitch ended. Keep repeating to make a continuous line.
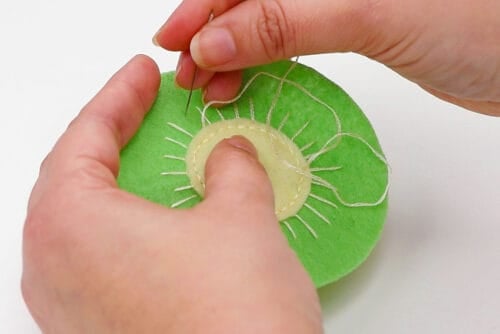
- Then use the same coloured thread to sew the line details that come out from the center of the kiwi.Space the lines roughly 1/4 inch apart and make them varying lengths. Bring your needle under the cream felt in the center to hide that end of the line.
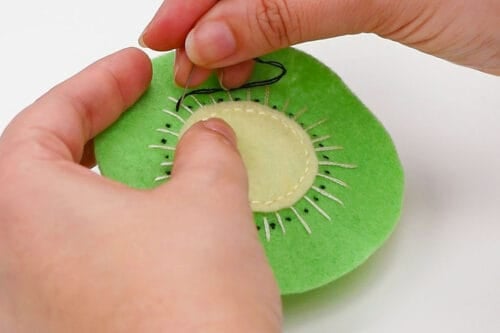
- Use black embroidery floss to make the kiwi seeds, putting 1 between each line. You can make French knots or keep the stitches flat by making small “X” shapes like we did.
Step 4: Connect the larger pieces
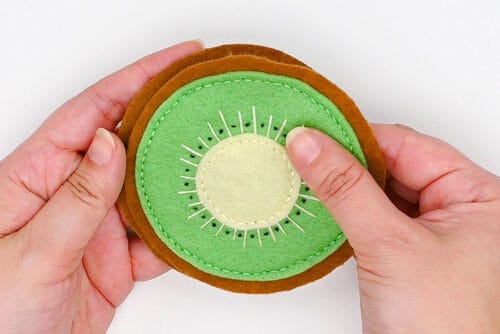
- Place the green circle on one of the brown circles, centering it as best you can. Use green embroidery floss to sew them together, using a backstitch.
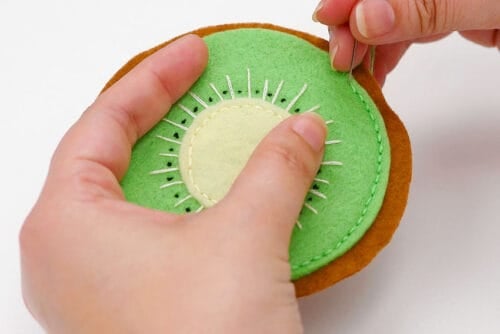
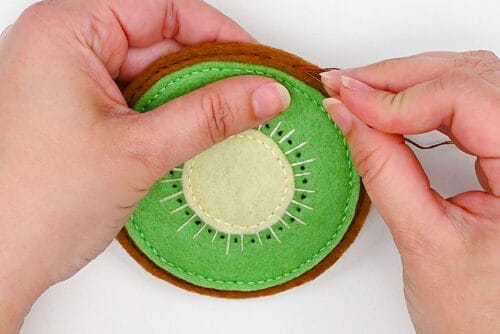
- Now set the kiwi on top of the other brown circle, lining up the edges nicely.
- Sew them together with brown embroidery floss, using a backstitch.
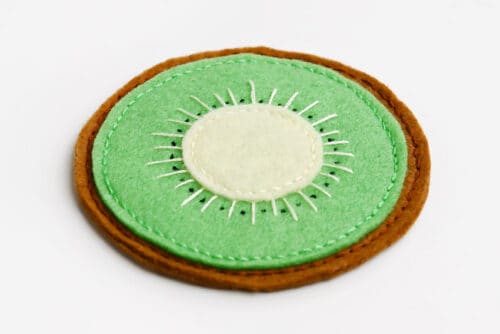
- Your felt fruit coaster is complete!
- Have fun making a whole set of coasters featuring different fruits!
Helpful Tips:
- Make 4 of the same felt coaster for a matching set, or make 1 of each fruit for a colourful mixed collection. Either option makes a cute handmade coaster set for your kitchen, patio table, or summer drinks.
- Use the citrus fruit coaster template in different colours to make several different fruit slices. Try yellow for lemon, green for lime, orange for orange (obviously, haha), and pink for grapefruit.

Download our free felt fruit coasters pattern:
Click on the link below to download our free, printable fruit coasters templates! The 2 page PDF file will open in a new window. Then simply print the templates on 8.5 x 11 (letter size) printer paper or cardstock.
>>> Felt Fruit Coasters Pattern <<<
Do I have to use a backstitch to sew these felt coasters?
No, you don’t have to use a backstitch, but it does give the felt coasters a really neat, sturdy finish. A backstitch is strong and makes the stitching look smooth and polished, but it can take a little longer to do.
You can also use a running stitch to attach the smaller felt pieces, then use a blanket stitch around the outside edge. If you want to make the coasters more quickly, you can even use a sewing machine to sew the main pieces together.

Are these felt fruit coasters heatproof?
The 2 layers of felt should provide enough protection for most warm mugs, cold drinks, and everyday use. They help protect the table from light heat, scratches, and condensation.
If you want extra protection for hot drinks, you can add a layer of heat-resistant batting or interfacing, such as Insul-Bright, between the 2 largest felt pieces before sewing them together. This gives the coaster more insulation, but it’s still best to use these for mugs and glasses rather than very hot pots or pans.

What type of felt should I use for these felt fruit coasters?
Use good quality soft craft felt that’s thick enough to hold its shape. Most craft stores sell different types of felt, so choose the thicker version, about 2mm if possible, instead of the very thin felt sheets that are almost see-through.
You can also use wool felt or a wool felt blend for these fruit coasters. Wool felt is more expensive, but it’s higher quality, feels nicer to work with, and doesn’t pill as easily as synthetic craft felt.

These felt fruit coasters are a cheerful little sewing project that’s both cute and practical. The layered felt gives each fruit slice a fun, dimensional look, and the simple stitching makes them feel extra handmade (in the best way possible).
Set them out for lemonade, iced tea, summer parties, or everyday drinks that could use a splash of colour. They’re perfect for brightening up your kitchen, decorating a patio table, or giving as a sweet handmade gift.
Here’s even more fruit-themed craft ideas:


Fruit and Vegetable Painted Rocks

Now available
Low-Mess Crafts for Kids Book
72 cute and fun crafts that kids and parents alike can enjoy. All with as little mess as possible!
Where to buy:
You can purchase Low-Mess Crafts for Kids from Amazon, or wherever books are sold:
Amazon | Barnes and Noble | Books-A-Million | Indiebound | Amazon Canada


Leave a Reply