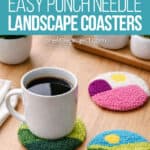
These punch needle landscape coasters are a fun and creative way to bring cozy, handmade charm into your home. Inspired by simple scenic views like rolling hills, sunny skies, and colourful horizons, these coasters use easy punch needle techniques to create textured, eye-catching designs.
Perfect for beginners and experienced crafters alike, punch needle coasters are incredibly satisfying to make. They look beautiful on any table or desk, and they’re a nice practical item for everyday use. Whether you’re crafting a full set or just one statement piece, these punch needle landscape coasters are a relaxing project with a gorgeous finished result.

This post contains affiliate links. If you use these links to buy something, we may earn a small commission at no extra cost to you. This helps support our website and allows us to keep creating fun, free content.
DIY Punch Needle Landscape Coasters
Materials:
- Monk’s cloth
- Washable fabric marker
- Yarn (4 to 5 colours)
- Sewing thread (white)
- Self-adhesive felt
Equipment:
- Embroidery hoop (no-slip; 4.7 inches)
See the craft in action:
Instructions:
Step 1: Find what you need
- Gather your supplies and materials.


Step 2: Prepare the fabric
- Cut a piece of monk’s cloth about 2 inches bigger than your embroidery hoop.
- Attach the cloth inside the hoop and ensure that the cloth is drum tight in the frame.(As you work, keep adjusting it to maintain this tension.)
- Use a washable fabric marker to draw your landscape design on the fabric.Here we drew hills and fields with a sunset in the sky.


Step 3: Thread the punch needle
- Place your first colour of yarn through the loop at the bottom of the needle threader.

- Insert the needle threader into the punch needle so the loop or fold is at the bottom.
- Pull the needle threader up through the punch needle until the yarn appears.
- Use the needle threader to push the end of the yarn through the hole in the top of the punch needle. It should go from the inside to the outside, coming out the flat side.Pull the yarn until there’s about 1 to 2 inches showing.


Step 4: Make your design
- Push (or “punch”) the needle down through the fabric at the outline of one area.
- Bring the needle back up and re-insert it next to your previous punch.
- Repeat until you’ve gone around the border of one area.
- Then fill in the inside of the section. We find it works well to continue going around, working towards the middle.It’s okay if the whole section doesn’t look filled from this side. Where you’re working will be the back of the coaster, so flip the hoop periodically to see what the right side will look like.
- Once you’re finished, cut off the yarn about 2 inches from the last punch.
- Thread your punch needle with a second colour and fill in another section the same way.
- Repeat with different colours and shades until your coaster design is complete.


Step 5: Finish off the coaster
- Remove the fabric from the hoop and cut around the work, leaving about 1 inch extra around the yarn-punched area.
- Thread a sewing needle with white thread or embroidery floss. Fold the fabric in towards the back center and gather it together with a simple running stitch. Finish by tying the two thread ends together in a double knot.
- Trace the inside of the embroidery hoop onto the back of some adhesive felt.
- Cut the felt circle and remove the backing. Place the felt on the back of the coaster, covering the folded fabric.
- Your punch needle landscape coaster is complete!
- Have fun creating different designs. You can make mountains, hills, fields, sunsets, and more!


Helpful Tips:
- Don’t love your design? Redraw it! If you’re not happy with what you sketched on the monk’s cloth, you can wash the marker off and try again once the fabric is dry.
- Punch all the way through the fabric. Each time you punch, make sure the needle goes fully through the monk’s cloth. This helps create consistent loops and a smoother, more even finish.
- Don’t have a fabric marker? Crayola fine-tip washable markers will also wash off the monk’s cloth easily.
- Want more punch needle tips? Our punch needle heart coasters tutorial has extra helpful beginner advice (and troubleshooting, too)!

What designs work well for punch needle landscape coasters?
Simple designs are best, especially if you’re new to punch needling. Curved lines are easiest to make, which is great, because you can create mountains, hills, and fields this way. You can also make a horizon line with a sun or sky.
Search “minimalist landscape” or “abstract landscape” and look at images to get some inspiration.

What if I don’t feel comfortable drawing my design freehand on the monk’s cloth?
The good thing is that fabric markers are water soluble — meaning they can be washed out if you make a mistake. Then it’s easy to try again once the fabric is dry!
But an even easier solution is to sketch your design on paper first. You can trace the embroidery hoop to get the right size and then practice your lines on paper. Then place the paper under the fabric and use the lines as a guide. As long as the lines are dark enough, you’ll be able to see them through the fabric. Using a light pad or holding the design up against a lit window will make the tracing even easier.

Why does the yarn keep coming out of my punch needle coaster?
If your yarn keeps pulling out as you punch, it’s usually because there’s too much tension coming from the yarn ball. You need plenty of slack between the punch needle and the yarn, otherwise the yarn can tug out of the fabric. Try pulling out a good amount of yarn from the ball and letting it rest loosely on your work surface while you punch.
What’s the best backing for these punch needle landscape coasters?
We used adhesive felt for the backing, and it works really well for holding the yarn ends in place and keeping the back neat. You can also glue regular felt in place, or add a cork backing onto the coaster if you want a sturdier, more heat-resistant option.

Punch needle landscape coasters are the kind of craft you can really sink into — simple, soothing, and so satisfying as the design starts to appear stitch by stitch. The best part is that you can completely customize them: choose your own minimalist landscape, pick colours that match your space, or play around with bold, unexpected combos just for fun.
And honestly, the colour choices might surprise you in the best way. A palette you wouldn’t normally choose can turn into a coaster you absolutely love once you see it finished! Whether you make one or a whole set, these little landscapes turn out so pretty, and they’re a relaxing, creative project you’ll want to do again.
Here’s even more DIY coaster ideas:


Now available
Low-Mess Crafts for Kids Book
72 cute and fun crafts that kids and parents alike can enjoy. All with as little mess as possible!
Where to buy:
You can purchase Low-Mess Crafts for Kids from Amazon, or wherever books are sold:
Amazon | Barnes and Noble | Books-A-Million | Indiebound | Amazon Canada


Leave a Reply