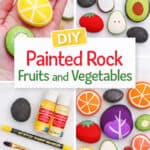
These fruit and vegetable painted rocks are a bright and cheerful craft that’s perfect for kids! With just a little paint and a few simple shapes, ordinary stones can be transformed into colourful strawberries, lemons, avocados, and other fun produce designs. They’re easy to make and a great way to practice painting patterns and details!
This painted rock craft is a fun art activity for kids of all ages. Use the finished rocks as playful decorations, pretend play, or add them to a garden or plant pot. However you use them, these cute fruit and vegetable rocks are sure to bring a splash of colour and creativity!

This post contains affiliate links. If you use these links to buy something, we may earn a small commission at no extra cost to you. This helps support our website and allows us to keep creating fun, free content.
How to Make Fruit and Vegetable Painted Rocks
Equipment:
Instructions:
Step 1: Find what you need
- Gather your supplies and materials.

Step 2: Add the base colours to the rock
- To make a citrus fruit try and use a round or oval rock. We find Mexican beach pebbles to be the best size and shape for making painted rocks.

- Begin by adding a coat of cream coloured paint to the top of the rock.(We’re using CraftSmart “Vanilla”, which has a slight yellow tint to it.)Allow to dry.

- Add a second coat of paint to give the rock better coverage.

- Then paint a strip of yellow paint around the outside of the rock. It should come slightly onto the top of the rock, but mostly just be around the outside edge.Make sure the whole side of the rock is covered, going a tiny bit underneath as well.

Step 3: Add the lemon details
- Once the paint is dry, use a yellow paint pen to draw a triangle on the rock.The base of the triangle should take up about 1/3 of the side and be curved to follow the edge of the rock. The top point should reach near the center of the rock.

- Add 2 other triangle wedges on either side of the first.

- Then add the same shapes to the other half of the rock. Again, start with the center triangle so you can match up the points nicely.

- Now colour in the triangles with the paint pen. Go slowly to create neat lines.

- Your lemon rock is complete!

Step 4: Make a kiwi rock (optional)
- Use the same basic steps to create the base of a kiwi. You’ll want a cream/light yellow base coat.Then add a brown strip around the outside of the rock for the skin, and a green top (leaving a light circle in the middle).Allow to dry.

- Draw thin lines coming out from the center with a cream paint pen. Make them a variety of lengths.

- Then use a black paint pen to add small seed dots around the cream circle.

- Your kiwi rock is complete!

- Now have fun making a whole set of fruit and vegetable rocks!

Helpful Tips:
- Start with a light base coat: If you’re painting lighter or bright colours on your rocks, try adding a thin white or light-coloured base coat first. This helps the colours show up more clearly and usually means you’ll need fewer total coats of paint.
- Choose smooth, flat rocks: Flat river rocks or Mexican beach pebbles work best for painted rock projects because they give you a smooth surface for painting. You can often find them at garden centers or local landscape supply stores, where they’re much cheaper than buying them from craft stores.

How can I paint different fruits and vegetables on rocks?
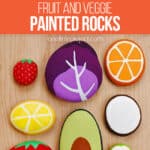
There are lots of fun produce designs you can make with simple shapes and colours. Here’s how to make the other rocks we painted:
- Tomato: Paint the whole rock red, then add small green triangle shapes at the top for the leaves.
- Avocado: Use an avocado-green base, add a dark green outline around the edge, and paint a brown oval seed in the center.
- Citrus slices: Follow the tutorial above to create lemons, oranges, grapefruits, or limes with colourful wedge sections.
- Strawberries: Use smaller rocks. Paint them red with green leaves at the top and add small yellow or black dots for the seeds.
- Pear: Start with a light cream base, add a green outline around the edge, and paint small brown teardrop-shaped seeds in the centre.
- Coconut: Paint the base of the rock white and add a brown outer ring. Once the paint is dry, use a different shade of white or a very light grey paint marker to make a circle in the center of the rock.
- Red cabbage leaf: Cover the rock with a gradient of purples, from light lavender to deep burgundy. Then add thin white lines with a paint pen to create the leaf’s veins.

What type of paint works best for painted rocks?
Acrylic paint works best for rock painting. A good-quality craft paint will give better coverage and brighter results than cheaper paints, and you’ll also need fewer coats.
Paint pens are also very helpful for rock painting. They make it easy to add small details like seeds, shapes, and outlines without worrying about using a tiny paintbrush. They also tend to provide great coverage and they dry quickly.

Do I need to seal my veggie and fruit painted rocks?
If you plan to place your painted rocks outside in a garden or plant pot, sealing them is recommended. You can use Mod Podge, polyurethane, or an acrylic spray sealer to protect the paint from chipping and help it withstand the weather.
If you’re keeping the rocks indoors or using them just for fun, sealing them isn’t necessary!
What other fruits or vegetables can I paint on rocks?
There are lots of fun options you can try! Some ideas include:
- Watermelon slice: Use a triangular rock. Paint it red with a white stripe and green rind along one edge, then add black seeds.
- Zucchini or cucumber: Use a longer rock with a dark green base and lighter green shading.
- Apple half: Similar to the pear design but with a red outer edge.
- Carrot: Paint a longer rock orange and add green leaves at one end. Use darker orange lines for texture.
You can also experiment with simple designs like peppers, blueberries, bananas, or peaches to create a colourful collection of fruit and vegetable rocks. It’s all about finding a uniquely shaped rock and imagining what it can become!

Painting fruit and vegetable rocks is a fun way for kids to practice simple shapes, bright colours, and playful details. Each rock can turn into a different piece of produce, and it’s fun to see a whole collection of colourful fruits and veggies come together!
Once they’re finished, you can display the rocks in a bowl, in the garden, or use them as kindness rocks in a painted rock scavenger hunt. However you use them, these cheerful little rocks are a great way to turn a simple art project into something that can be enjoyed long after the paint dries.
Here’s even more fruit craft ideas:


Now available
Low-Mess Crafts for Kids Book
72 cute and fun crafts that kids and parents alike can enjoy. All with as little mess as possible!
Where to buy:
You can purchase Low-Mess Crafts for Kids from Amazon, or wherever books are sold:
Amazon | Barnes and Noble | Books-A-Million | Indiebound | Amazon Canada


Leave a Reply