
This colourful Easter egg wreath is guaranteed to make your front door pop! Made with bright plastic Easter eggs arranged into playful flower shapes, it’s a bold and cheerful way to decorate for spring. The vibrant pastels and satin bow give it that perfect mix of fun and festive — making it impossible not to smile when you see it.
This DIY Easter wreath turns simple supplies into a statement piece. By grouping the eggs into daisy-like flowers, you create a unique spring wreath that’s full of texture, colour, and personality. It’s an easy way to add a fresh burst of Easter decor to your home without using traditional florals — and the result is seriously eye-catching!

This post contains affiliate links. If you use these links to buy something, we may earn a small commission at no extra cost to you. This helps support our website and allows us to keep creating fun, free content.
DIY Easter Egg Wreath
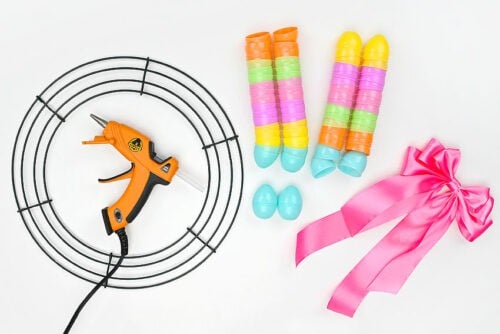
Materials:
- Mini plastic Easter eggs
- Metal wreath frame (12 inches)
- 1-1/2 inch wide Ribbon (pink or matching colour)
Instructions:
Step 1: Find what you need
- Gather your supplies and materials.

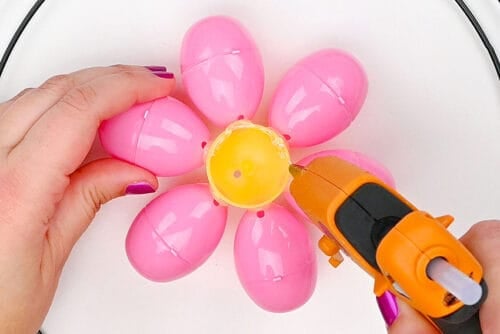
Step 2: Make the Easter egg flowers
- To make each flower on the wreath you’ll need 6 mini plastic Easter eggs of one colour.
- You’ll also need 1 yellow egg for the center of each flower. Cut the egg in half at the hinge — you’ll only be using the rounded bottom part.
- Set the round half of the egg on your working surface.
- Add a dot of hot glue to the pointed top of a pink egg.
- Hold the yellow egg as you push the pink egg into place. It should connect at the side of the yellow egg half at a slightly downward angle (i.e. the rounded part will stick up a bit).
- Repeat, gluing another pink egg directly across from the first one.
- This will give you room to glue the last 4 “petals”, placing 2 eggs in-between on each side, connecting them at an angle.

- Make 7 more flowers (8 total), using different colours of Easter eggs.


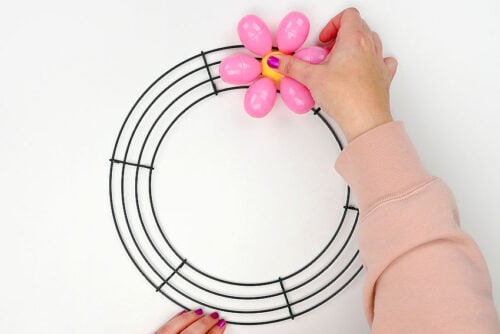
Step 3: Add the flowers to the wreath
- This amount of egg flowers will fit on a 12 inch wire wreath frame. If your wreath frame or eggs are different sizes you’ll need to see what works the best for you.
- Begin by adding hot glue to the back of the yellow center on one flower.
- Set it into place on the wreath.
- Once the glue is dry, flip the wreath over and add more glue to the back of the egg where it connects to the metal. This will secure the egg, keeping it in place.
- Now you’ll want to arrange the rest of the flowers on the wreath frame. It can be a bit tricky to make them fit neatly, so place and re-arrange until you’re happy with the look.
- You can take a picture of your flower placement and then refer to it as you glue the flowers into place.Or pick the flowers up carefully one by one to glue them, and then secure the backs of all the flowers at the end.


Step 4: Make and add a bow
- Use our how to make a bow tutorial to make a triple layered ribbon bow, or buy a premade bow.
- Add a dot of hot glue to the back center of the bow.
- Then set it into place at the top of the wreath, between 2 flowers, so the ribbons trail down into the center.
- Your Easter egg wreath is complete!


Helpful Tips:
- Use plenty of hot glue: Apply a generous amount of hot glue to “trap” each egg in place against the wreath frame. This helps secure the eggs firmly so they don’t pop off later.
- Arrange before gluing: Lay out all of your egg flowers on the wreath form first and adjust the spacing until you’re happy with the placement. It can be tricky to make everything fit evenly, so avoid gluing more than one flower down before checking the overall layout.
- Wrap the wreath form (optional): If you don’t want the wire frame to show, wrap it in ribbon, burlap, or lightweight fabric strips before attaching the eggs. This not only hides the frame but also gives the glue a better surface to grip.

What size plastic eggs do I need to make this DIY Easter egg wreath?
We used mini Easter eggs from the dollar store, since we found regular plastic eggs to be too big to fit nicely on the 12 inch wreath frame. The smaller eggs work best for creating evenly spaced flower shapes.
The mini plastic eggs we used measure approximately 1-3/4 inches tall with a 1-1/4 inch diameter at the middle.

How many plastic eggs do I need to make this Easter egg wreath?
You’ll need 56 plastic eggs total: 8 yellow eggs for the flower centers and 48 eggs for the petals.
We recommend using at least four different petal colours for a bright, balanced look. We used 12 pink, 12 blue, 12 orange, 6 green, and 6 purple.
How can I make a bow for this Easter egg wreath?
We used 1-1/2 inch wide satin ribbon to make the bow for this wreath. You can check out our full, detailed tutorial on how to make a bow! There are a couple styles to choose from that would look great on this wreath.

How else can I attach the Easter eggs to the wreath frame?
If you prefer something stronger or more permanent, you can use E6000 adhesive. If you use this, allow for a longer cure time and work in a well-ventilated area.
You can also secure the eggs by wrapping fishing line around a couple of the “petals” and tying it at the back of the frame. Very thin floral wire is another sturdy option for wrapping around the eggs and attaching them to the wreath form.

This Easter egg wreath instantly adds personality to your home decor and it’s such a fun way to turn simple plastic eggs into a bright and cheerful spring statement piece. Whether you hang it on a door or in an entryway, the flower shapes, bold colours, and ribbon bow make the wreath feel playful and eye-catching — perfect for celebrating Easter in a fresh, creative way!
Here’s even more cute Easter craft ideas:


Now available
Low-Mess Crafts for Kids Book
72 cute and fun crafts that kids and parents alike can enjoy. All with as little mess as possible!
Where to buy:
You can purchase Low-Mess Crafts for Kids from Amazon, or wherever books are sold:
Amazon | Barnes and Noble | Books-A-Million | Indiebound | Amazon Canada


Leave a Reply