
This crochet tea cup is SO CUTE! This cup of tea amigurumi is easy to make, is a great stash-busting project, and uses simple stitches — making it fun for both beginners and advanced crocheters.
Use the FREE crochet tea cup pattern below or grab the printable, ad-free pattern with BONUS Quick Guide from our Etsy shop. This whimsical tea cup crochet project is sure to brighten your day, and it makes an adorable gift for tea lovers, teachers, co-workers, and friends. So grab your favourite colour of yarn, and let’s get started!

This post contains affiliate links. If you use these links to buy something, we may earn a small commission at no extra cost to you. This helps support our website and allows us to keep creating fun, free content.
How to Make a Crochet Tea Cup
Materials:
- Worsted weight yarn (cup colour, light brown, off-white, black)
- Polyester fiber fill
- Safety eyes (12mm)
- 12 gauge Wire
- Soft pastels (optional)
- Crochet Tea Cup Pattern (No Ads)
Equipment:
Instructions:
Find what you need:
- Gather your supplies and materials.


Cup:
- Round 1: Using the main cup colour, insert 6 single crochet into a magic circle.Pull the tail to tighten and slip stitch into the first st to join. (6)

- Round 2: Chain 1 and insert 2 sc in each st around (an increase). Sl st into the first st to join. (12)
- Round 3: Ch 1 and *insert 1 sc into the first st, then inc into the next st*.Rep from * to * around. Sl st into the first st to join. (18)
- Round 4: Ch 1 and *insert 1 sc into each of the first 2 sts, then inc into the next st*.Rep from * to * around. Sl st into the first st to join. (24)
- Round 5: Ch 1 and *insert 1 sc into each of the first 3 sts, then inc into the next st*.Rep from * to * around. Sl st into the first st to join. (30)
- Round 6: Ch 1 and *insert 1 sc into each of the first 4 sts, then inc into the next st*.Rep from * to * around. Sl st into the first st to join. (36)
- Round 7: Ch 1 and insert 1 sc into the BLO of each st around. Sl st into the first st to join. (36)
- Round 8: Ch 1 and insert 1 sc into each st around. Sl st into the first st to join. (36)
- Rounds 9–22: Rep round 8. (36)
- Fasten off the yarn, leaving a 12 inch tail.
- Fold the edge of the cup inward, creating a 1/2 inch cuff, and use the tail to sew it in place.


Tea:
- Use light brown yarn to rep rounds 1 to 6 of the cup.
- Fasten off the yarn, leaving a 12 inch tail.


Tea Bag Tag:
- Foundation: Ch 6 with off-white yarn.
- Row 1: Insert 1 sc into each ch across. (5)
- Rows 2–11: Ch 1 and insert 1 sc into each st across. (5)
- Fasten off the yarn, leaving an 8 inch tail.
- Fold your work in half. Use the small tail to sew one side together, and then use the longer tail to sew the other.
- Sew the longer tail up through the middle of the tag, so it ends up in the top center, and pull it all the way through.Weave in the smaller tail, and leave the longer tail as is (don’t cut it!).


Handle:
- Cut a 4-1/2 inch piece of wire.
- Use pliers to fold both ends in about 1/4 inch, creating loops.
- Ch 15 with the cup colour yarn.
- Set the wire against the chs.
- Working over both the ch and wire, sc across, making about 25 sc total.The sts may feel tight and bunch slightly, which is normal. This ensures the wire is fully covered. Adjust the number of sc as needed.(You can also insert 1 sc in the last ch to help it stay in place.)
- Fasten off the yarn.
- Thread one of the tails through the loop of the wire and tie the 2 tails together.


Assembly:
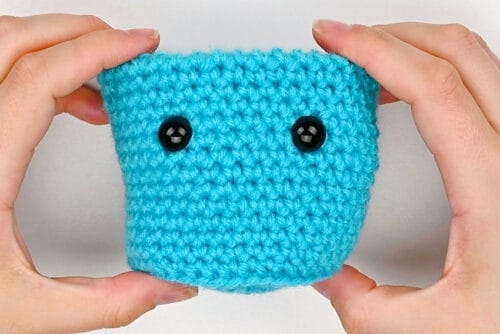
- Insert safety eyes into the cup between rows 9 and 10, placing them about 7 sts apart and securing them with the washer.Place them so the front of the cup is the opposite side to the seam.
- Stuff the cup with poly-fil until it’s firm and holds its shape.Avoid over-stuffing, as too much stuffing can cause the base to round, making it hard for the cup to stand.
- Use the long tail of the tea piece to sew it inside the cup, along the cuff you made earlier.
- Sew the handle to the cup. Attach the end with the tails to the side of the cup, 1 row below the rim.
- Tie a 6 inch piece of yarn through the loop on the other end of the handle and use that to sew it to the cup, 1 row up from the base.
- Use the tail of the tea bag tag to attach it, sewing it into the last round of the tea, on the opposite side from the handle.
- Tie the tail in a knot to keep the tag in place, then sew the tail into the body of the cup.
- Use black yarn to sew a smiling mouth onto the cup, 3-4 rounds below the eyes.Then weave in any tails you have left. You can tuck them into the body of the cup using your crochet hook or yarn needle.
- Optional: Use pink soft pastel or blush to add rosy cheeks to the cup, just below the eyes.
- Your crochet tea cup is complete!
- Have fun making your tea cup some friends in all different colours!


Helpful Tips:
- We write all our patterns in English using US terminology.
- Master the main crochet stitches with our crochet basics posts! These step-by-step guides are perfect for beginners, giving instructions on the stitch or technique, offering helpful tips, and answering frequently asked questions.
Crochet Abbreviations & Terms:
This pattern uses standard US crochet terms. Here’s what each abbreviation means:
BLO = back loop only
ch(s) = chain(s)
inc = increase
rep = repeat
sc = single crochet
sl st = slip stitch
st(s) = stitch(es)

Download our crochet tea cup pattern:
You can follow the full crochet tea cup pattern with step-by-step instructions for free right here in this post (supported by ads). Or, if you’d like a printable amigurumi tea cup PDF pattern with BONUS Quick Guide, you can grab it in our Etsy shop. It’s perfect to keep by your side as you crochet!
Printable Crochet Tea Cup Pattern
Get the printable Crochet Tea Cup Pattern PDF with step-by-step photos + BONUS Quick Guide in our Etsy shop!

What size crochet tea cup does this pattern make?
This little cup of tea amigurumi is about 3 inches tall and 2-3/4 inches wide, or roughly 4-1/4 inches wide including the handle.
The exact size will vary slightly depending on your yarn choice and tension.

Do I have to use safety eyes and wire in this crochet tea cup plushie?
Nope! If you’d like the cup to be completely soft, you can embroider the eyes with yarn or embroidery floss instead of using safety eyes. For the handle, you can skip the wire and work single crochet over the foundation chain only, using a smaller hook size to keep the stitches nice and tight.
Just keep in mind that without the wire, the handle will be decorative only and won’t really be “holdable” like a real mug handle.

These crochet tea cups are so much fun to make! They’re quick enough for an evening project, and easy to customize with different colours, embroidered expressions, or blushy cheeks.
Whether you stitch them as gifts for tea lovers, desk buddies for co-workers, or make a cheerful collection for yourself, they’re a sweet, cozy project you’ll want to come back to again and again.
Here’s even more fun crochet ideas:


Now available
Low-Mess Crafts for Kids Book
72 cute and fun crafts that kids and parents alike can enjoy. All with as little mess as possible!
Where to buy:
You can purchase Low-Mess Crafts for Kids from Amazon, or wherever books are sold:
Amazon | Barnes and Noble | Books-A-Million | Indiebound | Amazon Canada


Leave a Reply