
If you’ve ever wanted to try resin but weren’t sure where to start, a resin bowl is such a fun (and surprisingly doable) project! These little bowls are glossy, colourful, and completely customizable. You can keep them simple and sleek, add glitter for extra sparkle, or swirl in dreamy colours for a one-of-a-kind look. Plus, once you make one, it’s hard not to want to make a whole set.
We’ll walk you through how to make a resin bowl in our step-by-step tutorial, including the supplies you’ll need and some helpful tips. These little bowls are perfect for holding jewelry, keys, paper clips, or any tiny treasures you want to keep in one place — and they make such pretty handmade gifts too!

This post contains affiliate links. If you use these links to buy something, we may earn a small commission at no extra cost to you. This helps support our website and allows us to keep creating fun, free content.
How to Make a Resin Bowl
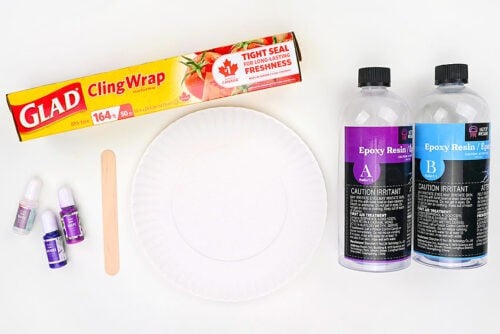
Materials:
Equipment:
- Popsicle stick (or resin stir stick)
- Cereal bowl (or bowl shape of choice)
- Nail file (or sandpaper)
See the craft in action:
Instructions:
Step 1: Find what you need
- Gather your supplies and materials.

Step 2: Mix the resin
- Protect your working surface with a drop cloth or silicone mat before working with resin. Always wear protective nitrile gloves and eye protection.Work in a well-ventilated space and wear a respirator if your resin requires it. Read your resin’s label for safety requirements.You’ll need a silicone measuring cup or disposable plastic cup to mix the resin in.
- Mix the amount of resin needed to make your bowl. We mixed 200 ml total to make two bowls.Begin by adding 1 part of Part A to a silicone measuring cup. The amount of Part A should be half the total amount needed. (In our case, 100 ml –50 ml per bowl.)Follow your specific resin’s instructions for ratios, drying times, and curing times.
- Add an equal amount of Part B (or whatever ratio your brand of resin suggests) to the measuring cup.(In our case, we added 100 ml of Part B to make 2 bowls.)
- Mix the resin and hardener together with a popsicle stick or reusable resin stir stick.Stir slowly, scraping down the sides and bottom of the measuring cup. Continue mixing for 3 to 5 minutes or until the mixture is clear.


Step 3: Colour the resin
- Cover a paper plate with plastic wrap.
- Pour the resin onto the plate. (Only pour half if you mixed 200 ml.)If there are any air bubbles use a lighter, or spray rubbing alcohol on the surface to remove them.
- Add drops of alcohol ink across the resin. Allow it to spread.
- Choose a second complementary colour of alcohol ink and add drops of this to the plate.
- White alcohol ink is a good choice to add to the bowls, since it’s heavier than most other inks.It’ll drop down and push the colours around, creating nice colour movement and contrast.
- Finish by adding a final colour to the resin.

- Optional: Use a stir stick to give the resin a swirled or marbled pattern.
- Allow the resin to sit for 4 to 5 hours, so it’s no longer tacky but is still flexible.(This timing will depend on your brand of resin and it’s cure time. Wear a glove while checking the resin.)


Step 4: Form the bowl
- When the resin is no longer tacky, pick up the plastic wrap and resin and place it on top of a bowl.(Note: We forgot to wear gloves here, but we highly recommend still wearing them for this step.)
- Push the resin piece down, shaping it to the sides of the bowl.
- Continue to push the resin into place. Try to ensure no plastic wrap gets trapped in any folds, as it can be hard to remove later if this happens.Now allow the resin to sit in the bowl for at least another 12 hours.


Step 5: Remove bowl from plastic wrap
- Once the resin has hardened, peel the plastic wrap off of the bowl.Most of it should come off easily, but you can use tweezers to pick off any stubborn pieces.
- Once your bowl is cured (this is longer than the dry time – it can take a few days or more) use a nail file or sandpaper to remove any hard edges.Always wear a dust mask or respirator when doing this.
- Your resin bowl is complete!


Helpful Tips:
- Stay safe with PPE: Only pour resin in a well ventilated area and be sure to protect your working surface. Wear nitrile gloves, eye protection, and long sleeves. Some resin also requires wearing a respirator.
- Getting rid of air bubbles: Spray rubbing alcohol on the surface of the resin to remove any air bubbles. You can also use a heat gun, but be careful you don’t blow the resin around too much.

How long should I wait before forming my resin bowl?
We let the resin sit for about 4 to 5 hours, or until it reached a soft-but-not-sticky stage. At this point, the resin isn’t fully hardened, but is no longer tacky — which makes it much easier to move and shape without leaving fingerprints or dents.
The exact timing will depend on your specific resin, since dry time and cure time vary by brand. For this project, we used Let’s Resin epoxy resin, which has:
- Dry time: about 8 hours
- Demold time: between 12 to 18 hours
Always check your resin’s instructions and, when in doubt, wait a little bit longer. Moving the resin too early can cause warping, pooling, or sticky spots.
(Check out our resin ghost to see what happens when you move the resin too early. In that case it was done on purpose, but you don’t want that to happen to your bowl!)

What size resin bowl does this make?
The exact size of your resin bowl will depend on what you’re using as a mold (since different bowls will create different dimensions).
As a general guideline, 100 ml of resin makes a bowl that’s roughly 6 inches across and about 1-1/2 inches tall.
If you’re using a larger bowl mold, you’ll likely need more resin to get the same thickness around the edges.
Is a resin bowl food safe?
Most epoxy resin is considered non-toxic once it has completely cured, but that doesn’t always mean it’s food safe. Certain additives — especially colourants like alcohol ink, dyes, or glitter — can also affect whether the finished bowl is safe for food contact.
Because of that, we recommend using resin bowls for non-food items only and for decorative purposes — like holding jewelry, keys, coins, or small office supplies (like paper clips).

How else can I colour my resin bowl?
There are lots of fun ways to customize the colour of a resin bowl! Some popular options include:
- Mica powder: great for shimmery, swirled colours
- Glitter: a combination of sizes and colours looks nice
- Acrylic paint: use only a tiny amount, as too much can affect curing
- Resin dyes: made specifically for resin and give the most vibrant colours
Whatever you use, make sure it’s compatible with epoxy resin, and add colour slowly — a little goes a long way.

This resin bowl is such a satisfying project! We love how customizable it is, both in colour and shape design. No two bowls ever turn out exactly the same, which makes each one feel extra special.
Once it’s fully cured, your bowl is perfect for holding trinkets. Whether you’re making one for yourself or gifting it to someone special, a handmade resin bowl is one of those crafts that looks so polished and pretty… and makes you feel like a crafting wizard when it’s done!
Here’s even more resin craft ideas:


Now available
Low-Mess Crafts for Kids Book
72 cute and fun crafts that kids and parents alike can enjoy. All with as little mess as possible!
Where to buy:
You can purchase Low-Mess Crafts for Kids from Amazon, or wherever books are sold:
Amazon | Barnes and Noble | Books-A-Million | Indiebound | Amazon Canada


Leave a Reply