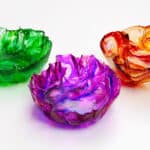
How to Make a Resin Bowl
These resin bowls, coloured with alcohol ink, are SO PRETTY! Have fun making your very own resin bowl -- no fancy molds required.
Yield: 1 resin bowl
Cost: $5
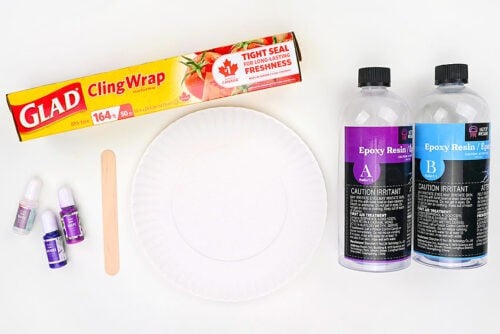
Equipment
- Popsicle stick (or resin stir stick)
- Cereal bowl (or bowl shape of choice)
- Nail file (or sandpaper)
Materials
Instructions
Step 1: Find what you need
- Gather your supplies and materials.
Step 2: Mix the resin
- Protect your working surface with a drop cloth or silicone mat before working with resin. Always wear protective nitrile gloves and eye protection.Work in a well-ventilated space and wear a respirator if your resin requires it. Read your resin’s label for safety requirements.You'll need a silicone measuring cup or disposable plastic cup to mix the resin in.

- Mix the amount of resin needed to make your bowl. We mixed 200 ml total to make two bowls.Begin by adding 1 part of Part A to a silicone measuring cup. The amount of Part A should be half the total amount needed. (In our case, 100 ml --50 ml per bowl.)Follow your specific resin’s instructions for ratios, drying times, and curing times.

- Add an equal amount of Part B (or whatever ratio your brand of resin suggests) to the measuring cup.(In our case, we added 100 ml of Part B to make 2 bowls.)

- Mix the resin and hardener together with a popsicle stick or reusable resin stir stick.Stir slowly, scraping down the sides and bottom of the measuring cup. Continue mixing for 3 to 5 minutes or until the mixture is clear.

Step 3: Colour the resin
- Cover a paper plate with plastic wrap.

- Pour the resin onto the plate. (Only pour half if you mixed 200 ml.)If there are any air bubbles use a lighter, or spray rubbing alcohol on the surface to remove them.

- Add drops of alcohol ink across the resin. Allow it to spread.

- Choose a second complementary colour of alcohol ink and add drops of this to the plate.

- White alcohol ink is a good choice to add to the bowls, since it's heavier than most other inks.It'll drop down and push the colours around, creating nice colour movement and contrast.

- Finish by adding a final colour to the resin.

- Optional: Use a stir stick to give the resin a swirled or marbled pattern.

- Allow the resin to sit for 4 to 5 hours, so it's no longer tacky but is still flexible.(This timing will depend on your brand of resin and it's cure time. Wear a glove while checking the resin.)

Step 4: Form the bowl
- When the resin is no longer tacky, pick up the plastic wrap and resin and place it on top of a bowl.(Note: We forgot to wear gloves here, but we highly recommend still wearing them for this step.)

- Push the resin piece down, shaping it to the sides of the bowl.

- Continue to push the resin into place. Try to ensure no plastic wrap gets trapped in any folds, as it can be hard to remove later if this happens.Now allow the resin to sit in the bowl for at least another 12 hours.

Step 5: Remove bowl from plastic wrap
- Once the resin has hardened, peel the plastic wrap off of the bowl.Most of it should come off easily, but you can use tweezers to pick off any stubborn pieces.

- Once your bowl is cured (this is longer than the dry time - it can take a few days or more) use a nail file or sandpaper to remove any hard edges.Always wear a dust mask or respirator when doing this.

- Your resin bowl is complete!

Video
Notes
Don't want to work with resin? Here are some other fun ways to use alcohol ink:
Alcohol Ink Crinkle Bowls
DIY Disco Ball Ornaments
Alcohol Ink Bookmarks