
This adorable pipe cleaner snowman is a fun way to bring a little winter magic indoors! With just a few simple supplies, you can create the cutest mini snowmen, complete with carrot noses, scarves, and hats or earmuffs!
This winter craft is a perfect indoor activity for kids, and the DIY snowmen look so cute as winter decor on your mantel or in a holiday village. Set them in a “snowy” scene on cotton batting, turn them into ornaments, or line them up on the windowsill to enjoy all season long. Once you see how easy it is to make one pipe cleaner snowman, you’ll want to create a whole frosty family!

This post contains affiliate links. If you use these links to buy something, we may earn a small commission at no extra cost to you. This helps support our website and allows us to keep creating fun, free content.
How to Make a Pipe Cleaner Snowman
Materials:
- Aluminum foil
- White pipe cleaners
- Pipe cleaners (orange, red, black, 2 other colours)
- Flatback doll eyes (or safety eyes)
- Black cardstock
See the craft in action:
Instructions:
Step 1: Find what you need
- Gather your supplies and materials.


Step 2: Make the base of the snowman
- To make the base of the snowman you’ll need aluminum foil. You can also use Styrofoam balls.

- For the bottom of the snowman, rip off a piece of foil at least 15 inches long. Begin crumpling the foil into a ball with a flat bottom and relatively flat top.
- Compress the tin foil until your ball is about 1-1/2 inches across and at least 1-1/4 inches tall. You can use a ruler or the sides of your scissors to smooth down the edges if it gets sharp.Try to make the ball look roughly like a snowball. It can be hard to make a perfect round shape with foil, but try your best. It’s okay if the edges aren’t completely flat and even — adding the pipe cleaners will clean up the shape a lot.
- Repeat, making a medium “snowball” and a small one.


Step 3: Cover the snowballs and glue them together
- Begin by wrapping the pipe cleaner around itself. It’s easiest to use tweezers to get a really tight wrap at the edge of the pipe cleaner, but this is optional.
- Wrap a few more times until you have a spiral.
- Add hot glue to the flat bottom of the largest “snowball”.
- Then set the pipe cleaner in place, centering it as best you can.
- Hold the pipe cleaner a few seconds so it sticks well and then add more hot glue to the foil.
- Continue gluing and wrapping the pipe cleaner so it goes around the ball. Try to push the pipe cleaner tight against itself so the foil doesn’t show through.
- At the beginning and end of each pipe cleaner you’ll have to hold it in place longer so it stays. Once the bottom is covered, begin wrapping around the side of the snowball.
- Continue wrapping the pipe cleaner around, gluing a bit at a time. Keep the pipe cleaner shape nice and rounded, not pushing it down too much in areas where the ball isn’t perfectly shaped.Repeat until you reach the top of the ball. You don’t have to go all the way to the middle — this part will be covered.
- Repeat, covering the medium and small balls with white pipe cleaners as well.For these, both the tops and bottoms can be left uncovered in the middle. (If you’re making earmuffs instead of a hat, cover the top center of the small snowball.)
- To put the snowman together, begin by adding a generous amount of glue to the top center of the bottom snowball.
- Add the middle ball to the glue, making sure it’s nice and centered. Then repeat, adding the small ball to the top of the middle ball.Make sure the snowman is balanced and looks good when standing.


Step 4: Make a hat and scarf
- Use black cardstock for the base of the snowman’s hat. Cut a 2 inch circle and a rectangle about 3 inches long and 3/4 inch wide.
- Add glue to one short end of the rectangle.
- Connect the other end of the paper, making a circular shape. Then add a thin line of glue to the side of it. Connect it to the center of the 2 inch circle.
- Glue another piece of paper to the top of the hat. You can pre-cut a circle to fit, or just glue a rectangle on top and cut around it.
- Then cover the outside of the hat with black pipe cleaners. Start at the top center of the hat, making a tight circle like you did for the bottom of the snowman.
- Once the hat is covered you can wrap a red pipe cleaner around as a hat band.
- Then glue the hat to the top of the snowman’s head.
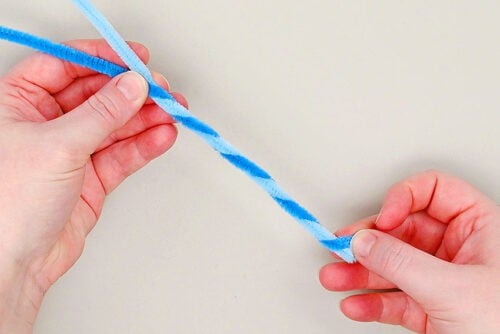
- To make the snowman’s scarf, use 2 colours (or 2 different shades) of pipe cleaner. Wrap them around each other to create a “striped” scarf.
- Wrap the scarf around the snowman’s neck, so the scarf goes to one side. Bend the pipe cleaners in curves to give the scarf life, and then cut each end shorter, as needed.You can glue the scarf in place, or just twist it around the “neck” of the snowman.


Step 5: Add features to the snowman
- Use an orange pipe cleaner to make the snowman’s nose. Begin by bending the edge up about 1/4 inch.
- Wrap the pipe cleaner around itself a couple times, creating a triangle shape. Cut off the excess pipe cleaner and use your fingertips (or tweezers) to make the end of the nose really pointed.
- Add glue to the flat end of the nose and attach it in place.
- For the snowman’s eyes and buttons we used flatback doll eyes in 2 different sizes.
- Attach the eyes above the nose and then place the 3 buttons on the middle snowball.We found it easiest to add a dot of glue to the snowman and then press them on. You can also use tweezers to place these small pieces.
- Your pipe cleaner snowman is complete!
- Now have fun making a whole snow family in different sizes and with different colours of scarves!You can even make earmuffs for the snowmen instead of hats — read more about how to do this below.


Helpful Tips:
- Give each snowman a personality: Use different colours of pipe cleaners for each snowman’s scarf so they all look unique!
- Try Styrofoam instead of foil: You can use Styrofoam balls for the base instead of foil balls, but you may need to add a bit of weight to the bottom to help the snowman stand.
- Protect your good scissors: Use inexpensive dollar store scissors or wire cutters to cut the pipe cleaners so you don’t damage your nice scissors.

How can I make earmuffs for my pipe cleaner snowman?
To make earmuffs, start with a pipe cleaner and two matching pom poms. Measure the pipe cleaner across the snowman’s head from one side to the other. Fold the pipe cleaner back across the snowman, so it’s doubled, and then cut off the excess.
Glue the two layers of pipe cleaner together for a thicker headband (you can also keep it single layer, if you’d like). Then glue a pom pom to each end of the pipe cleaner. Add glue to the back of the pom poms and press them onto either side of the snowman’s head, right over the “ears.”

What can I use for my pipe cleaner snowman’s eyes and buttons?
We used flatback doll eyes for both the eyes and buttons, but you can also use safety eyes. If you use safety eyes, adults will have to cut small holes with a craft knife for them to be poked into.
You can also use small black beads, tiny buttons, black puffy paint, or tiny pieces of black pipe cleaner.
How many pipe cleaners do I need to make a pipe cleaner snowman craft?
Body: 8 white pipe cleaners for a 2-ball snowman and about 12 for a 3-ball snowman (the exact number depends on the size of your foil balls).
Hat: 3 black pipe cleaners and 1 red (or any colour you like for the hat band).
Scarf: 2 pipe cleaners, 1 of each matching colour or shade.
Nose: Just a small piece of orange pipe cleaner.

How can I give my pipe cleaner snowmen arms?
To make arms for your snowman cut a toothpick in half and glue a brown pipe cleaner onto each piece, about 1/4 inch away from the pointy end. Wrap it around towards the cut end, and then bend the pipe cleaner into two little “finger” branches, so they look like twigs.
Then to attach the arms you simply poke the toothpicks into the sides of the snowman’s body. To make them extra secure, add a dot of glue first.

Add a bit of winter cheer to your home with this super cute pipe cleaner snowman. It’s really fun how much personality you can create with just a few twists and a couple of crafty details. Whether you make just one or create a whole snow family, these fuzzy little creations are sure to bring a smile.
Here’s even more snowman craft ideas:
Popsicle Stick Snowman Ornament

Ping Pong Ball Snowman Tealights


Now available
Low-Mess Crafts for Kids Book
72 cute and fun crafts that kids and parents alike can enjoy. All with as little mess as possible!
Where to buy:
You can purchase Low-Mess Crafts for Kids from Amazon, or wherever books are sold:
Amazon | Barnes and Noble | Books-A-Million | Indiebound | Amazon Canada


Leave a Reply