
Make the holidays extra merry with this adorable pipe cleaner reindeer craft! With just a few fuzzy pipe cleaners, a pom pom nose, and a little imagination, you can twist and shape your own miniature reindeer — complete with impressive antlers and plenty of charm.
This simple DIY is perfect for kids and adults alike, whether you’re crafting at a Christmas party, adding handmade decorations to the tree, or making a whole herd of reindeer for your holiday display. It’s quick, mess-free, and a fun way to get creative with classic craft supplies!

This post contains affiliate links. If you use these links to buy something, we may earn a small commission at no extra cost to you. This helps support our website and allows us to keep creating fun, free content.
How to Make a Pipe Cleaner Reindeer
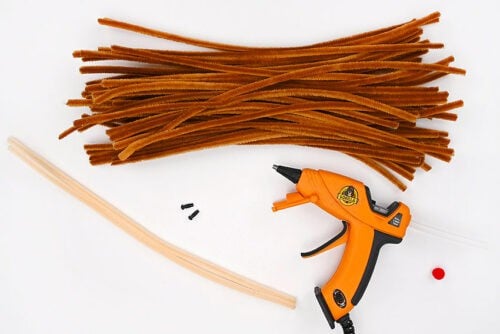
Materials:
- 45 Brown pipe cleaners
- 2 Pipe cleaners (cream or tan)
- Safety eyes (5mm)
- Red pom pom(s) (10mm)
See the craft in action:
Instructions:
Step 1: Find what you need
- Gather your supplies and materials.

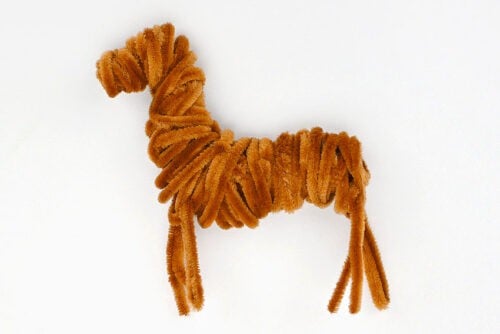
Step 2: Create the basic reindeer shape
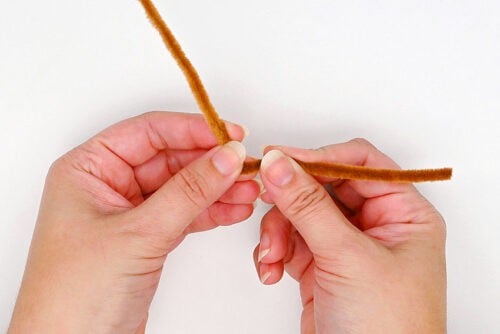
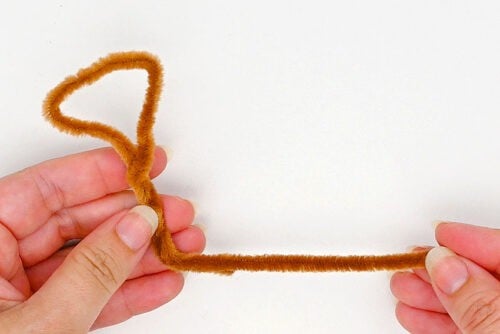
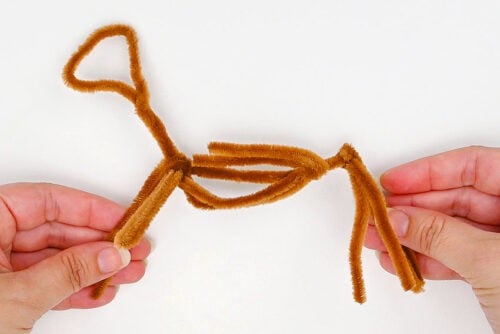
- Begin by folding a brown pipe cleaner at the 1/3 mark. Place this horizontal to form the reindeer’s spine.
- Then curve the remaining 2/3 of pipe cleaner into a head and neck shape. Secure the end of the pipe cleaner by wrapping it around the neck.
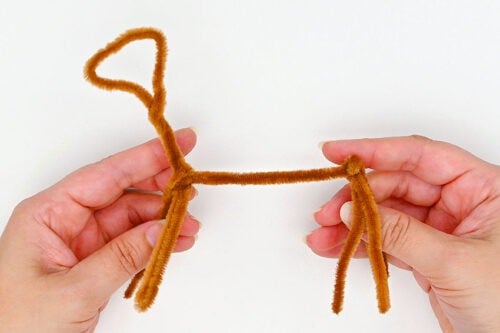
- Use 2 brown pipe cleaners to create the 4 legs. Fold each pipe cleaner in half and then in half again. Wrap the folds around the spine, one at the end of the spine and one at the base of the neck

- Fold another pipe cleaner in half. Place it around the top of the spine, wrapping it to keep it in place.Then form a rounded rib cage that comes down before going towards the back at a gradual curve. Leave the excess pipe cleaner straight along the spine.
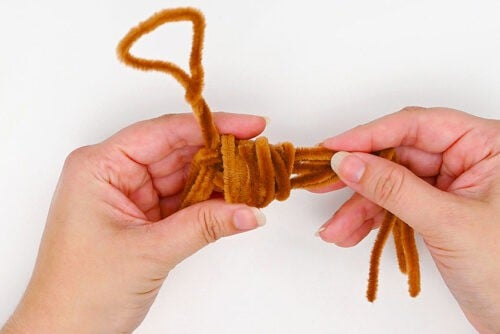
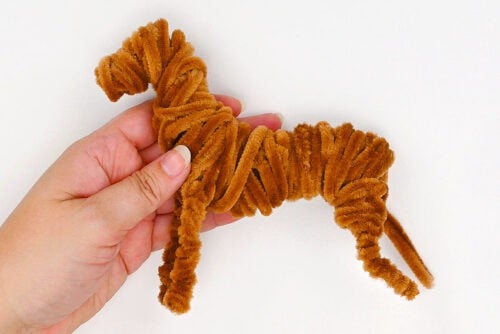
Step 3: Wrap pipe cleaners around the body
- Wrap a pipe cleaner around the rib cage. Don’t wrap it too tight – it should still keep the base shape you’ve created.Once you get to the end of the pipe cleaner, attach a second one to create a longer pipe cleaner and keep wrapping. Tuck the end in to secure it.
- Tuck another pipe cleaner into the rib cage and wrap it around the rest of the spine. Keep attaching pipe cleaners and wrapping around the whole spine section until the basic shape of the reindeer body is formed (we used about 6 pipe cleaners for this part).
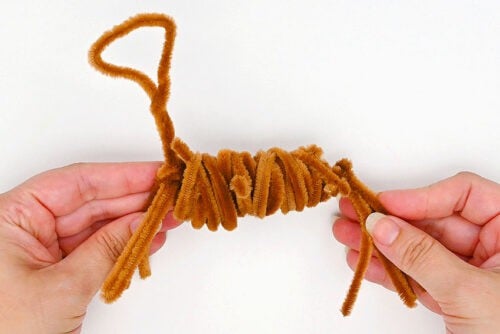
- Connect another pipe cleaner and wrap it around the neck, creating a form for the upper rib cage and wider neck.
- Keep wrapping up the neck and around the head. Use another 6 pipe cleaners or so to form the neck and head shape.
- Once you’re happy with the basic shape of the head and neck, use another 5 pipe cleaners or so to bulk up the body shape more.At the back, wind the pipe cleaner around and through the top of the legs a few times before tucking the end in.

Step 4: Form the legs
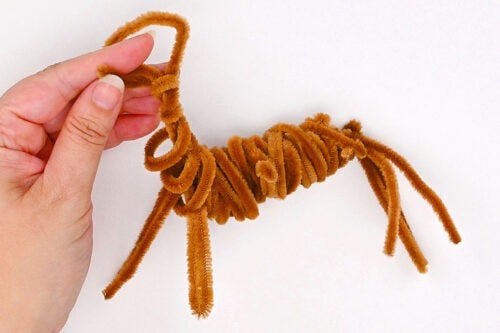
- Once you’re happy with the body shape, add some bulk to the front legs. Wrap pipe cleaners from the bottom up. You’ll want to use about 2 pipe cleaners per front leg. If you have extra at the end, wrap it around the rib cage.
- Then add bulk to the back legs. Again, start wrapping at the bottom of the leg and use about 3 pipe cleaners for each leg, creating larger haunches at the top.Wrap the last pipe cleaner between the legs and around the whole body a couple times before tucking it under a previous wrap.
- Repeat with the last leg. Then add another few pipe cleaners to bulk up the back end, wrapping around the body and between the legs until you feel the shape is secure.


Step 5: Add bulk where needed
- Wrap another few pipe cleaners around the body to create a smooth finish. Start these by tucking them into a previous wrap, and don’t connect the next pipe cleaner. Finish by tucking the end under a wrap, and start the next pipe cleaner the same way.
- Repeat at the neck, wrapping another couple pipe cleaners.


Step 6: Attach a tail and antlers
- Cut a 4 or 5 inch piece of brown pipe cleaner and fold it in half, leaving it rounded at the fold.
- Slide the ends down into the back of the reindeer’s body, leaving the rounded fold sticking out as the tail. Bend the tail however you’d like.
- Grab a lighter cream colour of pipe cleaner to make one of the reindeer’s antlers. Start by folding about 2/3 of the pipe cleaner up.
- Bend the long piece down, creating a “loop” about 1 inch tall. Wrap around the shorter part to secure in place.
- Continue, creating gradually smaller antler sections (5 total), spacing them about 1/8 inch apart. Leave at least 3/4 inch plain at the end so you can connect them.
- Repeat, making a second antler.
- Slide the ends of the antlers into the reindeer’s head, so that the “loops” on the antlers point in. You may want to secure these with a bit of glue.


Step 7: Add the eyes and nose
- Place the safety eyes near the top of the head. Push them down between wraps, securing them with hot glue.
- Add a dot of hot glue to a red pom pom and attach it to the end of the snout, at the top edge.
- Your pipe cleaner reindeer is complete!


Helpful Tips:
- Use different shades of brown pipe cleaners to create different looks for your reindeer, and choose which one will be Rudolph with a red nose!
- Make a smaller pipe cleaner reindeer and attach an ornament hanger to its back to place it in the Christmas tree!

How many pipe cleaners do I need to make a pipe cleaner reindeer?
You’ll need at least 45 pipe cleaners to make a reindeer that’s about 7 inches tall (including the antlers) and around 6-1/2 inches long.
The exact number of pipe cleaners will vary a bit, depending on your reindeer’s size and style. If you want a fuller, fluffier look, you’ll need extra to fill out the body and legs. For a sleeker reindeer, you can get away with a little less, so it all depends on how you want your finished reindeer to look.

What can I use for my pipe cleaner reindeer’s eyes?
We used 5mm safety eyes, but you can also use flatback doll eyes or small black beads. You can even glue googly eyes to your reindeer decoration for a fun look.

Do I need to glue my pipe cleaner reindeer together?
You’ll need to use hot glue or tacky glue to keep the reindeer’s nose and eyes in place. A couple dots of glue can help keep the antlers and tail exactly where you want them, too.
The rest of the reindeer is made by twisting pipe cleaners together and tucking in the ends. If your reindeer will be more of a toy, instead of being used simply as Christmas decor, we do recommend gluing some of the ends into place.

There’s just something irresistible about this handmade pipe cleaner reindeer, with its fuzzy body, its bright red nose, and its crowning antlers. This cheerful little Christmas craft brings the magic of the season to life, whether it’s prancing across your mantel, tucked into a holiday display, or made as a fun project with the kids.
Each reindeer turns out a little different, which is part of the charm. They’re a nice reminder that the most memorable Christmas decorations are the ones you create yourself!
Here’s even more Christmas craft ideas:

DIY Beaded Christmas Ornaments


Now available
Low-Mess Crafts for Kids Book
72 cute and fun crafts that kids and parents alike can enjoy. All with as little mess as possible!
Where to buy:
You can purchase Low-Mess Crafts for Kids from Amazon, or wherever books are sold:
Amazon | Barnes and Noble | Books-A-Million | Indiebound | Amazon Canada


Leave a Reply