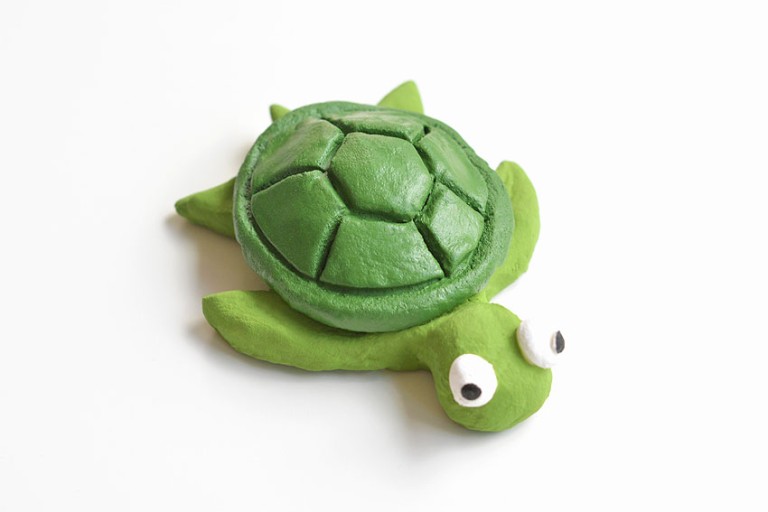
This clay turtle is so cute! It’s so easy to make a turtle sculpture out of air dry clay. No complicated sculpting techniques here! Simply use your fingers and a toothpick to create your creature.

Clay Turtle Sculpting
Turtles are such interesting creatures. Did you know that giant tortoises (a type of turtle) can live for an average of 100 years?! Turtles are also one of the oldest reptile species, dating back to the time of the dinosaurs!
We’ve had a lot of fun working with clay this year, and this turtle is no exception. Our air dry clay recipe is really soft and easy to work with. It dries a beautiful crisp white, which makes a nice surface for acrylic paint.
This clay turtle is great for beginners. It’s really easy to make the parts of the turtle, and no worries if it doesn’t match ours completely – the great thing about clay is that every sculpture is a little different!
Check out our Clay Turtle video tutorial:
*Note: Scroll down for the step-by-step photo tutorial.
Looking for more clay craft ideas? Here’s some of our favourites:

Here’s what you’ll need:
This post contains affiliate links. If you use these links to buy something we may earn a small commission, which helps us run this website.
The full printable instructions are at the end of this post, but here’s a list of products on Amazon and Target that are similar to the supplies we used:
- Air Dry Clay (check out our post for How to Make Clay)
- Acrylic paint
- Paintbrush
- Toothpicks

What clay should I use to make my clay turtle?
I definitely recommend our recipe for air dry clay — it has only 3 ingredients and it’s so easy to make! It has a really soft texture that makes it easy to work with, and it lasts for a long time if properly stored.
You can also buy air dry clay if you don’t feel like making it. Amazon, craft stores, and art supply stores all sell air dry clay.
What paint is best for clay?
Acrylic paint is the nicest for painting on clay. It’s thick and durable, and the colours stay vibrant after it’s dry.
You can also use tempera paint, which is great if kids are using it, since tempera paint is washable. Tempera paint isn’t as durable as acrylic, but it’s still a good option.

How do I dry my turtle clay sculpture?
Air dry clay usually has less of a chance of cracking when it’s dried at room temperature. Air drying this turtle takes 3 to 4 days.
Our air dry clay recipe also dries well in the oven, which will save you a lot of time! Preheat the oven to 200 degrees Fahrenheit. Place the turtle on a parchment lined baking tray and bake for 1 to 1.5 hours, rotating it a few times. After the oven is off, allow the turtle to come to room temperature in the oven with the door closed.
What special tools do I need to sculpt?
If you’re going to be sculpting a lot, you may want to buy a pack of clay sculpting tools, but it’s not necessary for making this clay turtle. We made our turtle sculpture just with our hands and a toothpick!
Even if you’d like to use sculpting tools, there are a lot of household items that work. Toothpicks or skewers are great for creating lines. Cuticle or nail tools are really similar to the sculpting tools you can buy.
You can also use cutlery (forks, spoons, and knives) for creating certain shapes and lines. A paintbrush or toothbrush can be used to add texture to the clay.

How to Make a Clay Turtle
Materials:
- Air dry clay (link in tips section below)
- Acrylic paint
Equipment:
Instructions:
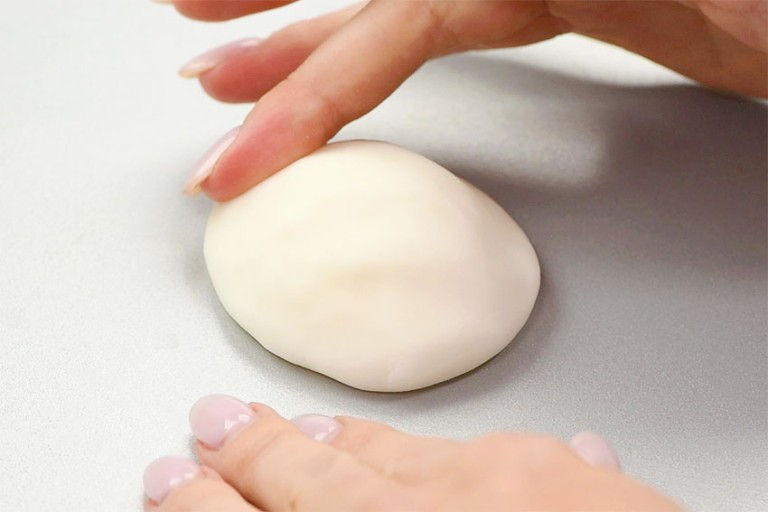
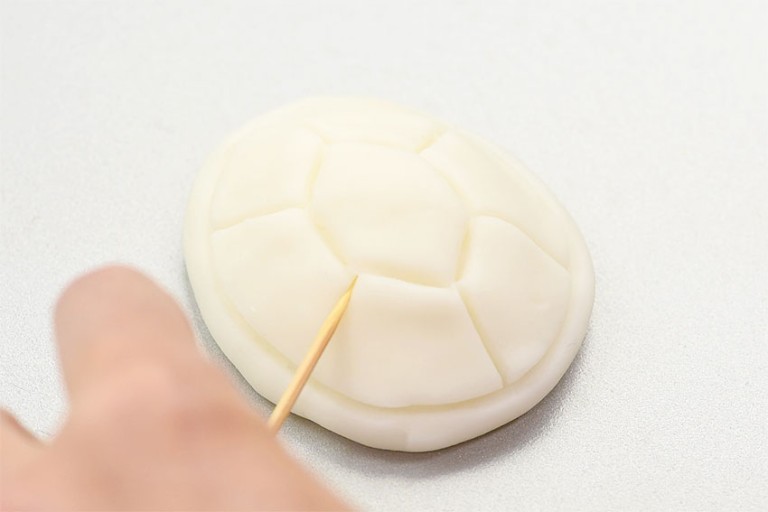
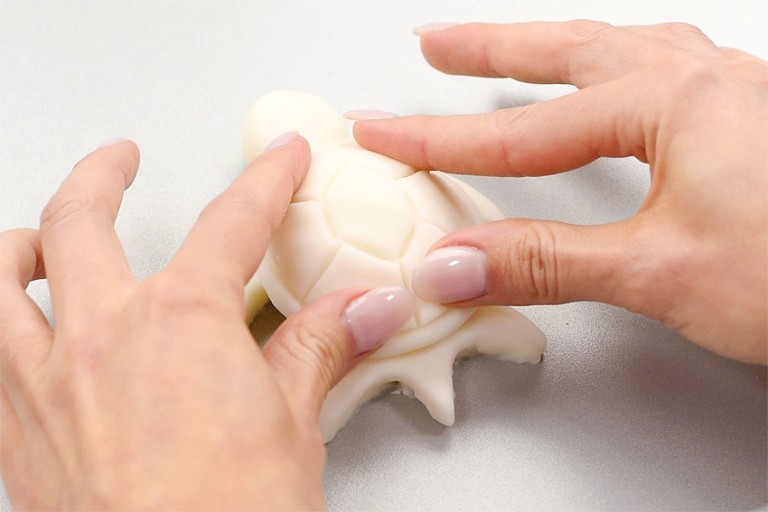
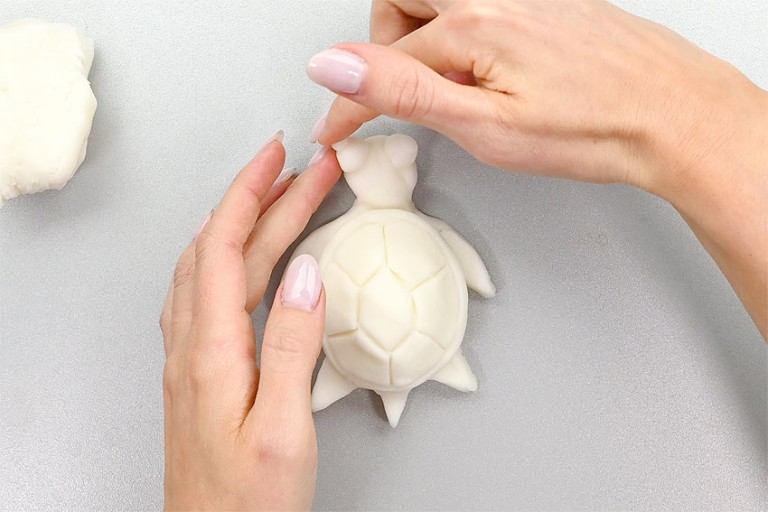
Step 1: Make the turtle’s shell
- Form a ball of clay and flatten it down to be 2-1/2 inches long and 2-1/4 inches wide. Smooth out the edges to create a dome shape.

- Use a toothpick to carve shell markings into the clay.
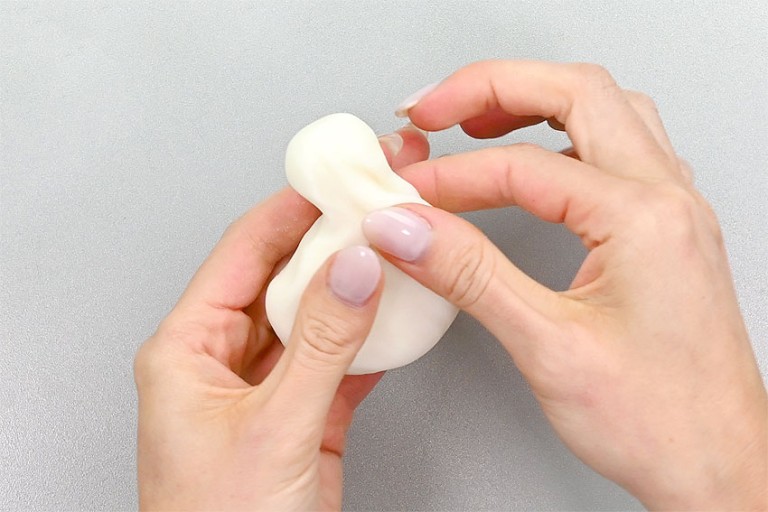
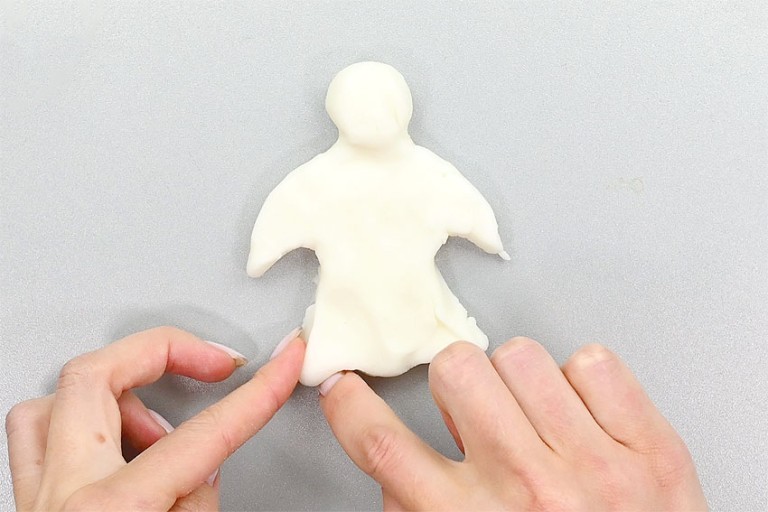
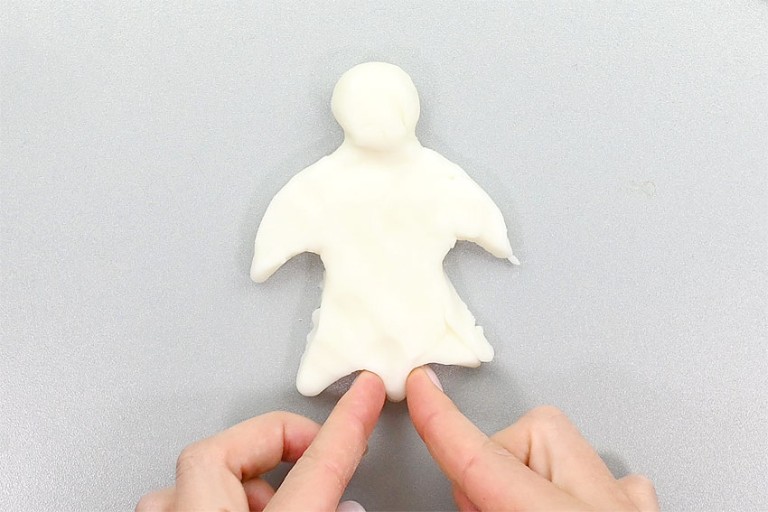
Step 2: Make the turtle’s body
- Take another piece of clay, slightly larger than the shell, and form the turtle’s body. Take one side of the ball and form a head about 1/2 inch wide and 1 inch long.
- Flatten out the rest of the clay and make a body and four flippers/feet.Our turtle’s body was about 1-1/2 inches across. The front flippers were 1-1/2 inches long and 1/2 an inch at the widest part, tapering down to 1/4 inch.The smaller back flippers were about 1 inch long and 1/2 inch wide, tapering down to 1/4 inch.
- At the bottom of the turtle form a little tail around 1/2 inch long, 1/2 inch wide at the top and 1/4 inch at the end.The turtle should be around 3-1/2 inches long from head to tail.
- Now that the turtle’s body is formed, smooth out the edges with your fingers.

- Press the turtle shell down on top of its body.

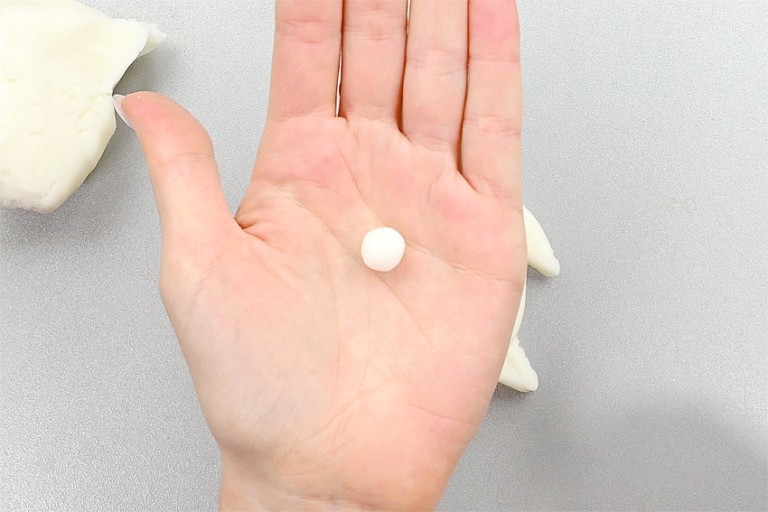
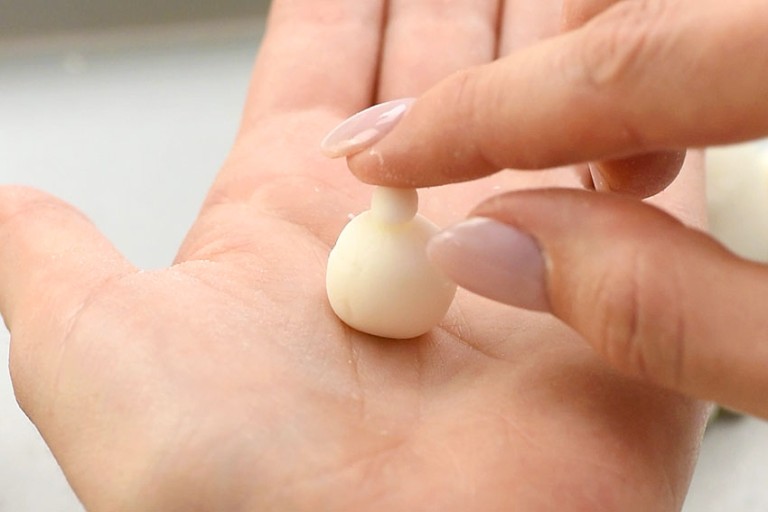
Step 3: Make the turtle’s eyes
- Roll a ball of clay a bit less than 1/2 inch in diameter.
- Make another tiny ball and press it down flat. It should be around 1/8 inch in diameter. Add it to the centre of the 1/2 inch ball.
- Make another eye and attach both to the top front of the turtle’s head.
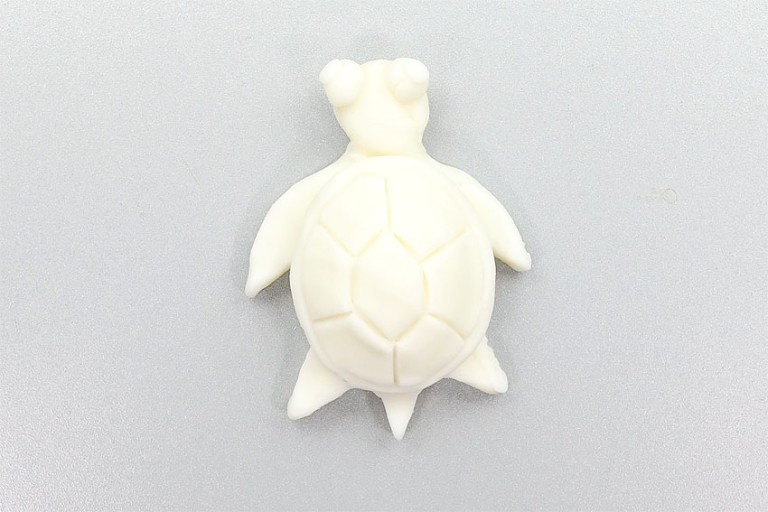
- Allow your turtle to dry. If using store bought clay, follow the directions on the package.If using our air dry clay recipe (see link in tips section below) this will take 3 – 4 days at room temperature. You can also place the turtle on a parchment lined baking tray and bake it at 200 degrees Fahrenheit for 1 to 1-1/2 hours.
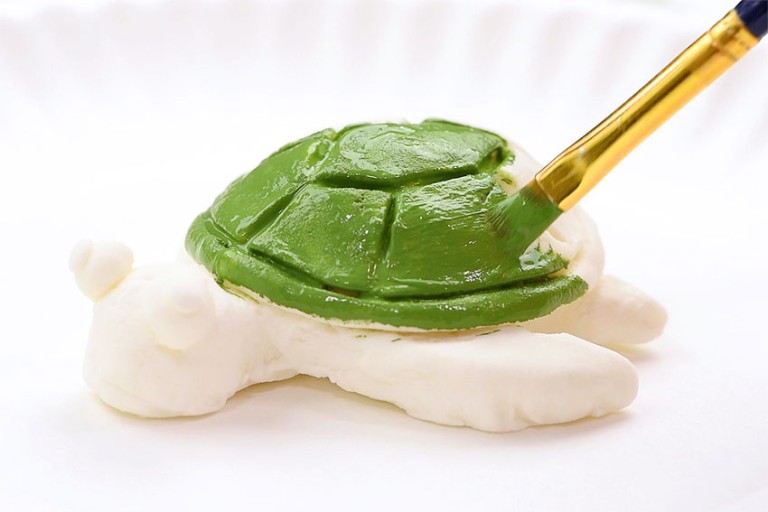
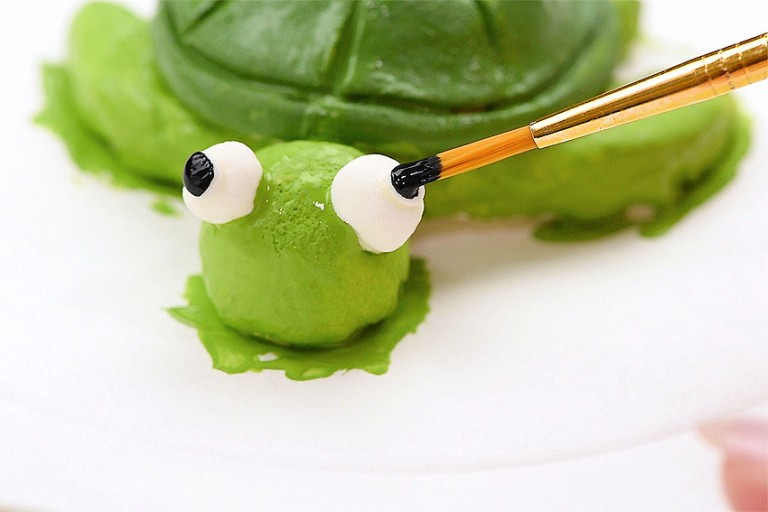
Step 4: Paint the turtle
- Use a darker green (or whatever colour you’d like!) to paint the turtle’s shell.
- Use a lighter or contrasting colour to paint the turtle’s body, and add a dot of black to the turtle’s eyes.Allow paint to dry before handling.
- Your clay turtle is complete!
Helpful Tip:

Turtles made out of clay are the perfect trinket for turtle lovers, and our 3 ingredient clay recipe makes it so easy (and inexpensive!) to make. Working with clay and sculpting a clay turtle is such a fun art project that both kids and adults will enjoy.

Here’s even more clay craft ideas:


Our book Low-Mess Crafts for Kids is loaded with 72 fun and simple craft ideas for kids! The projects are fun, easy and most importantly low-mess, so the clean up is simple!

Where to buy:
You can purchase Low-Mess Crafts for Kids from Amazon, or wherever books are sold:
Amazon | Barnes and Noble | Books- A- Million | Indiebound | Indigo | Amazon Canada


Leave a Reply