
Add a touch of fall charm to your home with this wood slice turkey craft! These adorable turkeys are easy to make using simple supplies, and they’re perfect for Thanksgiving decorating or a fun afternoon craft session with kids.
Each little turkey has its own personality, and they look super cute as table decorations, place cards, or handmade holiday decor. It’s a quick and festive project that will definitely bring a cozy, rustic feel to your fall celebrations!

This post contains affiliate links. If you use these links to buy something, we may earn a small commission at no extra cost to you. This helps support our website and allows us to keep creating fun, free content.
How to Make a Wood Slice Turkey
Materials:
- Wood slice
- Fabric leaves
- Large googly eyes (20mm)
- Craft foam sheets (orange, red, yellow)
Instructions:
Step 1: Find what you need
- Gather your supplies and materials.


Step 2: Prepare your supplies
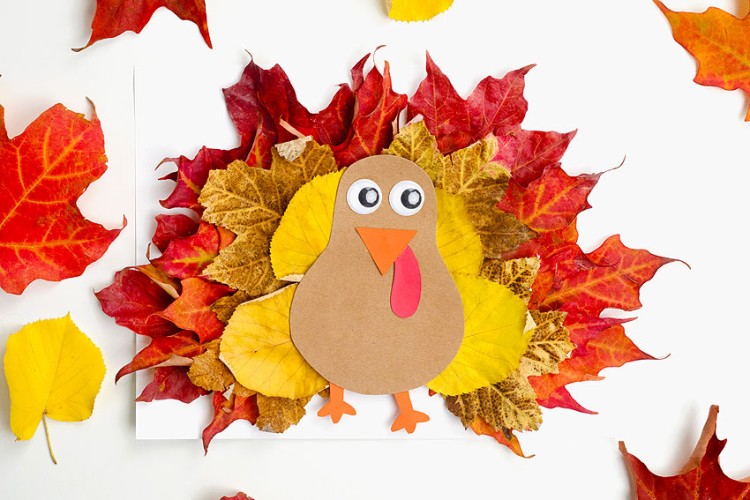
- To make your turkey you’ll need a collection of fabric leaves in fall colours. If you place the leaves like we did, you’ll need 1 yellow leaf, 2 orange leaves, and 4 red leaves.

- You’ll also need a wood slice coaster, 2 googly eyes, and craft foam sheets in 3 colours. Cut a beak from the orange craft foam, a wattle from red, and 2 feet from yellow.You can cut these free hand or use one of our turkey templates from another craft. Find more information below!


Step 3: Glue on the feathers
- Start by adding a line of hot glue to the front of the yellow leaf, near the bottom.
- Place it on the back of the wood slice, near the top, so it’s sticking out the top.
- Then glue the orange leaves on either side of the yellow one, overlapping a bit. Remember to add glue to the front of the leaves.
- Repeat, adding red leaves below the orange ones, again overlapping them.
- Flip the wood slice over so you can see the front. Add glue to the back of a red leaf.
- Place the leaf on the front of the wood slice, facing outwards. Set it near the edge, so there’s enough room for the turkey’s face. Then repeat with the last red leaf on the opposite side.


Step 4: Add the turkey details
- Glue 2 googly eyes to the wood slice.
- Add the wattle on a bit of an angle. Then place the beak so it overlaps a bit.
- Finally, add glue to the top front of both feet.
- Line up the feet next to each other and set the wood slice on top of them, so they’re sticking out the bottom.
- Your wood slice turkey craft is complete!


Helpful Tips:
- Plan your feathers first: Before gluing, lay out your leaves to visualize where each one will go. You can even attach them while looking from the front to make sure your turkey looks balanced and full.
- Mind your glue placement: For the leaves on the back, make sure to apply glue to the front of the leaves — that way they’ll show their best side when attached.
- Try different sizes: Smaller wood slices make adorable mini turkeys for name tags or ornaments, while larger slices work great as centerpieces.

How can I cut out the details for the wood slice turkey craft?
You can cut the shapes freehand — just trace one foot after cutting it so they match perfectly. Or, for easy precision, use the turkey template from our Thanksgiving place cards post or one of our other turkey crafts. You might need to adjust the print scale so the pieces fit nicely on your wood slice.

Can I make this wood slice turkey without craft foam?
Yes, no problem! You can cut the beak, wattle, and feet from construction paper, cardstock, or felt if you don’t have craft foam.
You can even paint the beak and wattle directly onto the wood slice for a simple and creative alternative.

What kind of leaves do I need for this turkey craft?
Fabric or faux leaves from the dollar store work perfectly, and they come in great fall colours.
But if you don’t have these on hand, you can also use our leaf templates to cut your own leaves from construction paper, cardstock, or felt!

This wood slice turkey craft is such a fun and heartwarming way to celebrate the Thanksgiving season! With their bright autumn leaf feathers and cheerful faces, these little turkeys bring a rustic, handmade charm to your holiday decor.
They’re perfect for adding to your Thanksgiving table, mantel, or even as place cards for your feast — and making them together is a great way to slow down and enjoy a cozy fall afternoon with family. So grab your glue gun, a pile of colourful leaves, and get crafting, because your holiday table is about to get a whole lot cuter!
Here’s even more turkey craft ideas:


Now available
Low-Mess Crafts for Kids Book
72 cute and fun crafts that kids and parents alike can enjoy. All with as little mess as possible!
Where to buy:
You can purchase Low-Mess Crafts for Kids from Amazon, or wherever books are sold:
Amazon | Barnes and Noble | Books-A-Million | Indiebound | Amazon Canada


Leave a Reply