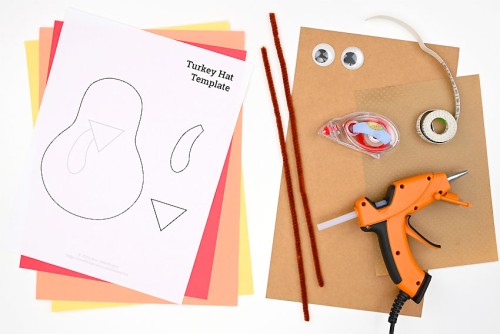
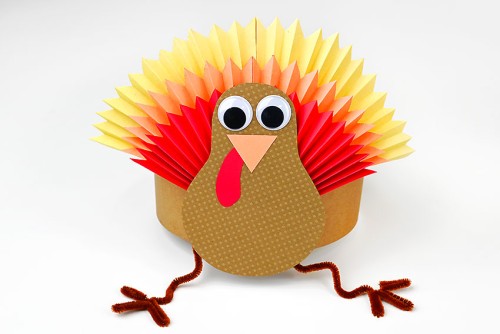
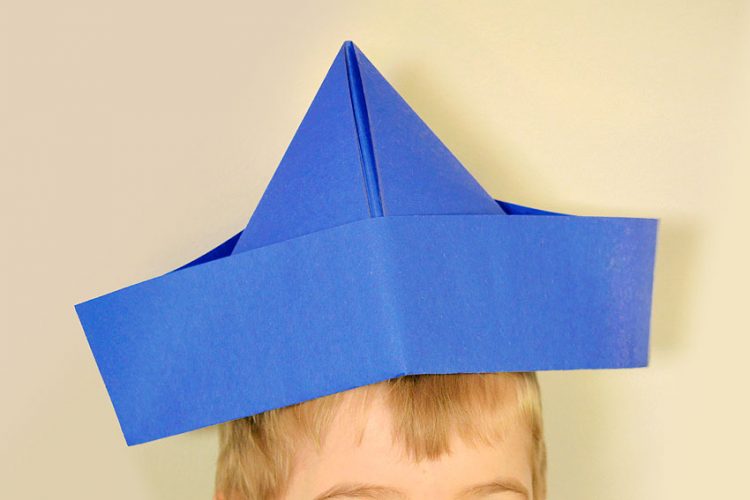
Get excited for the fall season with this DIY turkey hat. It’s such a cute and funny Thanksgiving craft, and it’s SO EASY to make! Use our free, printable template for the turkey face and body, and accordion folded paper to make the colourful turkey feathers.
This turkey craft is low mess, using simple supplies, and it’s a great way for kids to practice cutting and tracing. We think this autumn art project is pretty adorable, and it’s a goofy way to add to festive celebrations at the Thanksgiving dinner table.

This post contains affiliate links. If you use these links to buy something we may earn a small commission which helps us run this website.
How to Make a Turkey Hat
Materials:
Watch the step-by-step video tutorial:
Instructions:
Step 1: Find what you need
- Gather your supplies and materials.

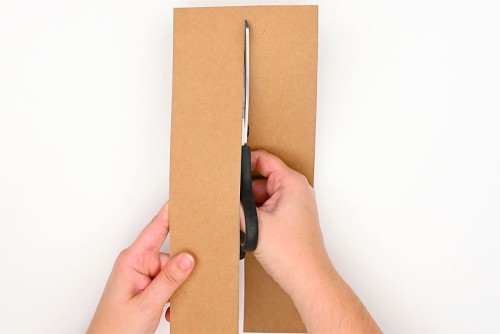
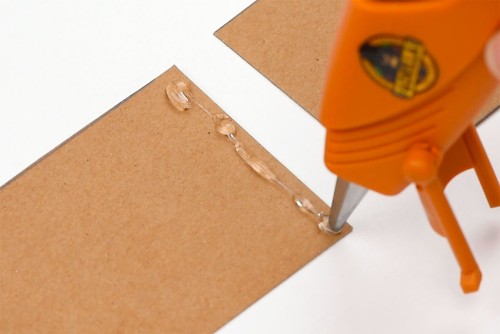
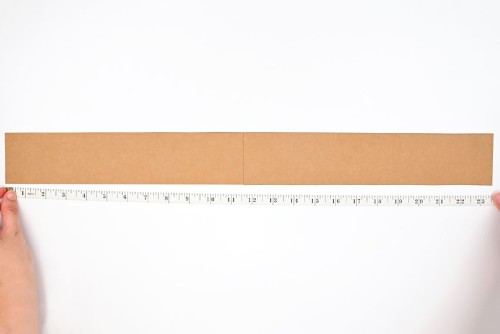
Step 2: Make the base of the hat
- Cut 2 strips of paper 2-1/2 inches wide and about 12 inches long, from a piece of heavy brown cardstock.
- Add hot glue to one of the short ends of the cardstock.
- Align and attach the other cardstock strip, holding it for a couple of minutes until the glue dries.

- Measure around your head and then compare that measurement with how big the headband needs to be.
- Add 1 inch to your head measurement (this allows room for some of the feathers inside).Then glue together the other sides of the cardstock, giving the hat its headband base.


Step 3: Make the turkey’s feathers
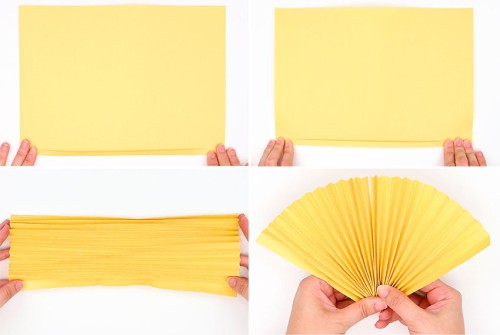
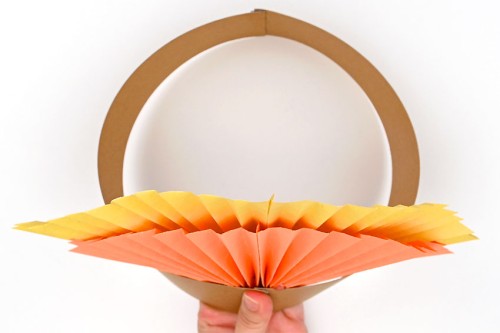
- Place a piece of yellow construction paper with the long edge in front of you. Fold up about 1/4 inch of the paper, all the way across.Flip the paper over and fold up another 1/4 inch. Repeat until the whole paper is folded accordion style, and then fold the paper in half.

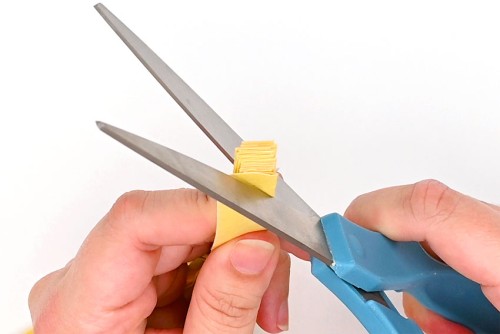
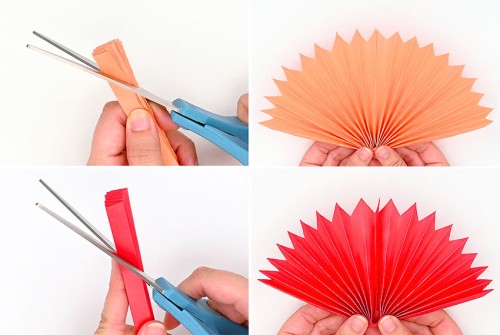
- Cut one end of the folded paper on an angle. Cut about 1/2 inch down on one side, angled up to the other corner.
- Make an equal cut on the other side, making sure to cut in the same direction.This creates the pointed feather look on the fanned paper.
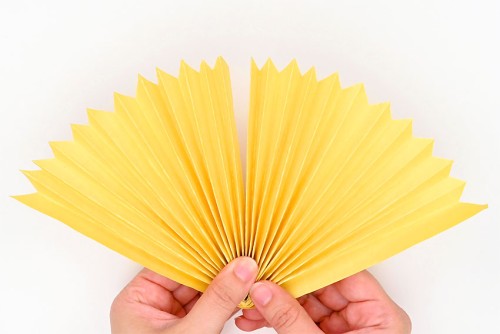
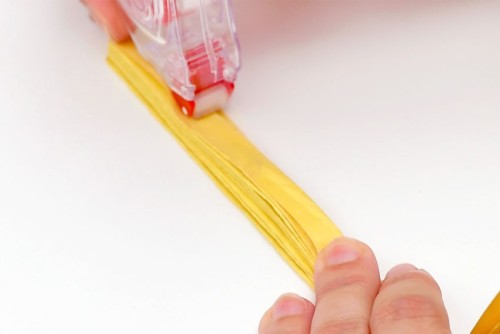
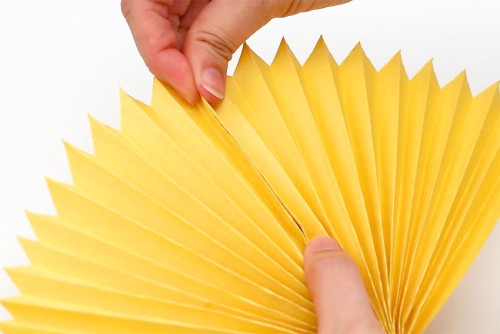
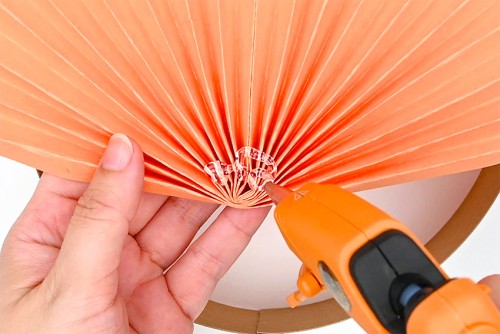
- Add glue tape to the inside of the fan.
- Push the center parts together, attaching the two sides.
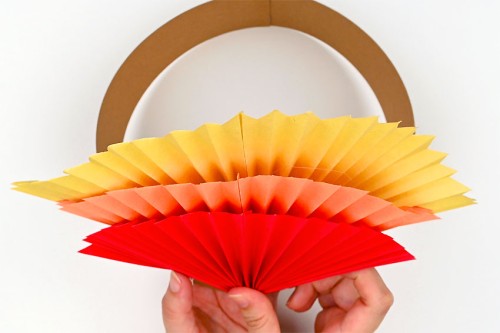
- Accordion fold an orange piece of construction paper. Cut the ends about an inch shorter than the yellow paper.Repeat with a red piece of paper, cutting the ends an inch shorter than the orange paper.Just like before, connect these fans in the center with glue tape.
Step 4: Make the turkey parts
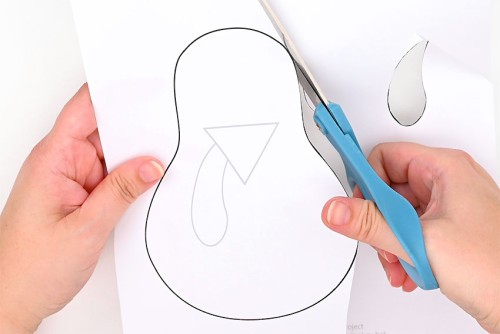
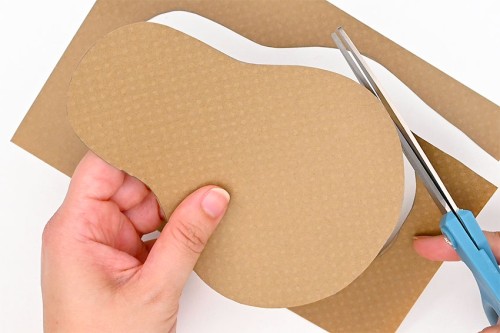
- Print out our free turkey hat template (find the link above!) and cut out the pieces of the body, beak, and wattle.
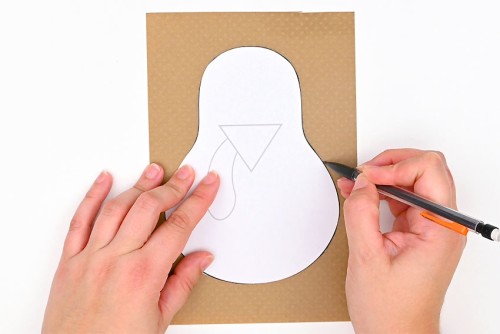
- Trace the turkey body on the textured scrapbook paper.
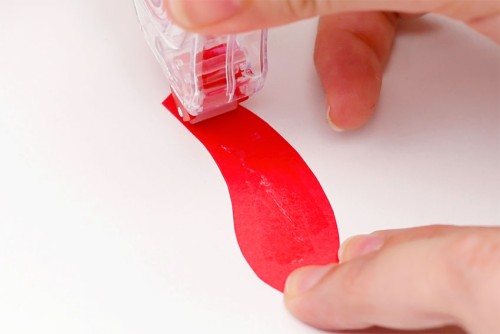
- Cut out the turkey’s body.Trace the beak onto orange paper, the wattle onto red, and cut these out as well.
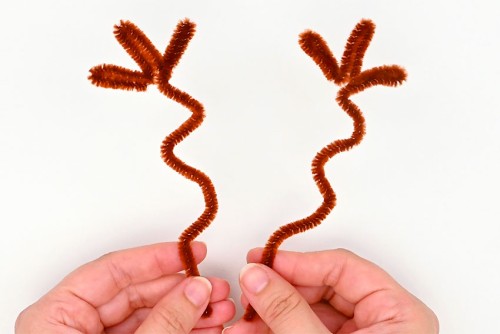
- Use brown pipe cleaners to make the turkey’s legs.To start, bend a pipe cleaner down about 1 inch and then back up on itself. Repeat 3 more times.Arrange the folds into 3 separate toe sections, and then bend the rest of the pipe cleaner into wavy curves.Repeat for the second pipe cleaner.
Step 5: Put the turkey hat together
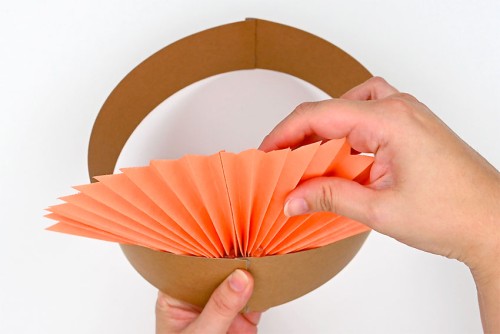
- Add a generous amount of hot glue to the bottom center of the orange paper fan.
- Place the orange feathers inside the headband, along one of the connecting seams.Hold the paper until it stays in place by itself.
- Attach the yellow feathers behind the orange, aligning the bottoms so that the yellow sticks out 1 inch above the orange.
- Add glue to the back of the red feathers and attach these on the outside of the headband, so that the top of the feathers are about 1 inch below the orange.
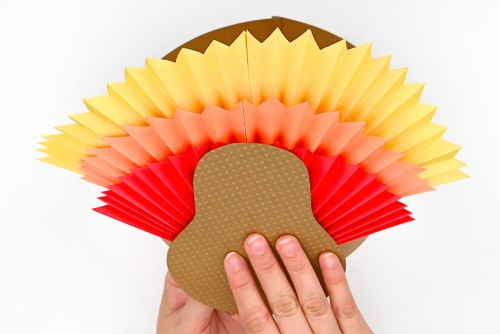
- Add hot glue to the bottom front of the red feathers and attach the turkey body onto the glue. Place the body so that it sticks out 1 inch below the headband.
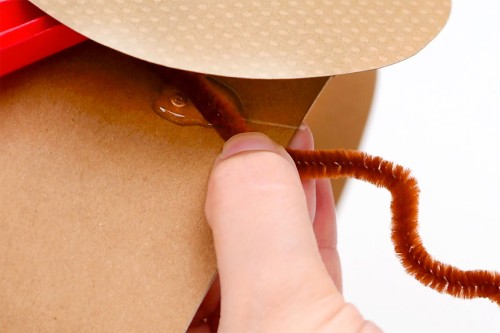
- Add hot glue behind the turkey body on one side. Place one of the pipe cleaner legs into the glue, holding it in place. Add more glue on top of the leg, if needed.Repeat with the second leg on the other side.
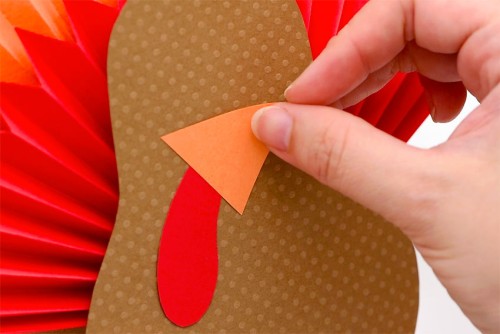
- Add glue tape to the back of the wattle.
- Attach it to the turkey’s head, and then glue the beak so it’s slightly overlapping.
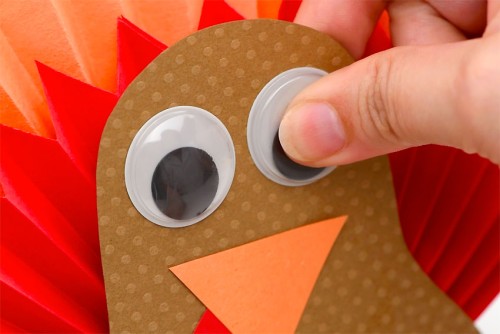
- Use glue tape to attach the googly eyes above the beak.
- Your turkey hat is complete!
Helpful Tips:
- When you’re making the headband, leave a bit of extra room so that the hat will still fit once the feathers are inside the band.
- You can measure the headband against your head and mark where you need to connect the pieces, rather than measuring your head and the hat separately.

Download a free turkey hat template:
Click on the link below to download our free, printable turkey hat template! The PDF file will open in a new window. Then simply print the template on 8.5 x 11 (letter size) printer paper.
>>> Turkey Hat Template <<<

Do I have to use the turkey hat template?
Our printable turkey hat template makes this turkey craft really easy to make, but you definitely don’t have to use the template if you don’t want!
You’ll need to cut your own turkey body, beak, and wattle. For the turkey body cut a circular shape that curves into an oval head. Our turkey is about 6 inches tall and 4-1/2 inches at the widest part.
Then cut a triangle for the beak and a curved narrow oval for the wattle.
What type of paper is needed for making these turkey hats?
You need a thicker cardstock for the headband base of the turkey hat – something that keeps its shape and won’t rip easily.
We used a textured scrapbook paper for the turkey’s body, but you can also use regular scrapbook paper, cardstock, or paper.
For the feathers we used construction paper, but coloured printer paper also works well. You need to use a paper thin enough to accordion fold easily.

If I don’t have pipe cleaners what can I use for the turkey hat legs?
We love the textured look of the pipe cleaner legs, and how easy it is to pose them the way you want. But if you don’t have brown pipe cleaners you can also cut legs from yellow or orange cardstock or paper.
Make the legs about 5-1/2 inches long and attach them at enough of an angle that they’ll drape on each side of your face, rather than falling into your eyes.
Do I need a glue gun to make the turkey hat? What other glue will work?
We used a combination of glue tape and a glue gun to put this turkey hat together. We have a low temperature glue gun, which is a great option for kids. But if you don’t feel comfortable using a glue gun, there are a few other options.
Use a stapler to connect the headband and to attach the fanned feathers. Make sure the smooth part of the staple faces the inside of the hat.
You can also use white glue, tacky glue, or even tape to combine parts of the turkey hat. Figure out what works best for you!

This turkey hat is a great way to keep the kids busy at Thanksgiving, whether in the classroom or at home. Explore paper folding and fall colours to create this wearable harvest craft!

Here’s even more Thanksgiving craft ideas:

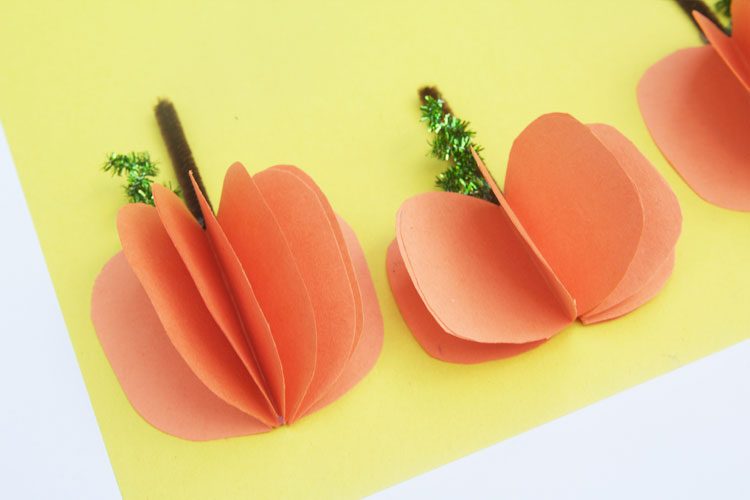
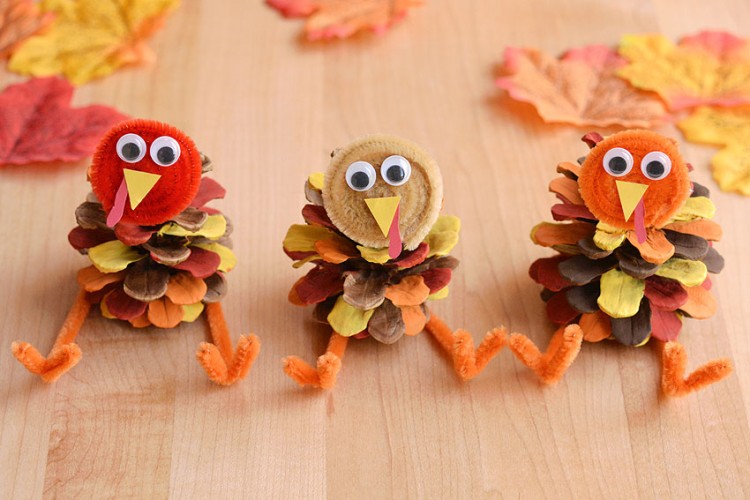
Hershey’s Kisses Turkey Treats


Our book Low-Mess Crafts for Kids is loaded with 72 fun and simple craft ideas for kids! The projects are fun, easy and most importantly low-mess, so the clean up is simple!

Where to buy:
You can purchase Low-Mess Crafts for Kids from Amazon, or wherever books are sold:
Amazon | Barnes and Noble | Books-A-Million | Indiebound | Amazon Canada


Leave a Reply