This paracord lanyard is so easy to make! Make one of these beginner friendly paracord lanyards using 1 simple knot in less than 30 minutes.
Hold your keys or a pocket knife with this DIY lanyard that’s both stylish and functional. This paracord craft is perfect for outdoor enthusiasts, and it’s also a fun craft for summer camp or Scouts!

This post contains affiliate links. If you use these links to buy something we may earn a small commission which helps us run this website.
How to Make a Paracord Lanyard
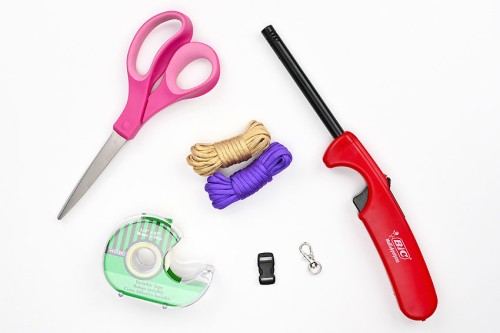
Materials:
- 30 feet Paracord (2 colours, 15 feet each)
- Swivel keychain clasp (1/2 inch ring)
- Bracelet buckle (1/2 inch)
Equipment:
Watch the step-by-step video tutorial:
Instructions:
Step 1: Find what you need
- Gather your supplies and materials.

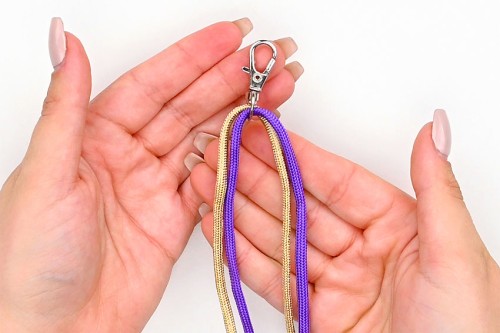
Step 2: Set up your lanyard
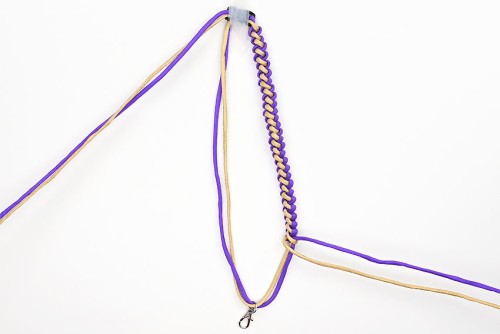
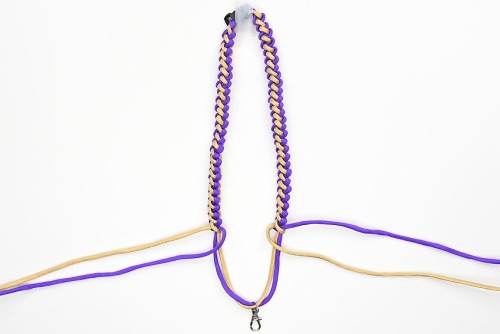
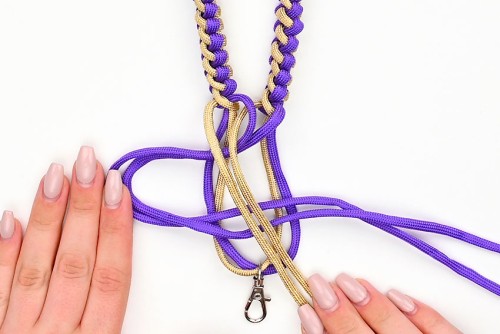
- Line up the two colours of paracord so the ends are even. Put the two strands of paracord through the ring of the keychain clasp.Then pull the cords through so that the lobster clasp is at the half way point.
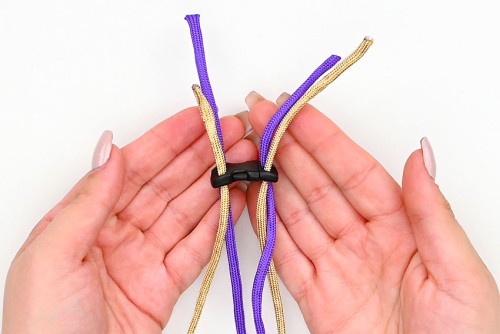
- Push the two sets of cord ends through each side of the bracelet buckle. Make sure the top of the buckle is pointing towards the ends of the cords.

- Pull the buckle down the cords towards the keychain clasp. Measure how long you want your lanyard to be and place the buckle that many inches above the clasp.For a neck lanyard we recommend a length of at least 15 inches.
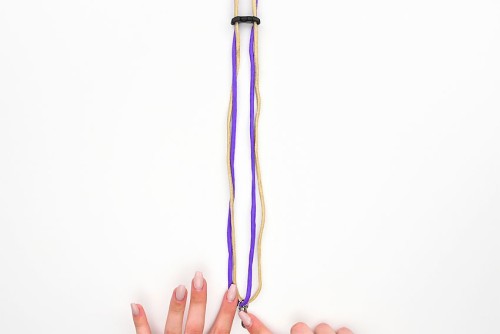
- Tape the buckle to your working surface and bring the loose cords down to either side. These are the working cords you’ll be making the knots with.

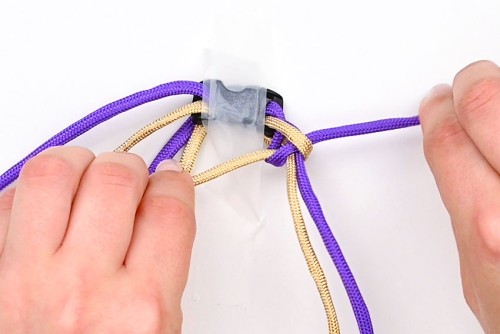
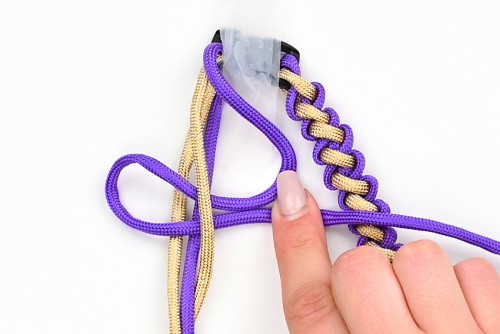
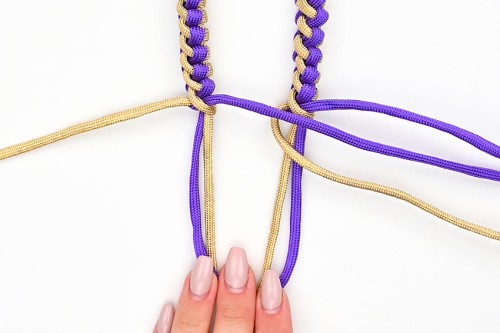
Step 3: Tie knots on the right side
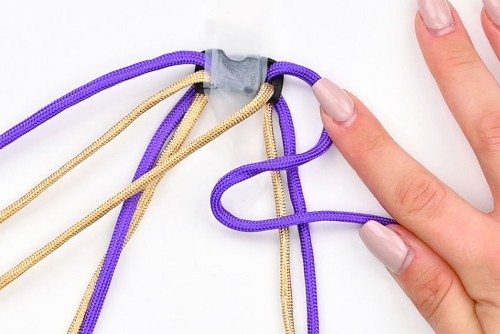
- Begin by making a bootlace knot on the right side of the lanyard.To do this, move the inside cord (gold) out of the way. Take the outside cord (purple) and bring it over the right stationary cords, making a loop that points left (towards the center of the lanyard).
- Take the right gold cord and place it over the purple loop.
- Then bring the gold cord underneath the right stationary cords.
- Bring the gold cord up through the loop formed by the purple cord.
- Pull both loose cords tight to create the bootlace knot. And push the knot up towards the buckle.
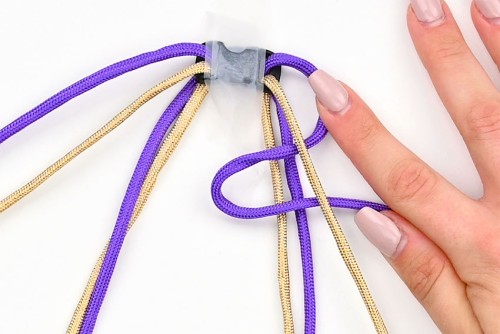
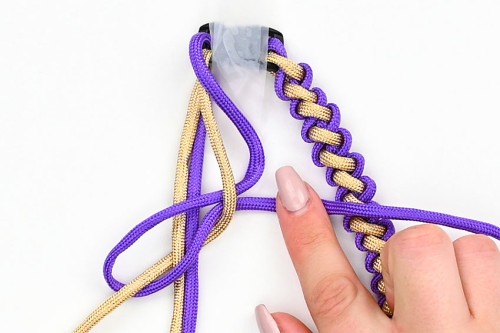
- Repeat, tying the same knot.Again, make a loop towards the inside of the lanyard with the purple cord. Bring the gold cord over the purple loop, back under the stationary cords, and up through the purple loop.Pull tight and push the knot up.

- Repeat the same knot until you’re about 3 inches above the clasp at the bottom.
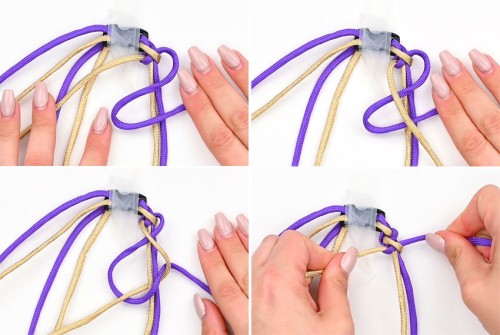
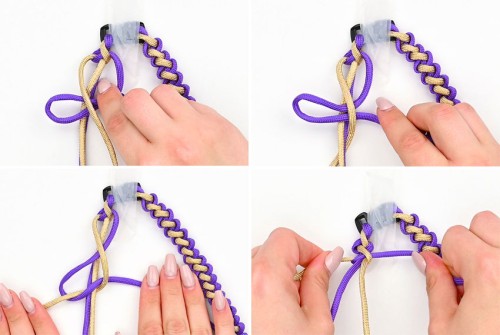
Step 4: Tie knots on the left side
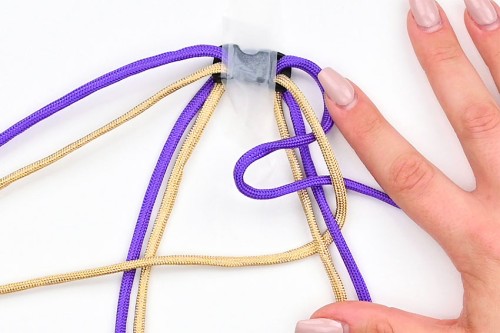
- Now we’ll be tying the bootlace knot on the left side of the lanyard.To begin, take the purple cord and make a loop over the stationary cords, pointing left towards the outside of the lanyard.
- Place the gold cord over the loop and then bring it under the stationary cords towards the left.
- Then pull the gold cord up through the purple loop.
- Pull the cords tight and push the knot up towards the buckle.
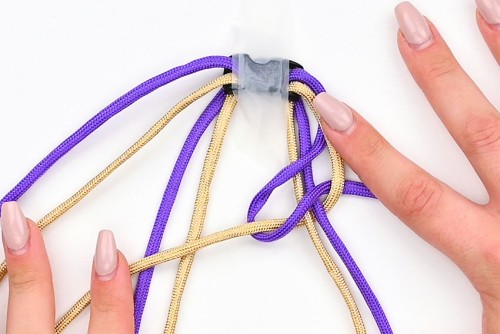
- Repeat the same knot.Again, make a loop with the purple cord towards the left of the lanyard and bring the gold overtop. Bring the gold underneath the stationary cords and up through the loop.Pull the cords tight.
- Just like on the right side, continue making the same knot until you’re even with the knots on the right, about 3 inches above the clasp.
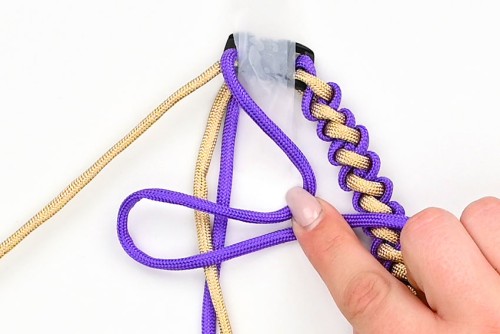
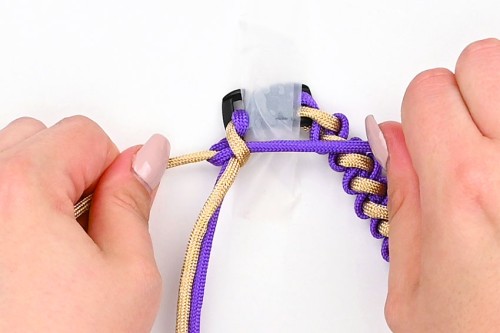
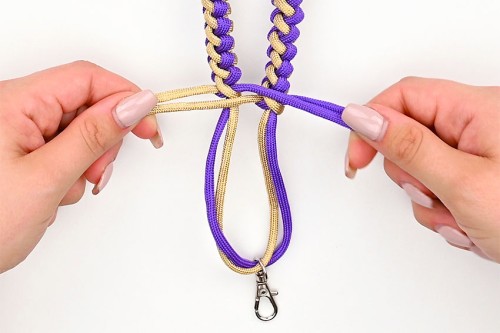
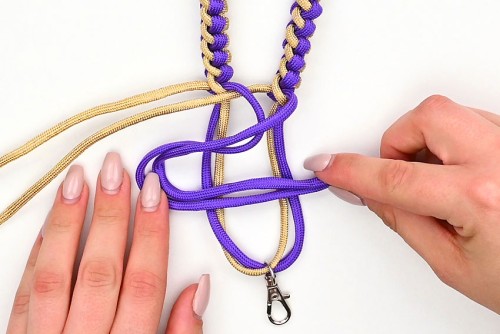
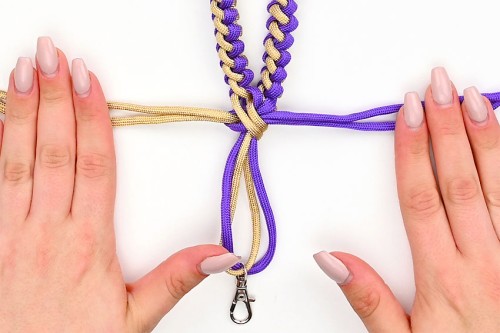
Step 5: Tie knots at the bottom of the lanyard
- To finish off the lanyard you’ll tie the same knot as above, with one small difference. This time, you’ll work with 2 cords at a time, tying the knot around all 4 stationary cords.To do this, first bring the purple cord from the left side over to the right.
- Then bring the gold from the right over to the left side. You should now have two gold cords on the left and two purple on the right.
- Take both the purple cords and make a loop over all four stationary cords. The loop should be pointing towards the left.
- Bring both gold strands over top of the purple loop.
- Bring the gold cords underneath the four stationary cords and up through the purple loop.
- Pull both pairs of cords tight and push the knot up as much as it will go.
- Repeat the same knot until you reach the clasp.

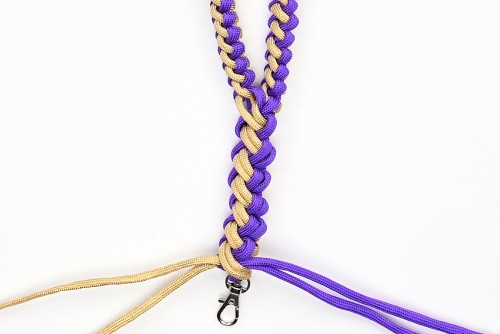
Step 6: Finish off the lanyard
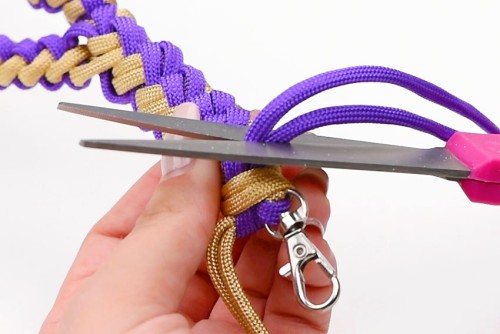
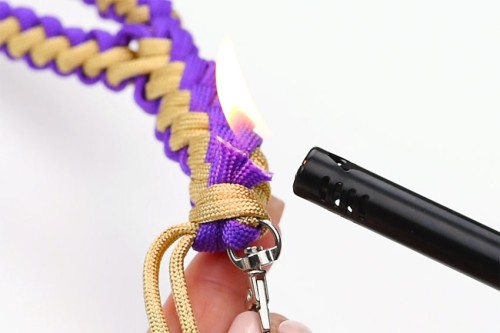
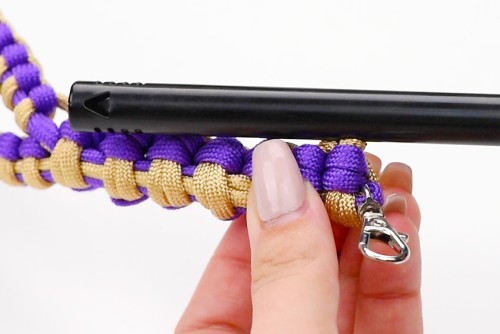
- Cut off both cords of one colour, about 1/4 inch from the last knot.
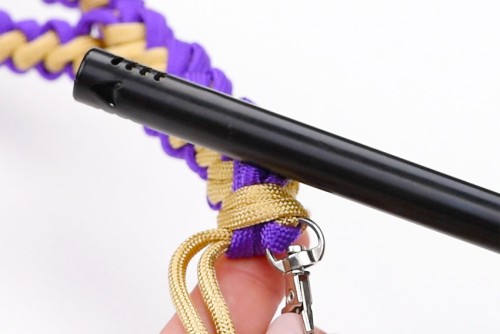
- Hold a BBQ lighter over the cut ends for about 3 seconds to melt the end of the cut paracord.
- Press the edge of the lighter against the melted cord to stop the knots from unraveling.
- Repeat, cutting and melting the other two strands.
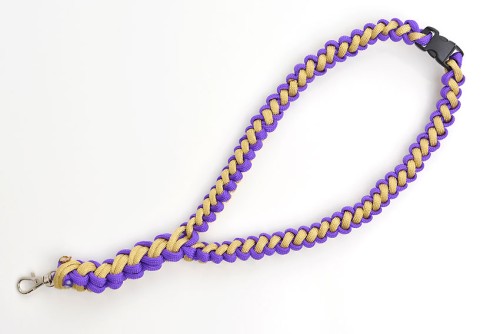
- Your paracord lanyard is complete!
Helpful Tips:
- If you don’t have a 15 foot piece of paracord, melt the ends of 2 shorter pieces of paracord and fuse them together.
- Take your time making the knots carefully and precisely. This ensures your paracord lanyard will look the best!

How many feet of paracord do I need for a lanyard?
We used 30 feet of paracord total to make this paracord lanyard, 15 feet of each colour. This makes a lanyard that’s about 15 inches long from top to bottom, if measured flat.
To make a longer lanyard, simply use more paracord and place the buckle a longer distance from the lobster clasp.

What is the best knot for a paracord lanyard?
We made this paracord lanyard using the bootlace knot, which is also known as the “curling millipede”. It’s a nice, thin knot that makes a lanyard that isn’t too bulky and shows off both colours of paracord nicely.
Or you can also make a shorter wrist lanyard using the cobra weave!

Where can I buy paracord?
You can buy paracord on Amazon, at a craft store like Michaels, or at an outdoors or camping store. There are also paracord specific websites, like Paracord Planet, with a huge selection of paracord.
What can this paracord lanyard be used for?
This paracord lanyard is great for holding keys, a security/ID badge, a pocket knife, a multi-tool, a USB drive, or even a hunting call.
In an emergency situation the paracord lanyard can be pulled apart to replace a broken shoelace or to tie a tarp for some shelter. Additionally, the thin inner threads can even be used for sewing thread or fishing line!

This DIY paracord lanyard is so much fun to make, and it only requires a few simple supplies. Choose your favourite colours and tie one together in 30 minutes or less!

Here’s even more paracord craft ideas:

How to Make a Paracord Bracelet


Our book Low-Mess Crafts for Kids is loaded with 72 fun and simple craft ideas for kids! The projects are fun, easy and most importantly low-mess, so the clean up is simple!

Where to buy:
You can purchase Low-Mess Crafts for Kids from Amazon, or wherever books are sold:
Amazon | Barnes and Noble | Books-A-Million | Indiebound | Amazon Canada


Leave a Reply