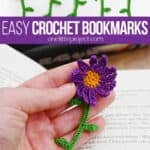
This crochet bookmark is the prettiest way to add a handmade touch to your reading time! These colourful flower bookmarks are super cute, and they make the sweetest gift for book lovers, teachers, and friends. Tuck one into your favourite novel, add one to a gift basket, or make a whole “bouquet” in different colours to share.
This easy crochet bookmark pattern is perfect for anyone who loves small, satisfying projects, and it’s a great way to use embroidery floss in a fun and creative way. Use the FREE crochet bookmark pattern below or purchase the printable, ad-free pattern with BONUS Quick Guide from our Etsy shop!

This post contains affiliate links. If you use these links to buy something, we may earn a small commission at no extra cost to you. This helps support our website and allows us to keep creating fun, free content.
How to Make a Crochet Bookmark
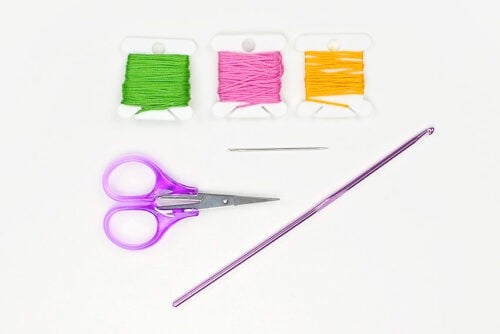
Materials:
Equipment:
See the craft in action:
Instructions:
Find what you need:
- Gather your supplies and materials.This crochet bookmark is made with embroidery floss!

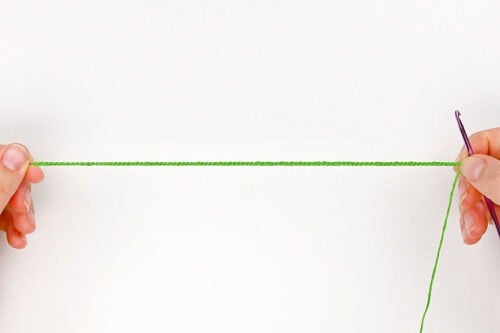
Stem:
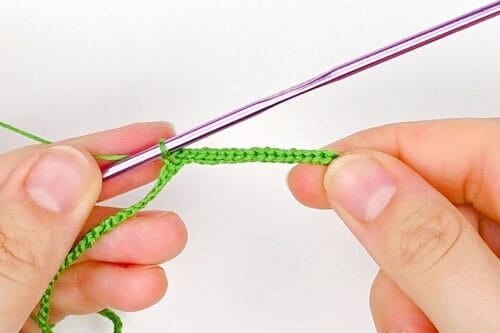
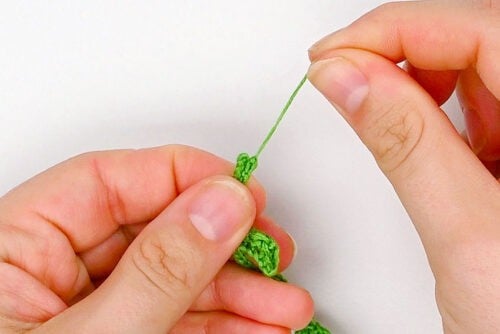
- With green embroidery floss, chain 91.

- Insert 1 slip stitch in each of the first 20 chs, starting in the 2nd ch from the hook.
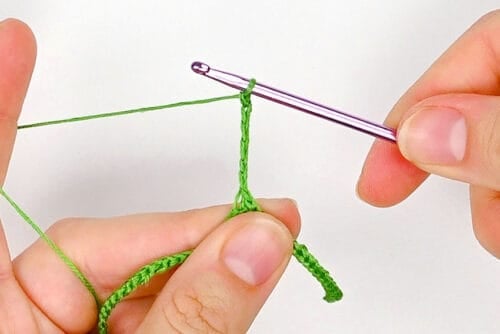
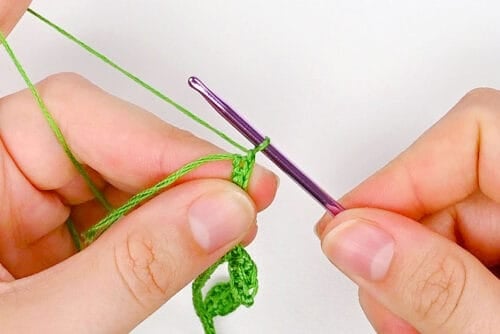
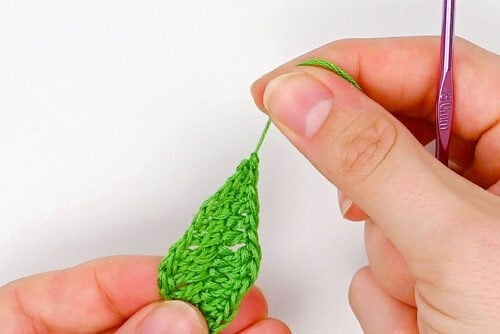
- Leaf:Ch 6.
- Starting in the 2nd ch from the hook, work the following sts into successive chs:1 sl st, 1 single crochet, 1 double crochet, 1 sc, 1 sl st.This completes the first small leaf.
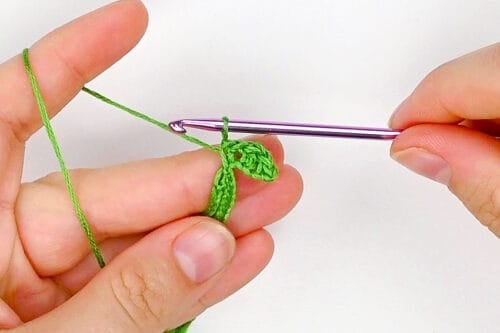
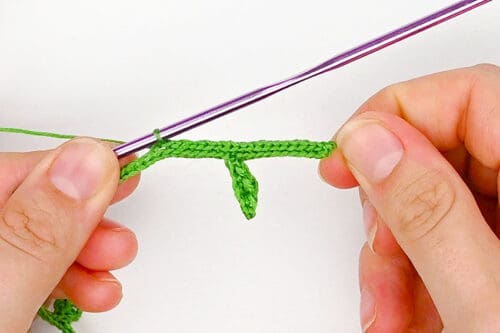
- Sl st into each of the next 20 chs.
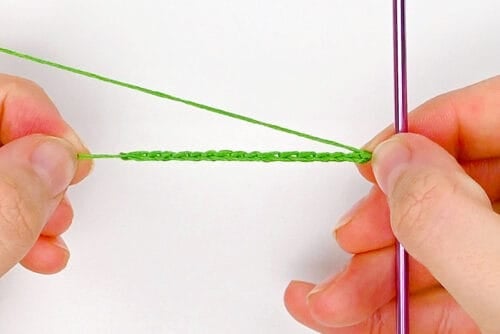
- Rep these steps (make a leaf, insert 20 sl st, etc.) across.You should end up with 4 leaves. Then finish the row with 1 sl st in each of the last 10 chs (instead of 20).
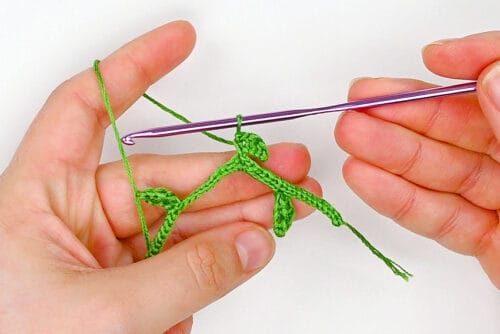
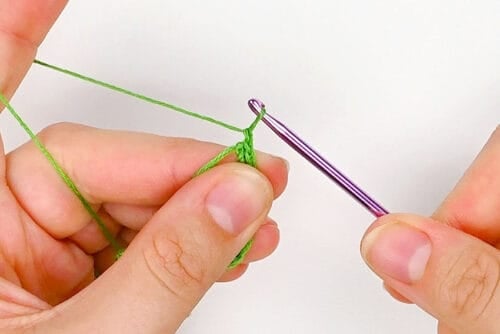
- Ch 1.
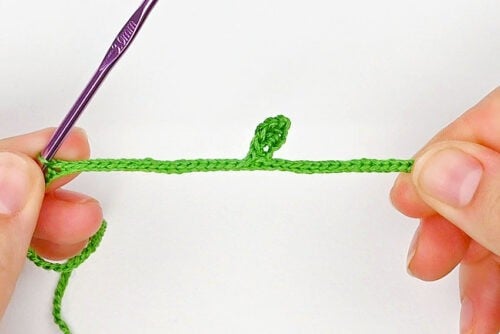
- Turn your work and begin working in the back of the foundation ch.Insert 1 sl st into each of the first 20 chs.
- Make a leaf, following the same st pattern as before.This leaf should sit halfway between 2 of the other leaves, but on the opposite side of the stem.
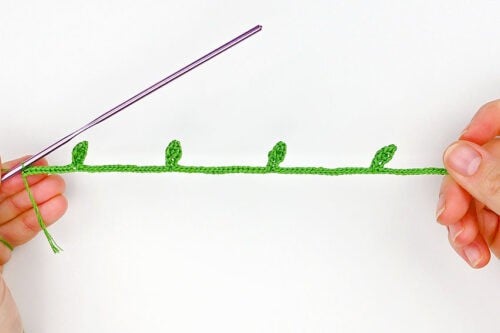
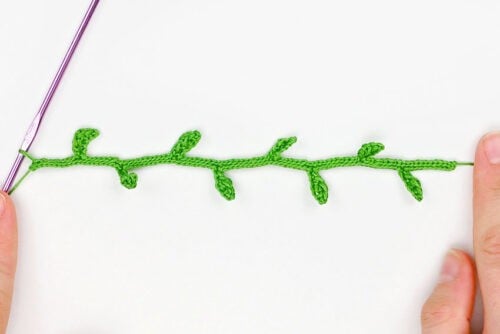
- Rep the same pattern again (20 sl st, leaf, 20 sl st, etc.), finishing with 1 sl st in each of the last 10 chs.
- Fasten off the embroidery floss.
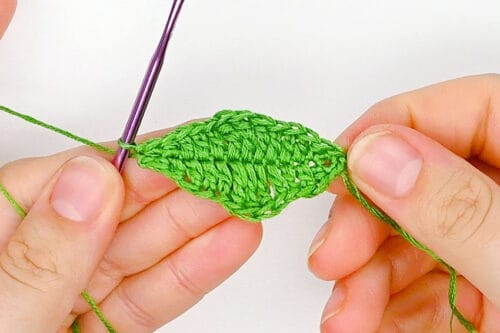
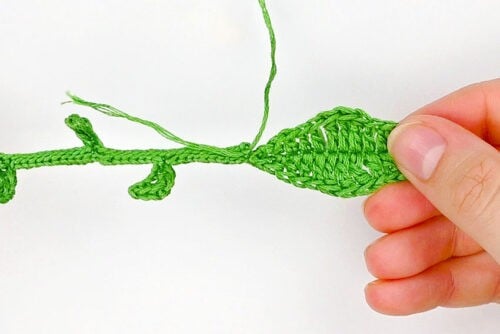
Large Leaf:
- Ch 16 (with the same green embroidery floss).
- Starting in the 2nd ch from the hook, work the following sts, placing 1 st in each ch across:1 sl st, 1 sc, 1 half double crochet, 3 dc, 3 triple crochet, 3 dc, 1 hdc, 1 sc, 1 sl st.
- Ch 1.
- Turn your work and, working in the back of the foundation ch, rep the same st pattern on the other side.(1 sl st, 1 sc, 1 hdc, 3 dc, 3 tr, 3 dc, 1 hdc, 1 sc, 1 sl st.)
- Fasten off the embroidery floss.

Flower:
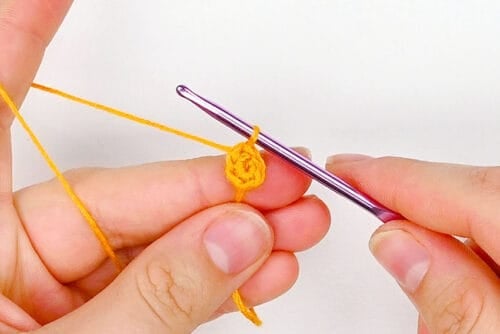
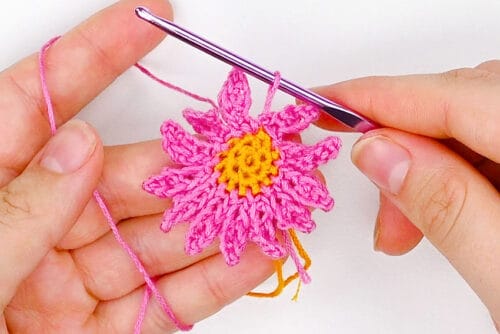
- Using yellow floss (for the flower’s center), insert 6 sc in a magic circle. Pull the tail to tighten and sl st in the first st to join.
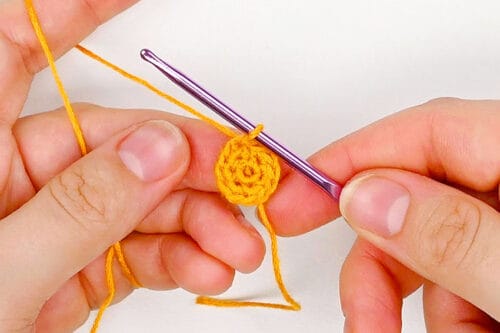
- Ch 1 and insert 2 sc in each st around (an increase). Sl st in the first st to join.Fasten off the embroidery floss.
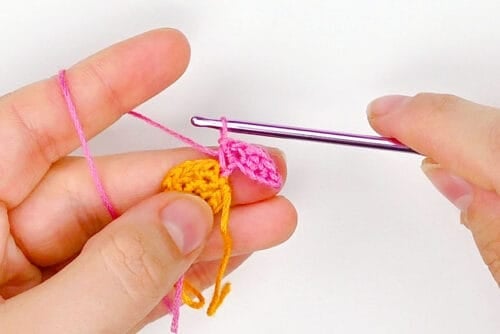
- Attach pink floss (or another flower colour) to one of the sts on the yellow circle. Ch 6.
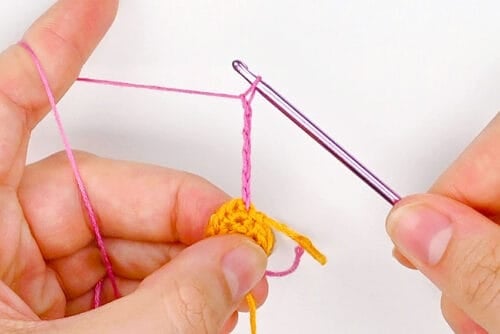
- Starting in the 2nd ch from the hook, insert the following sts into successive chs across:1 sl st, 1 sc, 1 dc, 1 sc, 1 sl st.(This is the same st pattern as the small leaves.)
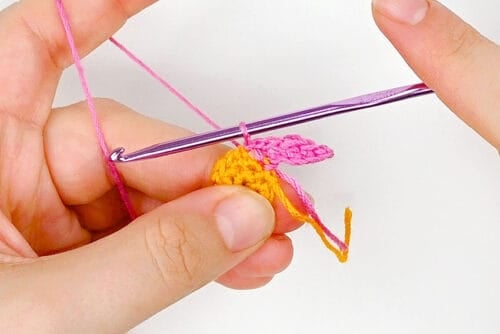
- Sl st in the next st on the circle to anchor the petal.
- Rep this petal pattern around, for a total of 12 petals.Finish the last petal with a sl st in the first st. Fasten off the embroidery floss.
Assembly:
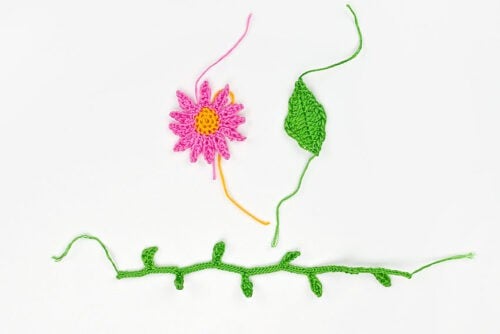
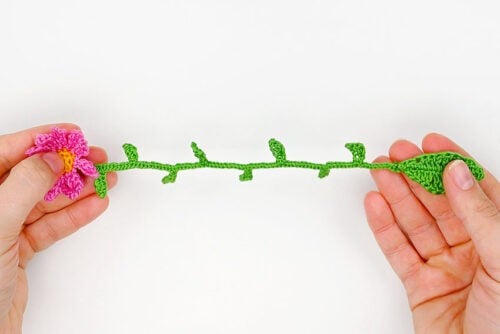
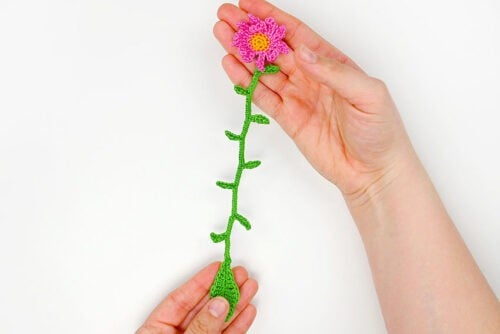
- Here are the stem, large leaf, and flower that we’ll be sewing together.
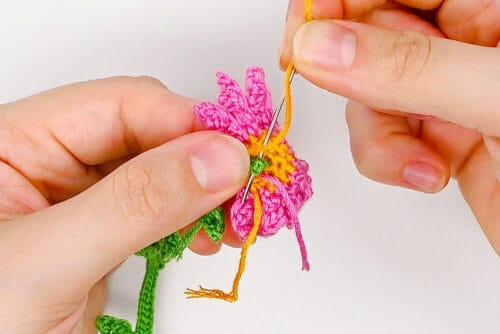
- Start by sewing the large leaf to one end of the stem.
- Sew the flower to the other end of the stem, attaching at the back center of the flower.
- Weave in all the ends.
Blocking (optional):
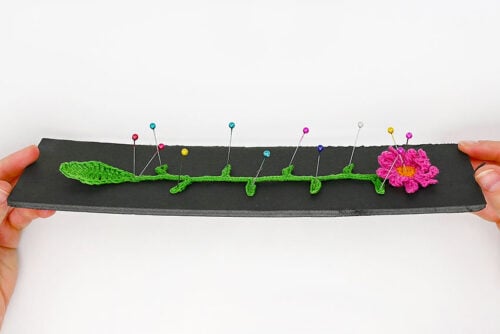
- Soak the bookmark in water, then gently squeeze out the excess.
- Pin the bookmark to a piece of foam board, or another type of blocking board.We chose not to block the large leaf, so start by placing a pin at the bottom of the stem. Gently stretch the bookmark and place another pin in the center of the flower. Then pin each small leaf in place, stretching them slightly as you go.Allow the bookmark to dry completely.
- Once dry, remove the pins. You’ll be able to see the difference in how the flower and leaves lie flat.
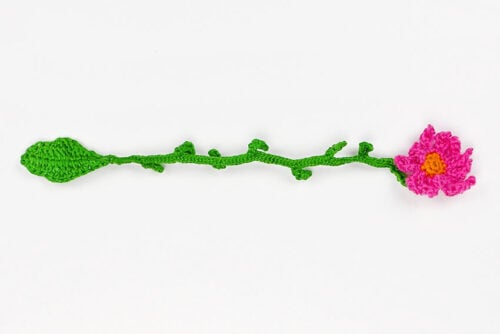
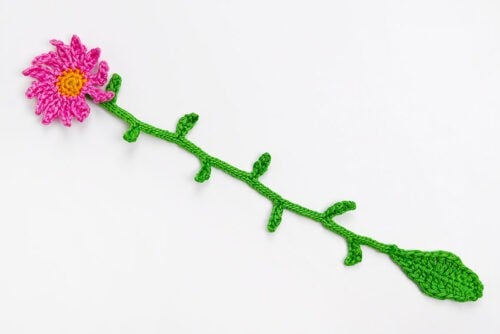
- Your crochet bookmark is complete!
Helpful Tips:
- Looking to brush up on your crochet stitches and techniques? Check out our crochet basics posts for detailed step-by-step tutorials and helpful tips.
- This pattern is a great way to ease into micro crochet. The finished pieces are small and delicate, but not so tiny that they feel overwhelming. It gives you a chance to practise even tension and careful stitching before trying even finer materials like sewing thread and a 1 mm hook.
Crochet Abbreviations & Terms:
This pattern uses standard US crochet terms. Here’s what each abbreviation means:
ch(s) = chain(s)
dc = double crochet
hdc = half double crochet
rep = repeat
sc = single crochet
sl st = slip stitch
st(s) = stitch(es)
tr = treble/triple crochet

Get our crochet bookmark pattern:
You can follow the full crochet bookmark pattern with step-by-step instructions for free right here in this post (supported by ads). Or, if you’d like a printable flower bookmark PDF pattern with BONUS Quick Guide, you can purchase it in our Etsy shop. It’s perfect to keep by your side as you crochet!
Printable Crochet Bookmark Pattern
Get the printable Crochet Bookmark Pattern PDF with step-by-step photos + BONUS Quick Guide in our Etsy shop!

What size is this crochet bookmark?
These crochet flower bookmarks are about 10 inches long. The flower itself is roughly 1-3/4 inches across.
These bookmarks fit comfortably inside a standard hardcover book (6 by 9 inches). If you want to make a larger bookmark, simply start with more chains (working in multiples of 20 + 10). Then repeat the stem and leaf pattern until the end of the chains before adding the large bottom leaf.

Do I have to use embroidery floss or can I use yarn to make these crochet bookmarks?
Yes, you can use yarn instead, but we highly recommend embroidery floss for the best results. It creates a bookmark that’s the right size for slipping inside a book and gives the finished piece a thinner, smoother look. Yarn will make the bookmark larger and a bit bulkier, so it may not sit as nicely between the pages.
Do I have to block my crochet bookmark?
No, this step is completely optional, but we do recommend it. It makes a big difference in the final look. Blocking helps the bookmark lie flat and, we think, improves the appearance quite a bit.

These crochet flower bookmarks are such a sweet way to make reading time feel a little more special. They’re pretty, practical, and fun to make, and the delicate flowers and leafy stems give them such a lovely handmade look.
Whether you make one for yourself or a few to share, this is a simple little project that feels extra special when it’s finished. Have fun choosing your colours and stitching up a bookmark that’s just as beautiful as it is useful!
Here’s even more DIY bookmark ideas:


Now available
Low-Mess Crafts for Kids Book
72 cute and fun crafts that kids and parents alike can enjoy. All with as little mess as possible!
Where to buy:
You can purchase Low-Mess Crafts for Kids from Amazon, or wherever books are sold:
Amazon | Barnes and Noble | Books-A-Million | Indiebound | Amazon Canada


Leave a Reply