Return to our homepage.
I did something crazy in April of this year. I quit my day job to become a full time professional blogger. If you would have asked me ten years ago where my life was heading, or even five years ago, I can pretty much guarantee that I did not plan this, or even see it as a possibility!
But the crazy thing is that I love blogging. Like, I REALLY LOVE blogging. I feel like the luckiest person in the world that I get to do this as my job and that I actually earn money from it!
We need two incomes in our family, so ever since I quit my “proper” job, this blog has had to provide my portion of our family income. So when I call myself a professional blogger, it’s because I consider it a viable income, not just a little extra spending money here and there (which wouldn’t be so bad either!). It still blows my mind that you can make money blogging! You can read all of my income reports here to see how this little blog of mine is doing.
I worked as a Mechanical Engineer for eight and a half long years. I loved the people I worked with, but the whole time, I had this feeling that there was more to life than going to work at a job that I wasn’t in love with. I desperately wanted to be one of those people who loves their job, but I didn’t know how to make it happen.
I started One Little Project in December 2012 when my second daughter was 8 months old. I was on maternity leave at the time, and the thought of going back to work was breaking my heart. I started my blog in hopes that maybe, just maybe, I could quit my job some day and make a full time income from blogging.
I felt a little crazy at first, and it was months before I even admitted to any of my friends that I had started a blog. But my life needed to change, and I needed to push myself to do something different or I’d be stuck in a rut forever. It took three years, but I’m over the moon that my wish came true!
How to Start a Blog
Any time someone I know tells me they’re thinking of starting a blog, my response is always an enthusiastic “DO IT!”. I love blogging. I could talk about blogging all day. And I get so excited to see others start their own blogging journey!
So if you’re thinking of starting your own blog, my advice is the same as what I tell my friends. “DO IT!” Even if you don’t plan to earn an income from it and you’re just doing it for fun. It’s so inexpensive to own a website these days and it’s so easy to get it up and running. It’s such a fun way to express your creativity and to share your story with the world! And how cool is it that you can earn money from it!?
I promise you, it’s easy to get started. In fact, you can get your blog all set up within 15 minutes and I’m going to show you exactly how to do it! Yup! Stay with me!
Here are the three steps I’m going to walk you through:
There are three easy steps you need to complete to start a website. I’ve included a screenshot of absolutely everything you’ll come across.
- Step 1: Choose a Name for your Website
- Step 2: Register Your Domain Name and Choose a Host for Your Website
- Step 3: Install Wordpress
- BONUS! How to Install a Free Theme
Please note that this post contains affiliate links. That means if you click one of the links on this page and for example, sign up for hosting through HostGator, I’ll get paid a small commission. You don’t pay any extra money (In fact, if you use the coupon code ONELITTLEPROJECT, you’ll get 25% off your hosting plan!), it’s just HostGator’s way of paying me for referring you to their business. If you don’t want to use my affiliate link, I understand. But if you do, thank you! Please know that I really appreciate your support!
Step 1: Choose a Name for Your Website
Are you having trouble deciding what to blog about? You’re not alone. Check out our How to Choose a Blogging Niche post for some great tips to help you choose a topic. There’s even a list of niche ideas to help inspire you.
Maybe you’ve already spent some time thinking about your blog name? But if you haven’t, that’s okay. In the grand scheme of things, your blog name doesn’t really matter. I’ve seen ridiculous blog names succeed. And I’ve seen very plain blog names succeed. Choose something you’re comfortable with. Try to make your name relevant to what you want to blog about, but simple enough that people can remember it.
Don’t worry, a great logo design can make even the most crazy name look professional and appealing. And if all else fails, you can always change your domain name later if you aren’t happy with it. So don’t sweat it. Just choose something and get started.
Now, how do you actually find a domain name that’s available? It’s easy! There are lots of ways to search, but I LOVE using this little tool – Name Mesh! It helps generate domain name ideas that are actually available and gives you tons of options with related words and combinations.
See how I typed in the words “my little craft blog” in the box? I just clicked the “Generate” button, and look at all the options it gave. AND all of them are available! Pretty neat, don’t you think? The sky’s the limit when it comes to domain names, but I definitely recommend getting a .com domain. Choosing a .net domain is okay if you really have to, but in the blogging world, .com is standard, and it’s always best to stick with what people are used to. You want your readers to easily be able to find you.
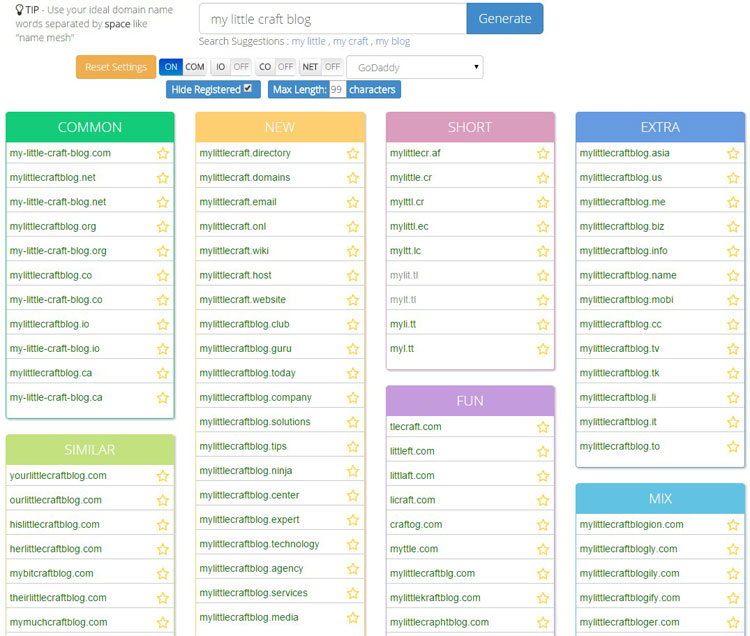
Let’s pretend I’m starting a new blog, and I want to call it “My Little Craft Blog”. I typed it into the generator, and it looks like mylittlecraftblog.com is taken, but my-little-craft-blog.com is available. Great, right? Well, not so much. If I go to visit mylittlecraftblog.com, it turns out someone else already runs a craft blog there. So for me to use the same name, but with hyphens would be reeeeeally confusing.
Always make sure you do a quick Google search of your blog name before you buy it, to make sure the name you choose isn’t similar to someone else’s blog name. Even if it’s slightly different, it can get confusing for readers if your name is too similar to someone else’s. You’ll have to use your best judgement on that one.
So let’s try putting a different name into Name Mesh. This time I tried “amazing craft blog”:
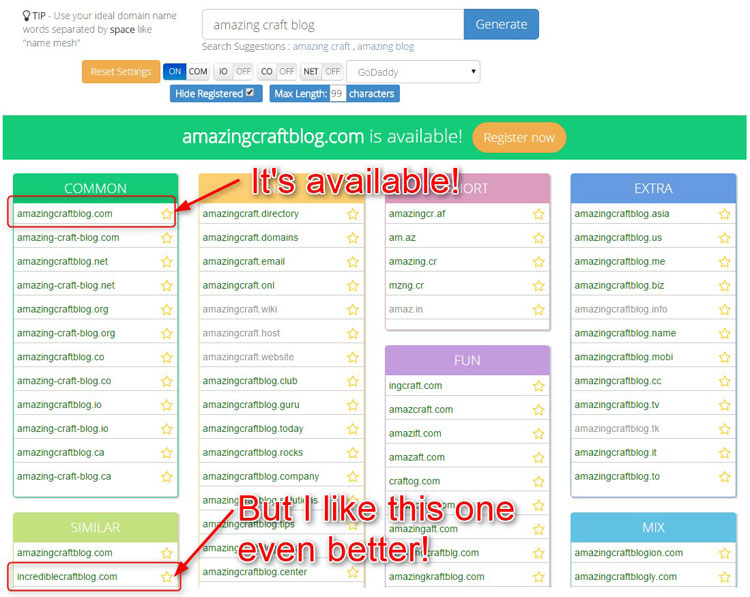
It turns out “amazingcraftblog.com” is available! But when I look through the other suggestions, I actually really like “incrediblecraftblog.com” (and if you scroll down, it gives you tons of other great options too!) When I do a quick Google search of “Incredible Craft Blog”, nothing comes up with a similar name, so I’m good to go!
Step 2: Register Your Domain Name and Choose a Host for Your Website
Buying a domain name is really cheap. Usually you pay around $12 once a year. You can shop around if you really want to, but if you’ve never had a website before, I definitely recommend purchasing your domain name through the same company you’re hosting with. If you buy it through another company such as GoDaddy or NameCheap you’ll have to figure out how to transfer it over to your host. It’s not difficult, but it can be a little frustrating if you aren’t the most “techy” person.
Your “host” is basically where your website is going to “live”. It’s the company who stores all your website data and makes sure it’s available on the web.
Choosing a hosting provider for your website can be really confusing. There are so many hosting companies out there, trying to convince you they’re the best. But I’m going to let you in on a little secret… it really doesn’t matter who you choose as your host. If you read the reviews, all the major hosts are pretty much the same (Bluehost, DreamHost, HostGator, etc). They are all reliable. They all have excellent customer service. And they are all affordable. Honestly, you can’t make the wrong decision, no matter who you choose.
When I first started, I used HostGator and I was thrilled with them! HostGator has amazing reviews and they’re incredibly affordable. They were always available when I had technical issues, and most importantly, it was easy to sign up and get my website up and running. HostGator has amazing reviews, and I can confidently recommend their services to any beginning blogger.
HostGator will work for you until your blog is around 125,000 pageviews per month. It took about two years for me to get to that point, and then I switched to another amazing company called Black Chicken Host. With the larger hosting plan at Black Chicken Host, I can accommodate big surges in traffic at zippy speeds. The downside is that instead of paying the super cheap $6 per month, I pay closer to $75 per month. So you’ll probably want to stay on the affordable plans for as long as you can.
Let’s get started!
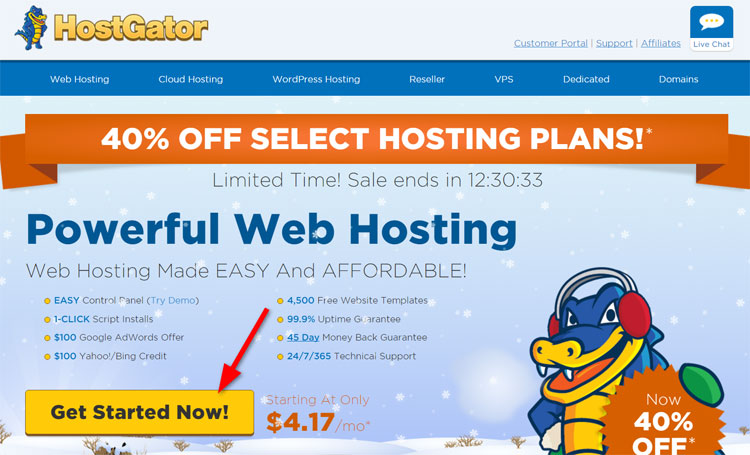
Navigate to the HostGator homepage and this is what you’ll see. It just so happens I made this tutorial the week they were having a big sale. Sorry if the 40% off isn’t available when you register! But if you use the coupon code ONELITTLEPROJECT you’ll get 25% off. Hopefully that helps!
Click “Get Started Now!”
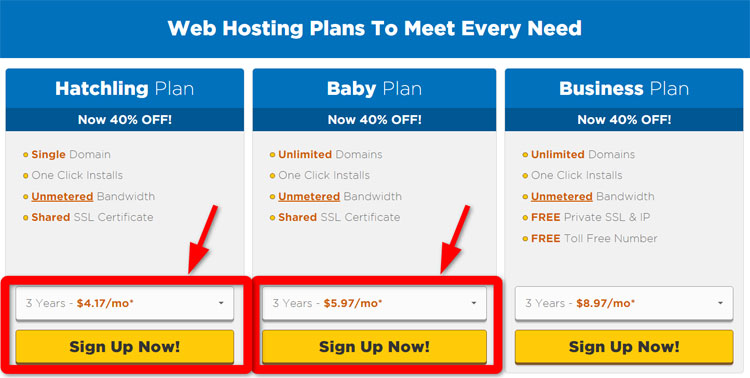
Then scroll down to the Web Hosting Plans and choose either the “Hatchling Plan” or the “Baby Plan”. The biggest difference is that with the “Baby Plan” you can start as many websites as you want. If you have dreams of having multiple blogs, or if you have more than one company, definitely choose the “Baby Plan”. If you only plan to have one website, then go with the “Hatchling Plan”.
When I first started, I wasn’t sure what I wanted to do, so I went with the “Baby Plan”. I ended up purchasing two other domain names and owning two other websites, and that plan gave me the flexibility to make that happen so I was happy. If you aren’t sure, just go with the “Hatchling Plan” and you can always upgrade your plan after you register if you need to.
Select the length of time you want. (For example, it’s cheapest if you buy it for 3 years, so that’s what I chose when I started). Then click “Sign Up Now!”
It will bring you to the HostGator Order Form. Remember how we had talked about buying your domain from your host? Well, this is where you make that happen.
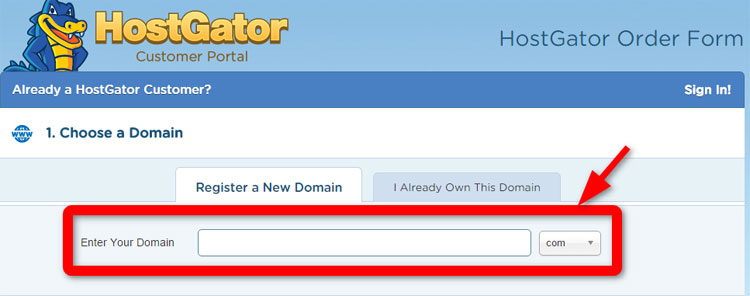
I bought my very first domain from somewhere else and it was a bit stressful figuring out how to connect it to my HostGator account. So looking back, I wish I had just spent the extra $3 and just done it this way to start! It’s so easy! All you have to do is enter the domain name you decided on.
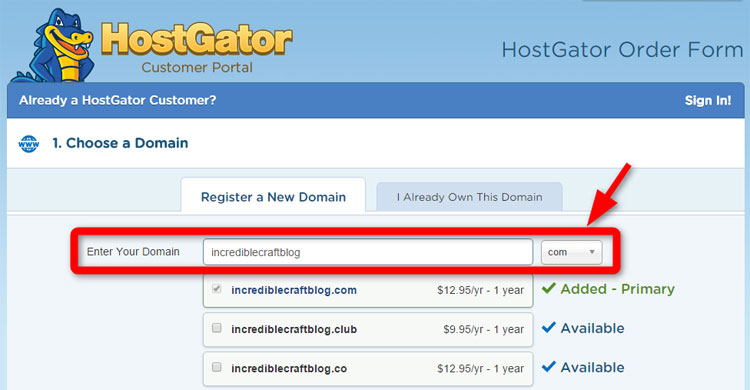
So in my example here, I’ll enter “incrediblecraftblog” in the box, and then select “.com” and it brings up my options. The price is only $12.95, which I think is reasonable. Anywhere between $10 to $20 is good. Make sure the little check box beside the domain name with the “.com” is checked (and all the other ones are unchecked) before you move on.
When you scroll to the bottom of the list, it will give you a “Domain Privacy Protection” option. This is completely optional. If someone wants to know who owns your website, they can do a Google search and find the contact details you are about to include in the registration form. If you purchase this privacy protection, it will help to hide that information, so it’s not so easy to find. I’m kind of cheap, and I’m not overly worried about it, so I left it unchecked. But if you want your personal information hidden, by all means, go ahead and purchase the privacy protection.

Next, you’ll want to double check that the billing cycle you selected is correct. And then enter a username and a numerical security PIN.

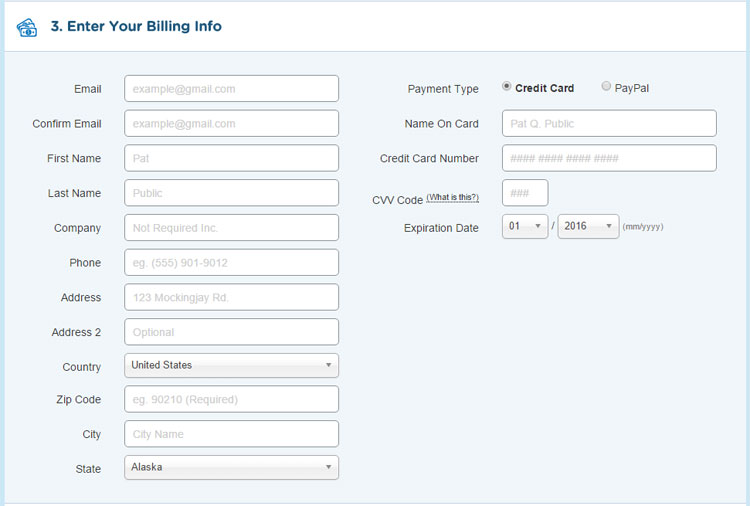
Enter your billing information here. You can either pay by credit card or PayPal.
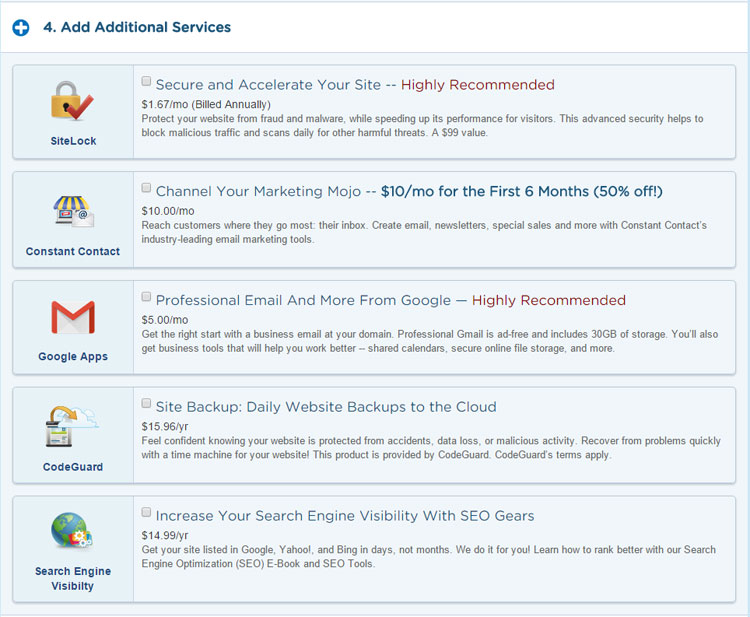
Next, they are going to try to up-sell you on extra services. Again, these services are completely optional and none of them are required. The only one I’ve ever purchased is the top one “SiteLock”. It’s not a bad idea if you’re a complete newbie, but you definitely don’t “need” it. As for the “Site Backup” option, it’s always a good idea to have something to back up your website (I personally use BlogVault), but if you don’t want to spend extra money right now, you can wait to purchase it until you actually have a few posts up on your blog.
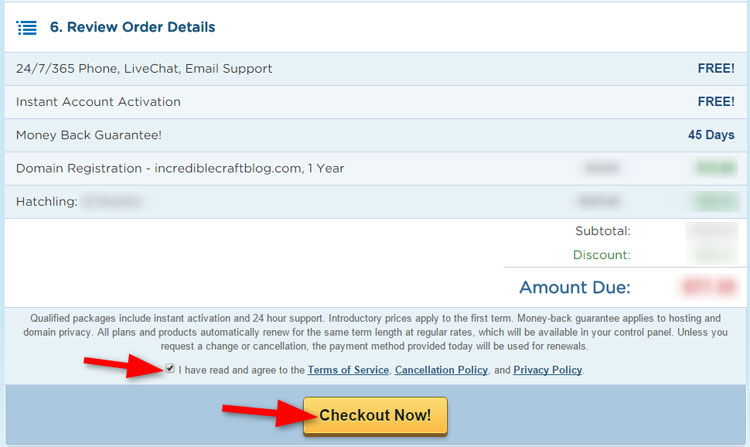
Now because you are supporting me and my website, I have an awesome coupon code that will give you 25% off your purchase! How awesome is that?! Just enter ONELITTLEPROJECT in the coupon code box and click “Validate”.

Review your order details, check the box that you’ve read the terms of service, cancellation policy and privacy policy, and then take a deep breath and click “Checkout Now!” You can do it!
I went with the PayPal option, so it took me to my PayPal page to complete the order. Now wait for it!
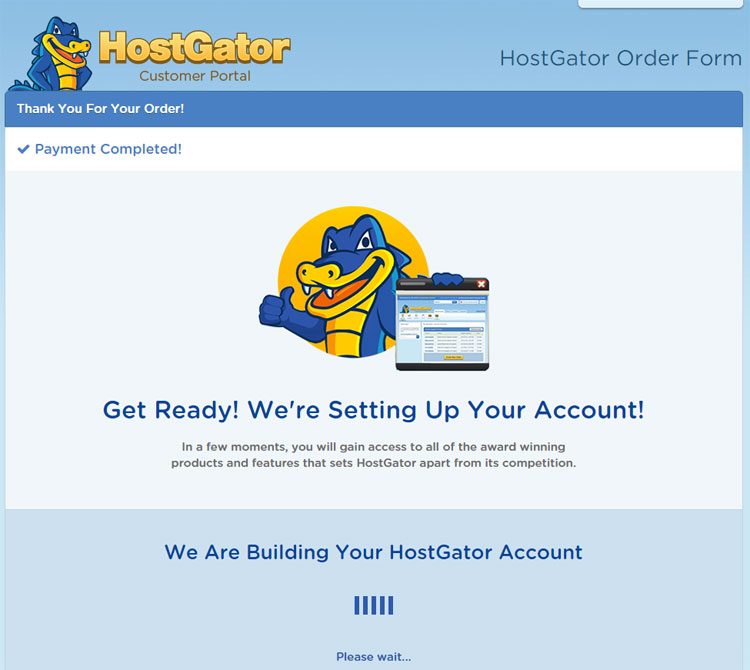
Then it will load your brand new account. So exciting, right!?
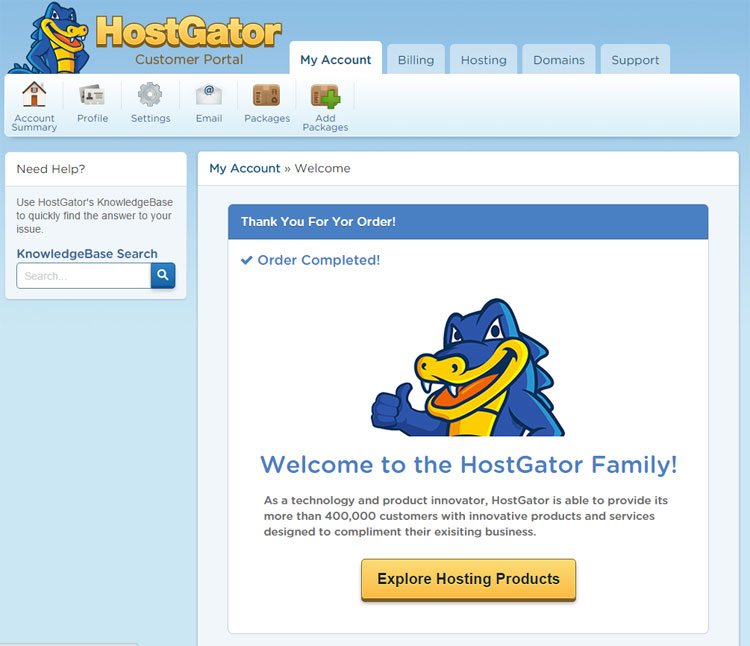
You now officially have a domain and a host! Congratulations! I’m so excited for you!
Step 3: Install Wordpress
OK, so you have a domain and a host, but now what? You need a way to make your website look like, well… it needs to look like a website. Just give it a quick test and type in your new domain name into the URL box on your browser. When I type in “incrediblecraftblog.com” this is what shows up on the screen:
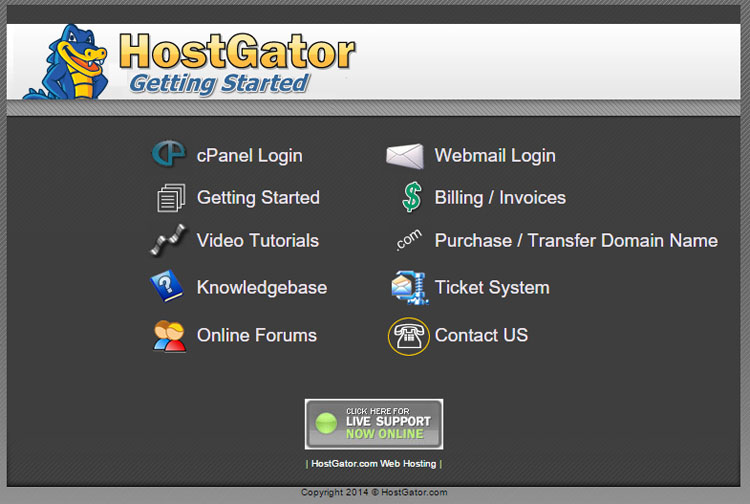
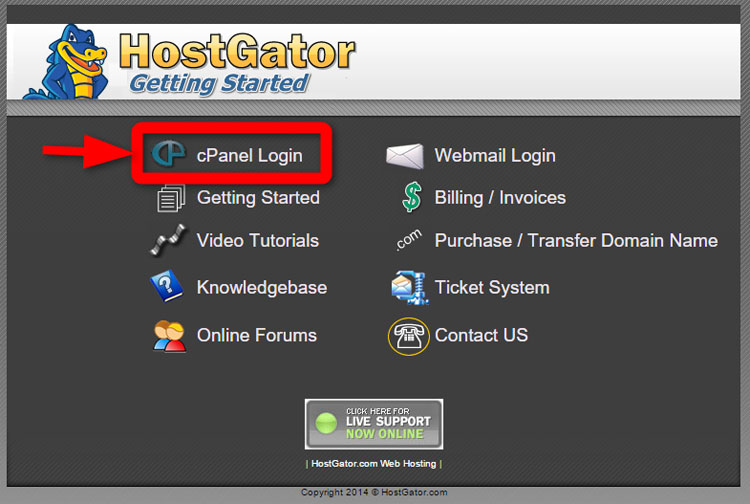
Not exactly what you’re going for, but it’s exactly what it needs to look like right now. Go ahead and click on cPanel Login.
It will bring up a box like this. You should have received an email with a subject like “HostGator.com :: Your Account Info” from Hostgator which will include your new login credentials. Be sure to check your spam folder for the email (that’s where mine went).
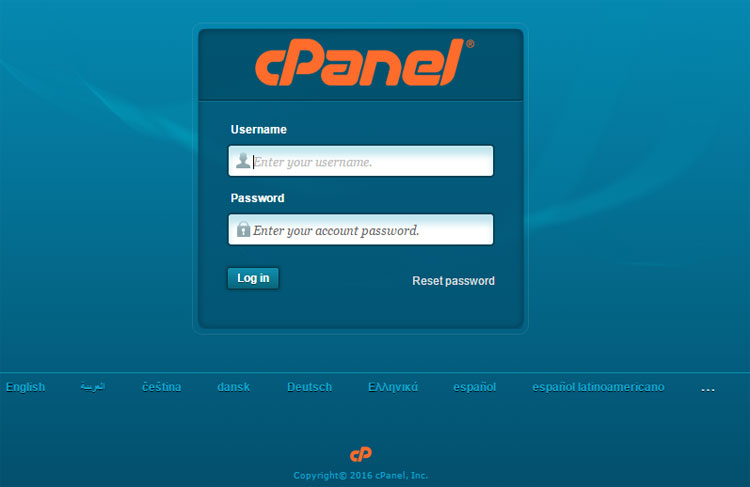
After you enter your username and password (again, this is the username and password in the email they sent you, not the username and PIN you typed in earlier), click “Log in”.
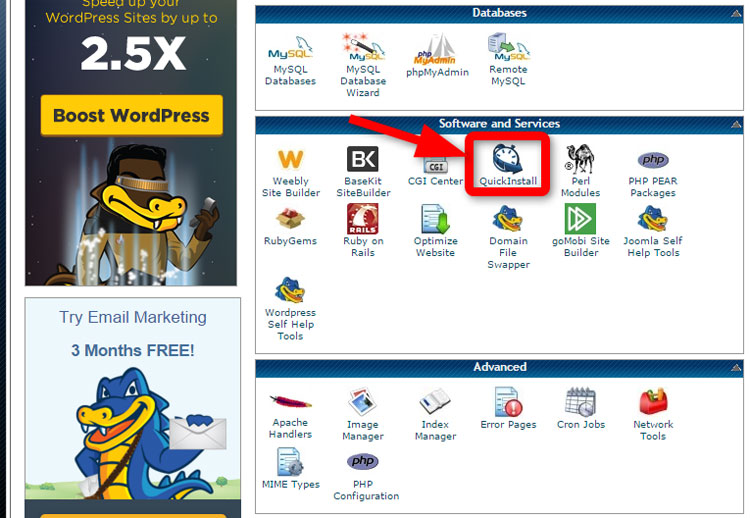
This is what your CPanel looks like. I’m not going to lie, it looks scary to me. But this is pretty much one of the only times you are ever going to need to access it, and I promise, I’ll walk you right through it.
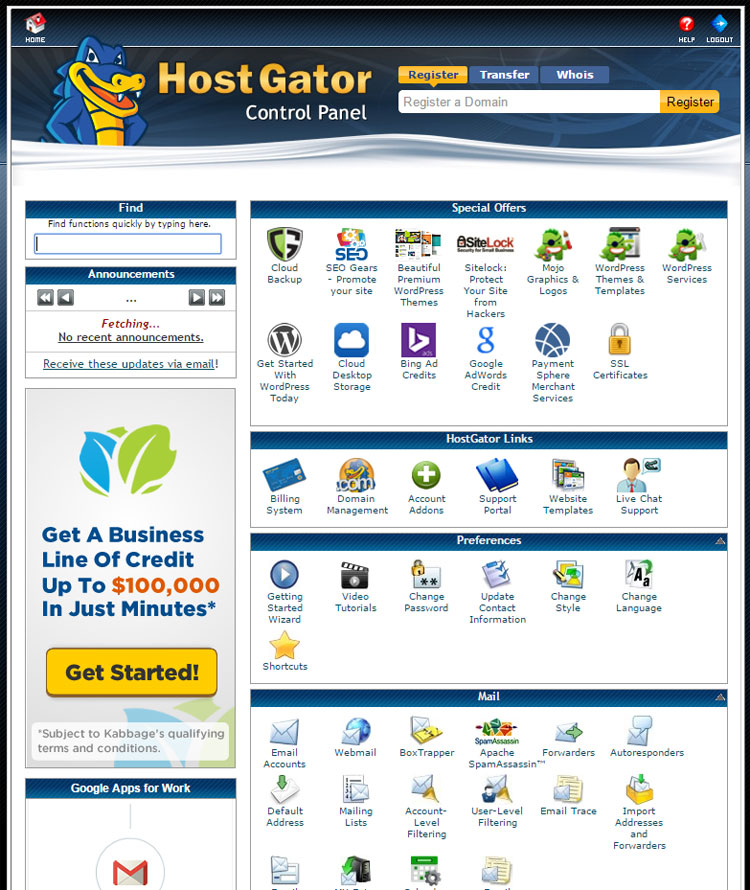
See how there are different sections with the titles in the blue bars? (Special Offers, HostGator Links, Preferences, etc). Scroll down to the second last section called “Software and Services” and click on the “QuickInstall” button.
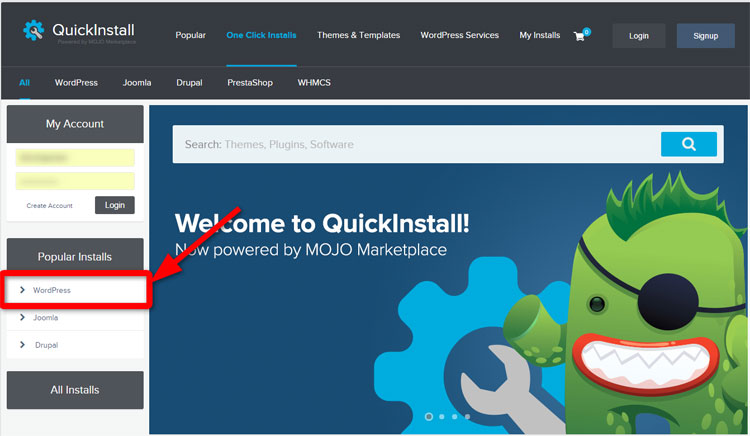
It will bring you to the QuickInstall page. On the left sidebar, under Popular Installs, click “WordPress”.
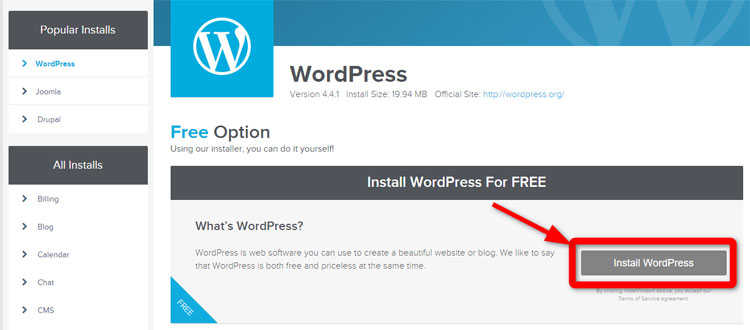
Then scroll down a little, and click on the “Install WordPress” under the section “Install WordPress for FREE”.
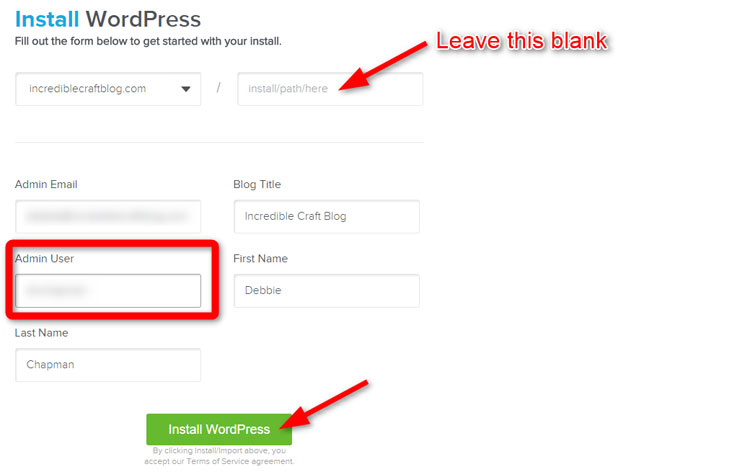
It will bring you down to a form that needs to be filled out. Start by clicking the little drop down arrow on the first box and selecting your new domain name. Leave the box beside it blank.
Admin Email: Enter your email address here. (An existing email address that works.)
Blog Title: Fill it in
Admin User: This will be your login user name. Don’t make it “Admin” or “Administrator” or “YourFirstName”, since those are the most popular usernames and they’ll make it easier for you to be hacked. Maybe make it your first and last name together? Or your first initial and your last name? It’s up to you, as long as you steer clear of the ones I just listed.
Then click “Install WordPress”.
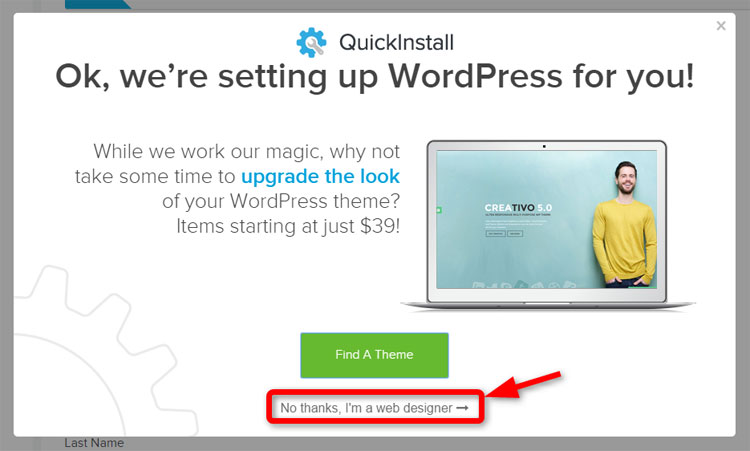
It might bring up a box that looks like this. Again, it’s just an up-sell, so ignore it. Go ahead and click “No thanks, I’m a web designer”.
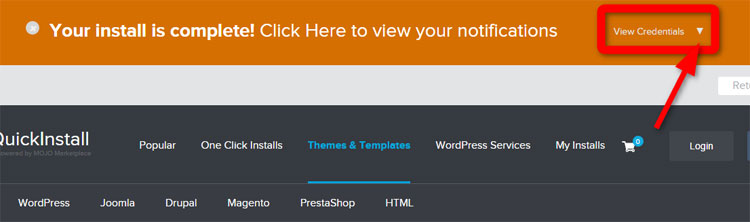
At the top of the screen, it will bring up a box that tells you your installation is finished. Click on the drop down arrow beside “View Credentials”.
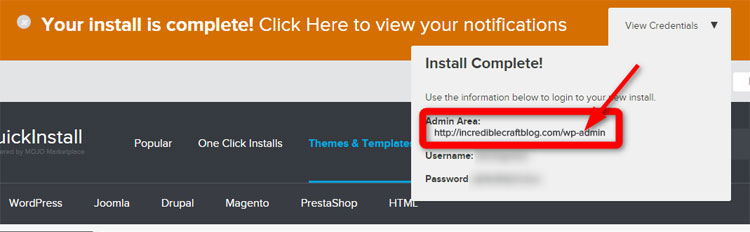
It will say “Install Complete!” And it will give you everything you need to access your WordPress account. Go ahead and click on the link below “Admin Area”.
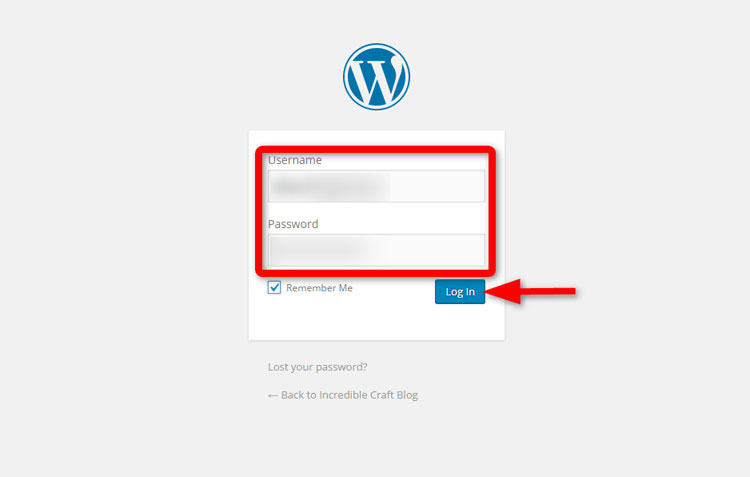
This is it my friends! It may not look like much, but you’ve done it. This is the front door to your blog. They’ll send you your username and password in an email, but it’s just the same credentials in the box you just clicked on. So you can type in your username and copy over the password and click “Log In”.
This is your WordPress dashboard. It’s where all the magic happens.
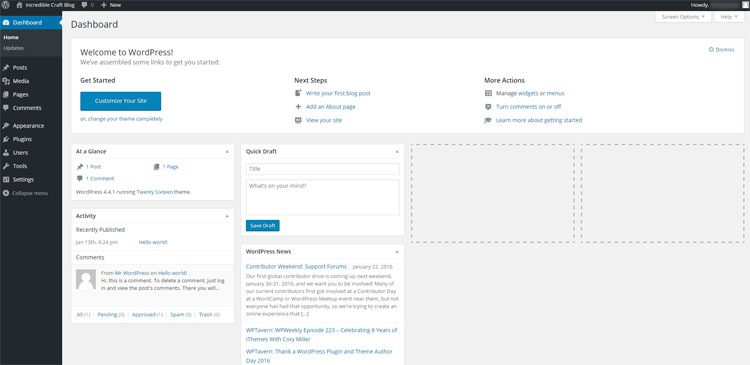
When you type your new website address into the URL box in your browser now, this is what you’ll get:
Congratulations! You officially have a website! It’s going to take some tweaking to make it look pretty, but you’ve done it. Through your WordPress dashboard you can add new posts and play around with things.
BONUS! How to Set Up a Free Theme
You can definitely pay for themes, and to tell you the truth, that’s probably the easiest way to go. But I was extremely cheap when I first started, so believe me, I get it that you want to keep costs down. There are tons of themes out there, and lots of them are free. Here’s how you find them:
On the left sidebar, click on “Appearance”, then “Themes”.
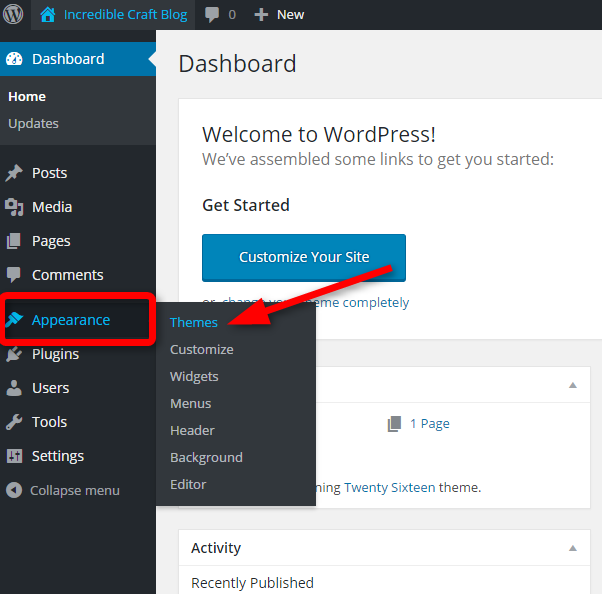
Find the button that says “Add New” and click it.
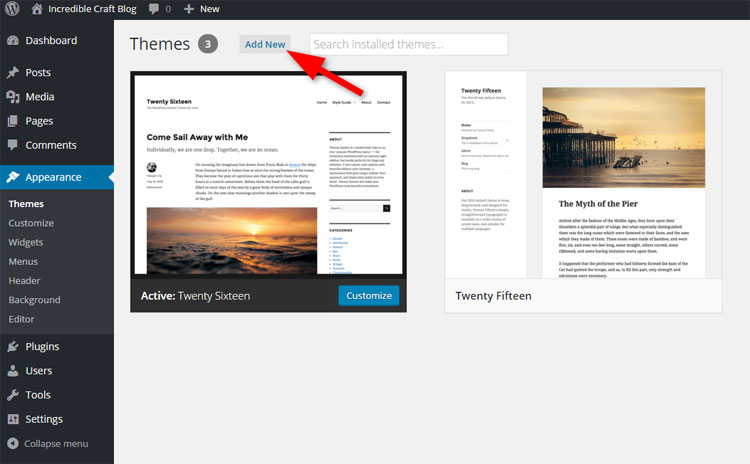
It’s going to give you tons of theme options to choose from. There are thousands. And you can choose any of them! Try browsing the popular ones and see if anything stands out to you.
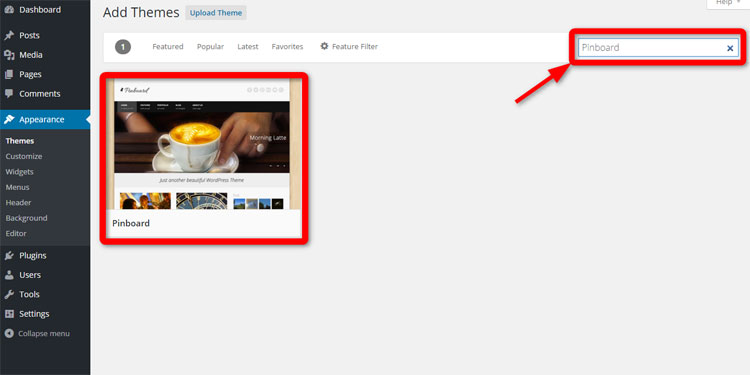
I recommend a theme called “Pinboard” because it’s free, it looks like a proper blog and it’s fairly easy to set up. (It’s the theme I used for over a year when I first started out) Find the search box and type in “Pinboard”.
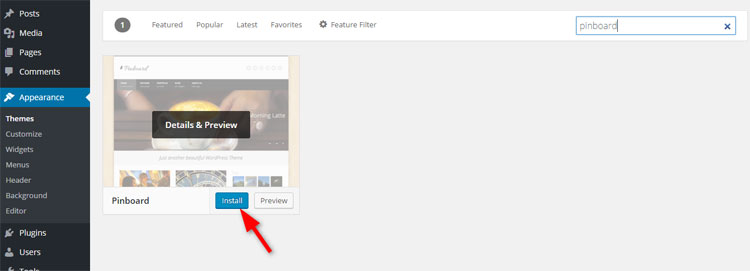
Click on the image that comes up and then click “Install”:
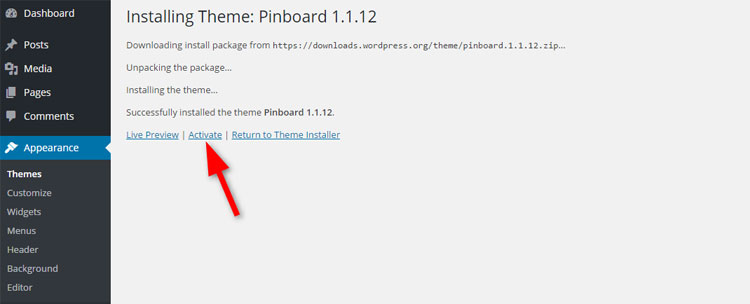
Once it installs, click “Activate”:
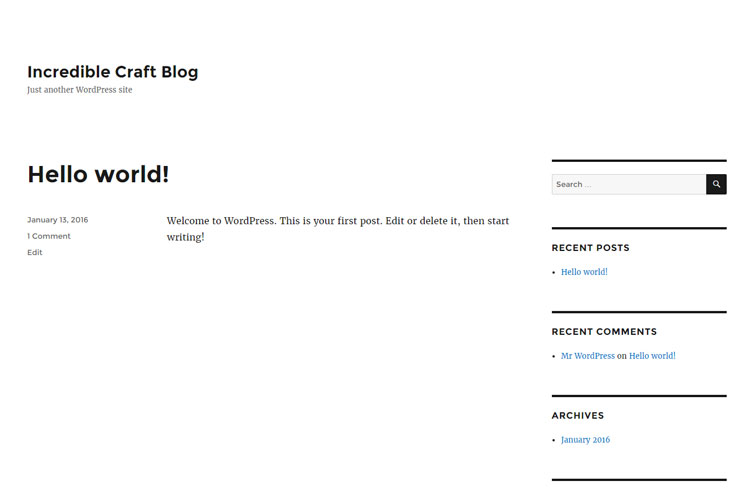
Now when you go back to your website, it will look more like this:
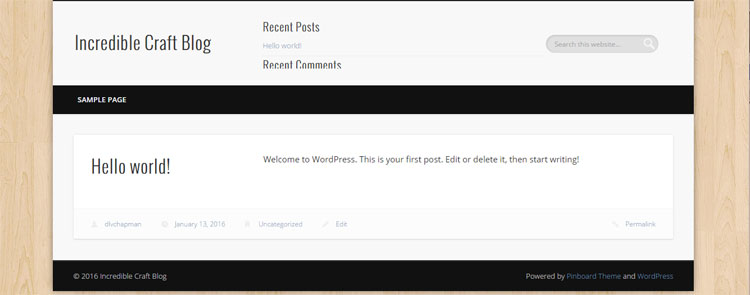
Once it’s installed you can customize it however you like! You can change the background image and all the colours to suit your style. And then you can add your own logo. Once you’ve done that, it’s pretty much ready to go!
You are now officially a blogger! See! I knew you could do it! Now go ahead and get writing! There’s nothing holding you back now!
Return to our homepage.