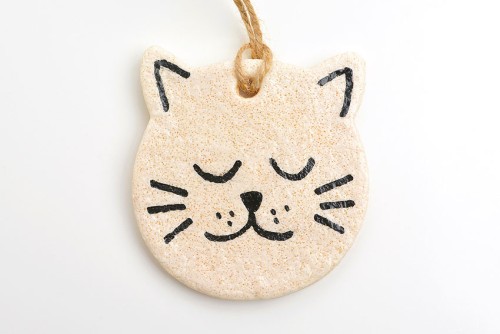
These salt dough cat ornaments are the purr-fect keepsake for the cat lovers in your life. Use water, flour and salt to make this salt dough recipe that works perfectly every time!
Make a cat ornament that looks like your own pet, or create a whole clowder of them (did you know that’s the name for a group of cats?!). These salt dough ornaments are SO EASY and fun to make, and they look paws-itively adorable!

This post contains affiliate links. If you use these links to buy something we may earn a small commission which helps us run this website.
DIY Salt Dough Cat Ornaments
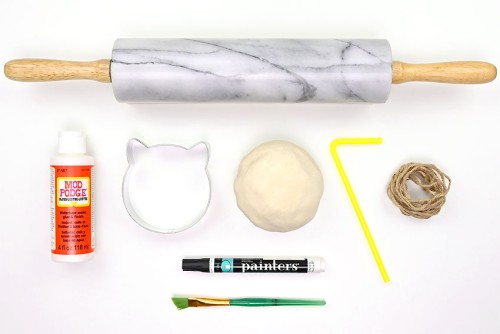
Materials:
- 1 cup All-purpose flour
- 1/2 cup Salt
- 1/2 cup Warm water
- Black paint pen
- Glossy Mod Podge
Equipment:
Watch the step-by-step video tutorial:
Instructions:
Step 1: Find what you need
- Gather your salt dough ingredients and supplies for decorating the ornaments.

Step 2: Make and roll out the salt dough
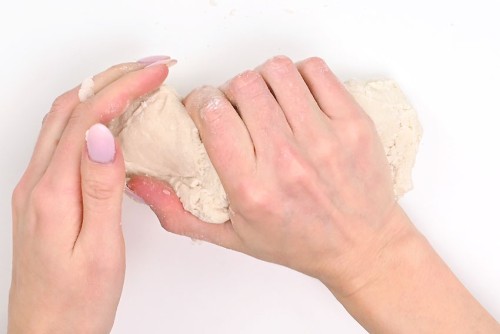
- Microwave the water until warm (about 45 seconds). Then add the warm water, flour, and salt to a mixing bowl.Mix the dough with a spoon until it becomes hard to stir.
- Squeeze the dough with your hands and knead it on a flat surface until you have a nice, soft dough ball.If the dough is too sticky, add more flour 1 teaspoon at a time. If the dough is too dry, add more water 1 teaspoon at a time.
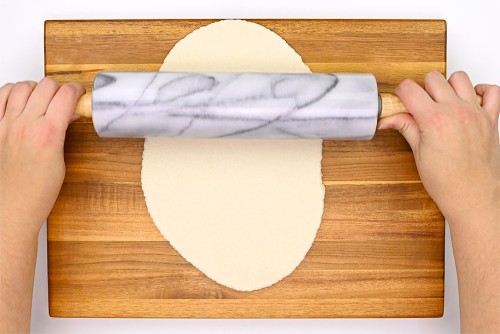
- Sprinkle a little bit of flour onto your surface, then use a rolling pin to roll out the dough to about 1/4 inch thick.

Step 3: Cut out and bake the ornaments
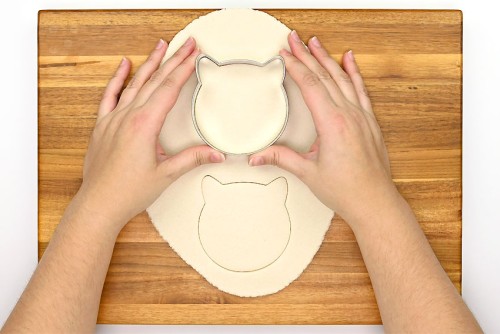
- Press the cat head cookie cutter into the dough.
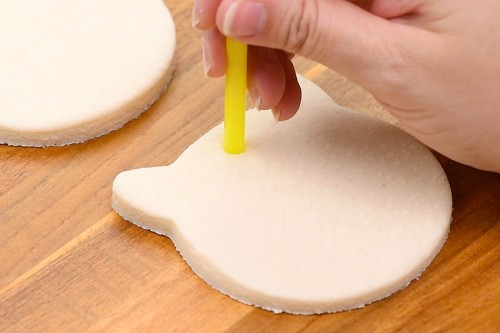
- Remove the dough scraps around the cat heads and push the end of a drinking straw (or the flat end of a wooden skewer) into each shape to make a hole to hang the ornament.

- Place the ornaments on a parchment lined baking sheet. Bake at 225F for 4 – 6 hours or until dry and hard.Flip the salt dough ornaments half way through baking to ensure both sides are dry. Larger or thicker ornaments may take longer to dry.
- Remove the ornaments from the oven and allow to cool.


Step 4: Decorate the salt dough cat ornaments
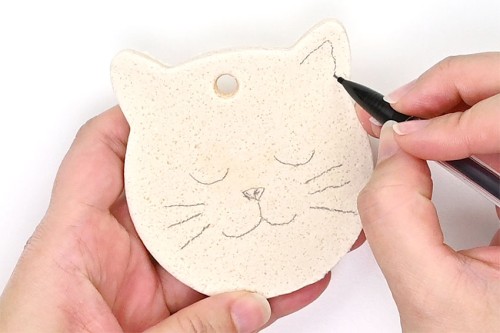
- Use a pencil to sketch out a cat face on your baked salt dough ornament.
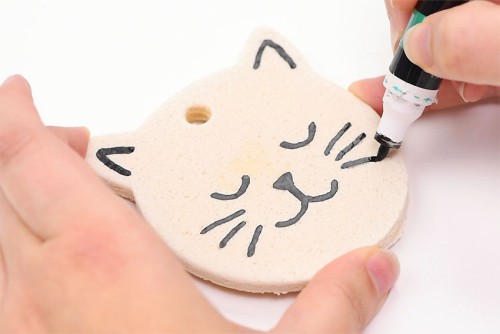
- Use a paint pen to go over the pencil lines. Allow to dry completely.
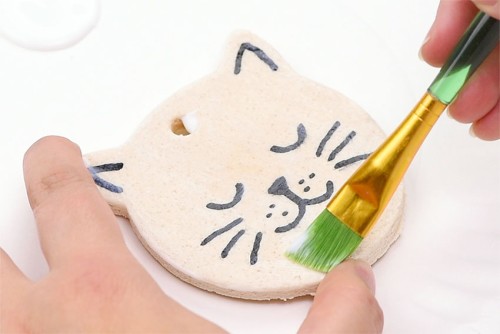
- Brush a thin layer of glossy Mod Podge over the cat face. Allow to dry.You can also seal the back of the ornament with Mod Podge, if you’d like. We chose to only seal the front surface of the cats.
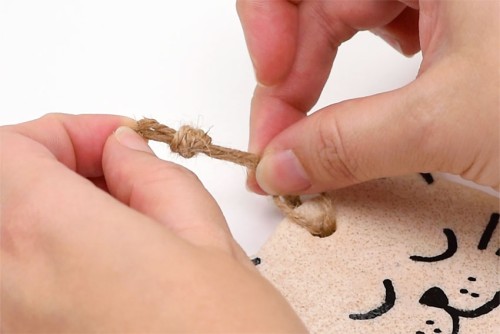
- Cut a piece of twine about 10 inches long and fold it in half. Pull the loop through the hole so it faces the front of the ornament.
- Pull the loose ends of the twine through the front loop and then tie them in a knot.
- Repeat for your remaining ornaments. Try drawing different expressions on each of your cats!Your salt dough cat ornaments are complete!

Helpful Tips:
- Practice drawing your cat faces on paper first, before drawing them onto the ornaments.
- Make sure the paint pen lines are completely dry before adding the Mod Podge. If you don’t, the paint will smudge.

How many cat ornaments does this recipe make?
It will depend on the size of your cat (we used a 4 inch cat cookie cutter) and the thickness of your dough, but we were able to make 6 salt dough cat ornaments from our salt dough recipe.
Do you need to seal these salt dough cat ornaments?
We used glossy Mod Podge on our cat ornaments because we wanted them to have a shiny finish.
Mod Podge also helps protect the paint and keeps moisture out of the salt dough, which helps it to last longer. However, salt dough ornaments will last a long time even without being sealed, so it’s definitely an optional step.

How long do salt dough ornaments last?
Salt dough ornaments will last years, if not decades, especially when they’re properly sealed and stored. If you’d like to keep your salt dough cat ornaments for a long time, be sure to store them in a cool, dark place with low humidity. Wrap them in bubble wrap or paper towel when not in use to keep them from breaking.
What salt is best to use for making salt dough ornaments?
Regular table salt is the best type of salt to use for making salt dough. It’s inexpensive and the small grains mix well with the flour and water.
The finer the grain of salt, the nicer your ornaments will look. Surprisingly, we found the table salt from the dollar store had the finest grain and ended up looking nicer than grocery store table salt.

Why did my salt dough cat ornaments puff up?
Salt dough shouldn’t puff up in the oven, but there are several reasons why this might have happened:
- Your oven was too hot. Every oven is different, so try lowering the temperature to 200F.
- You used self-rising flour. Oops! Definitely only use all-purpose flour.
- You didn’t roll the dough thin enough. Air pockets can form in dough that isn’t rolled thin enough.
- You used the convection setting instead of regular bake. The salt dough should only receive heat from the bottom of the oven, rather than heat blowing from all directions.
 What if I don’t have a cat cookie cutter?
 What if I don’t have a cat cookie cutter?
If you don’t have a cat cookie cutter you can print off a cat shape (google “cat shape”). Then cut it out and place it on top of your rolled salt dough. Use a paring knife to cut around the shape.

Don’t forget to carve or write the year (and the cat’s name!) on the back of your salt dough cat ornaments! These cat ornaments are super cute, and they would also make great magnets if you don’t make an ornament hole.

Here’s even more salt dough craft ideas:

Paw Print Salt Dough Ornaments


Our book Low-Mess Crafts for Kids is loaded with 72 fun and simple craft ideas for kids! The projects are fun, easy and most importantly low-mess, so the clean up is simple!

Where to buy:
You can purchase Low-Mess Crafts for Kids from Amazon, or wherever books are sold:
Amazon | Barnes and Noble | Books-A-Million | Indiebound | Amazon Canada


Leave a Reply