
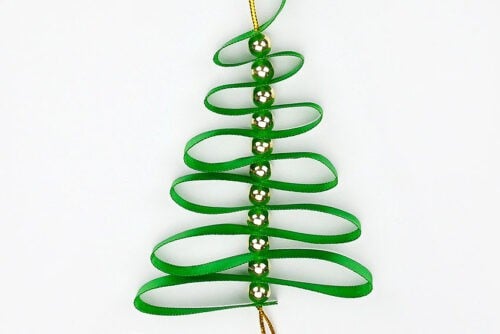
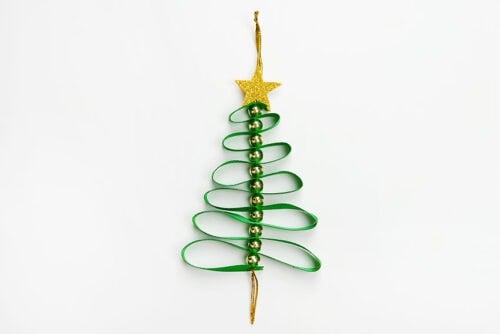
Add a handmade touch to your holiday decor with this simple ribbon Christmas tree ornament! Made with just a few basic supplies — ribbon, beads, and a sparkly star — it’s a fun and easy DIY that looks beautiful hanging on the tree.
This little ribbon Christmas tree has that perfect homemade charm. The loops of festive ribbon give it a lovely layered shape, and the metallic beads add just the right amount of Christmas sparkle. Whether you’re crafting with the kids or adding a personal touch to your gifts, this easy ornament is sure to bring holiday cheer to your home.

This post contains affiliate links. If you use these links to buy something, we may earn a small commission at no extra cost to you. This helps support our website and allows us to keep creating fun, free content.
How to Make a Ribbon Christmas Tree Ornament
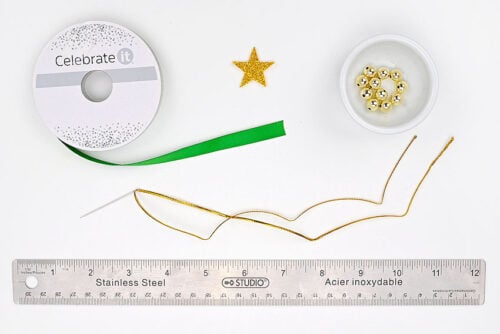
Materials:
Equipment:
Instructions:
Step 1: Find what you need
- Gather your supplies and materials.

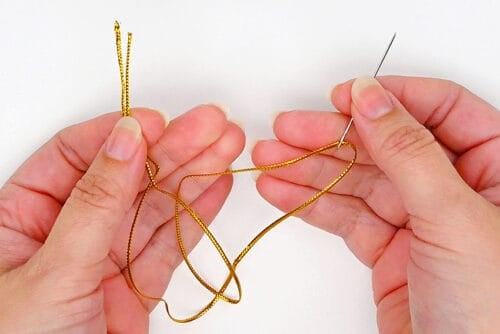
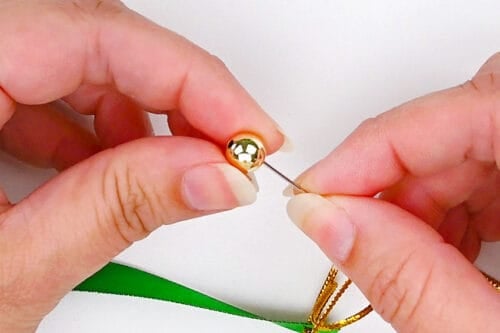
Step 2: Connect the cord and ribbon
- Cut an 18 inch piece of gold cord and thread it onto a needle.
- Line up the ends of the cord and tie a knot, leaving about 1 inch free below the knot.
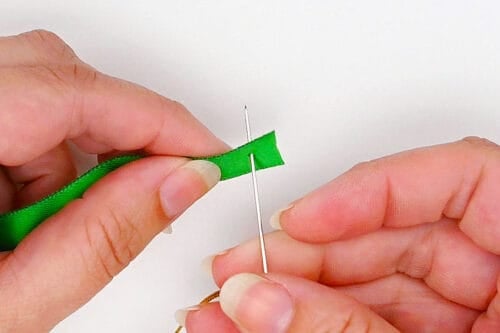
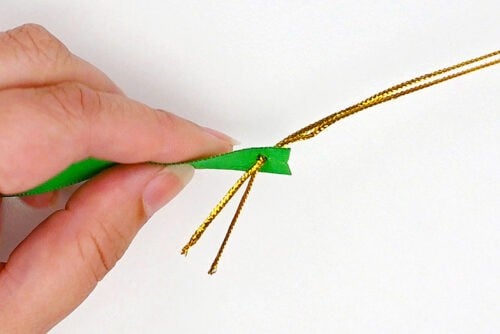
- Push the needle through the end of the 3/8 inch wide green ribbon (you can leave this ribbon attached to the spool). The ribbon should be going out to the left.

- Pull the needle and cord all the way through, so the ribbon sits against the knot.

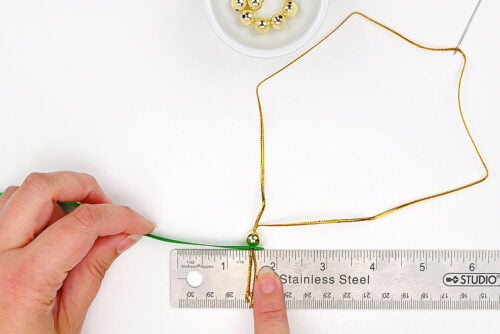
Step 3: Create the Christmas tree shape
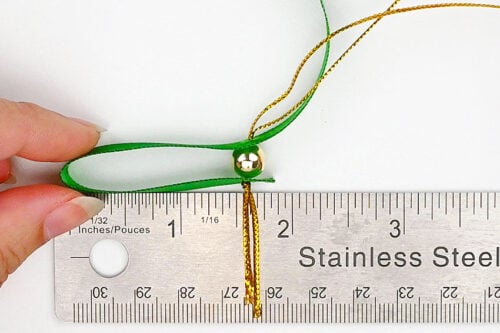
- Add a bead onto the needle, pushing it down next to the green ribbon.
- Grab a ruler and line it up so the bead (and cord end) are at the 1-3/4 inch mark.
- Fold the green ribbon over at the zero mark, bringing it to the center and creating a 1-3/4 inch section.
- Then push the needle up through the green ribbon right above the bead.
- Pull the needle and cord up all the way.
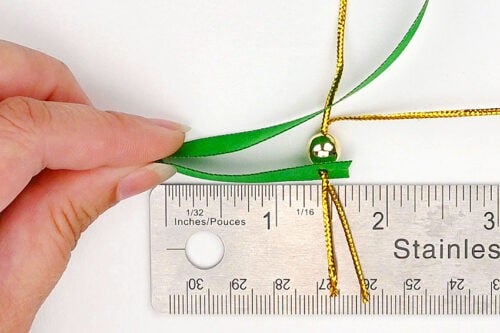
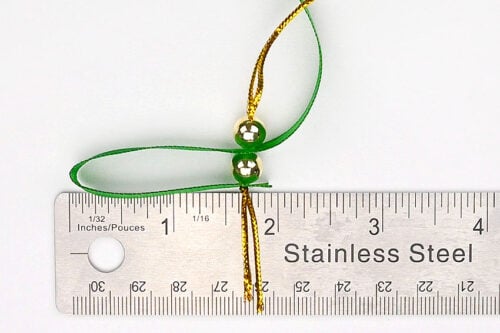
- Then add another bead onto the needle, once again pushing it down next to the ribbon.
- Bring the bead to the zero mark on the ruler and measure the green ribbon out 1-1/2 inches to the right (1/4 inch smaller than the first fold).
- Put the needle through the ribbon right above the bead, creating the second branch section.
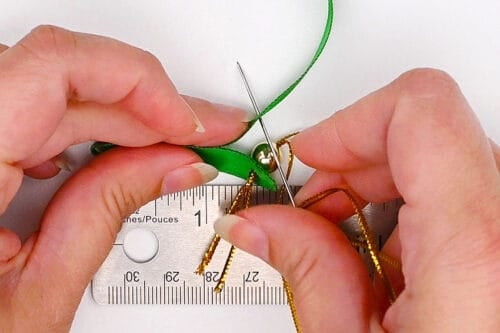
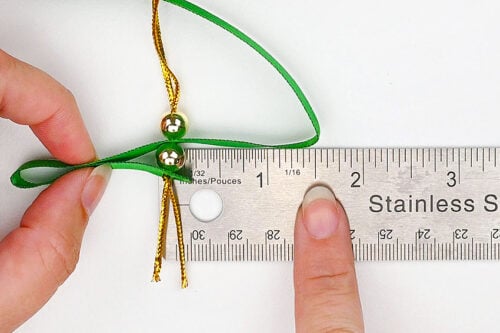
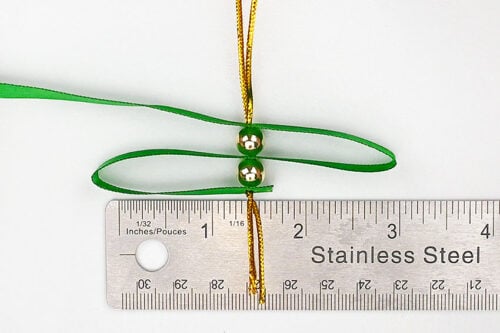
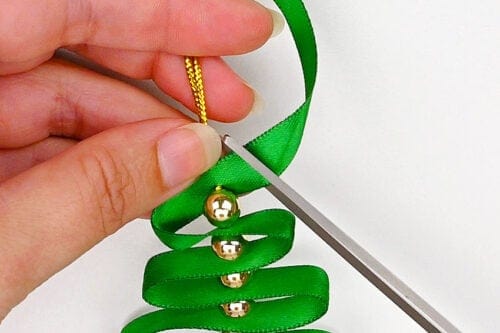
- Repeat these steps until you have 11 beads on the tree, making each fold 1/4 inch shorter than the previous one.End with plain cord at the top (the last bead should be below a layer of green ribbon).
- Cut off the green ribbon 1/4 inch to the right of the cord and bead.
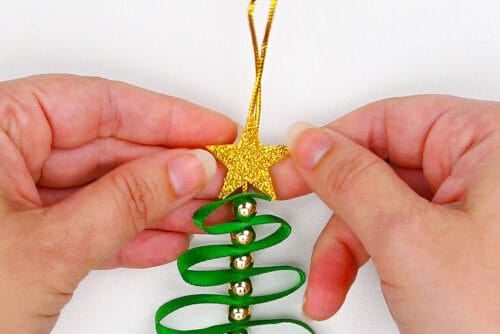
Step 4: Add a tree topper
- Add a star sticker to the top of the tree. To do this, pull up the backing from one side of the sticker and slide the cord in-between the backing and sticker.Once the star is centered, push the backing back against the sticker. This keeps the star in place without stickiness showing.
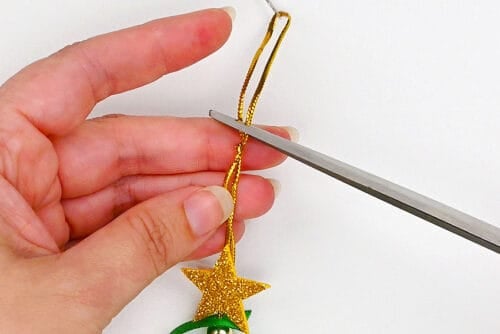
- Make a knot in the cord, creating an ornament hanger. Then cut the cord off the needle, just above the knot.
- Your ribbon Christmas tree ornament is complete!
Helpful Tips:
- Flatten the layers gently: Before you thread your needle through, press the ribbon lightly at the side to help the folds stay in place.
- Keep the ribbon attached to the spool: This way you’ll always use just the right amount of ribbon for the branches.

What type of cord works best for the center of this ribbon Christmas tree?
You’ll want something thin, smooth, and strong. It needs to fit through the beads, pass through the ribbon, and fit in the eye of a needle.
Metallic embroidery floss, waxed cotton cord, or nylon beading cord are all great choices. Avoid regular sewing thread, which can snap under tension, and thick string, which may not fit through smaller bead holes.
A beading or embroidery needle makes threading much easier, but don’t use one with too large an eye, since it needs to pass through the other ribbon.

What ribbon is best for making this Christmas tree ornament?
Satin ribbon is the most classic choice because it’s smooth, soft, and folds nicely into the layered “tree” shape. But you can also use:
- Grosgrain ribbon: for a slightly stiffer, more structured look.
- Wired ribbon: which will hold its shape especially well.
- Sheer or organza ribbon: for a lighter, more ethereal look.

What are the best beads for making this Christmas tree ornament?
We used 8mm metallic round beads. They give a bit of glitz and glam that matches well with the glitter star.
But you can also use different beads to take the ornament in whatever direction you’d like! Try to stick to 8mm beads if you’re using 3/8 inch ribbon, but otherwise the choice is yours completely!
Faceted beads catch the light beautifully, while pearl beads add elegance. Wood beads will give the ornament a cozy, rustic look, and you can even mix and match bead types for extra texture. Just ensure that the beads you choose will fit over your cord and needle.

There’s something so special about creating ornaments by hand! Each one becomes a tiny keepsake filled with holiday memories. This ribbon Christmas tree ornament might be simple to make, but it captures the magic of the season beautifully.
Hang this DIY ornament on your tree, tie it to a gift, or share it with someone special. It’s full of homemade charm and is a heartfelt reminder that the best holiday decor comes straight from the heart — with plenty of Christmas spirit woven in.
Here’s even more DIY Christmas ornament ideas:


Now available
Low-Mess Crafts for Kids Book
72 cute and fun crafts that kids and parents alike can enjoy. All with as little mess as possible!
Where to buy:
You can purchase Low-Mess Crafts for Kids from Amazon, or wherever books are sold:
Amazon | Barnes and Noble | Books-A-Million | Indiebound | Amazon Canada


Leave a Reply