

This pom pom cat craft is almost too cute to handle! With its fluffy yarn body, tiny felt ears, and sweet little face, it’s amazing how a few simple pom poms can transform into an adorable kitten. The soft texture and round shape make these cats extra cuddly and fun to display.
This easy and satisfying cat craft is perfect for kids and adults alike. Using basic supplies like yarn and a pom pom maker, you can create your own cute cat in any colour you like. Whether you’re making one as a gift for the cat lover in your life, or creating a whole cat army for your shelves, these pom pom cats are a fun way to get creative and make something irresistibly cute!

This post contains affiliate links. If you use these links to buy something, we may earn a small commission at no extra cost to you. This helps support our website and allows us to keep creating fun, free content.
How to Make a Pom Pom Cat
Materials:
- Worsted weight yarn (white and grey, or other cat colours)
- Felt (grey, or matching cat colour)
- Cat safety eyes (12mm)
- Pom poms (small pink, 2 sizes of white)
- Fishing line
- White paint pen
Equipment:
- Pom Pom maker (2-1/2 inches)
See the craft in action:
Instructions:
Step 1: Find what you need
- Gather your supplies and materials.


Step 2: Make the body and head pom poms
- Wrap 1/2 of one half of a 2-1/2 inch pom pom maker with white yarn.
- Wrap the rest of this half with grey yarn. Cut off both yarns and tuck the ends in.

- Use grey yarn to fill the other half of the pom pom maker. Cut off the yarn and close the pom pom maker.
- Slide sharp scissors into the gap between the two sides of the pom pom maker and cut through the middle of the yarn.
- Cut a 12 inch piece of grey yarn and insert it into the center of the pom pom maker (where you just cut). Wrap it around the maker and secure it with a double knot.
- Unlatch the maker and remove the pom pom.
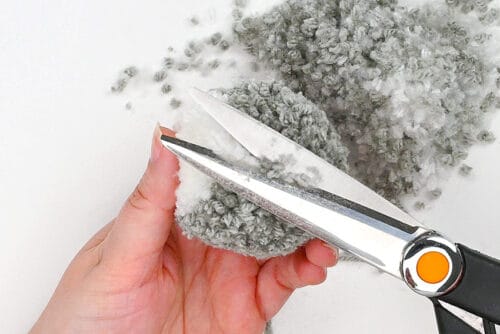
- Use sharp scissors to give the pom pom a “haircut”, trimming it down into a ball shape.
- Make a second pom pom on the same size of pom pom maker using only grey yarn on both halves.
- Trim this pom pom to an even smaller ball.


Step 3: Make the tail and ears
- To make the small pom poms for the cat’s tail we’re going to use a fork! Begin by cutting a 12 inch piece of grey yarn and sliding it through the center of the fork tines.
- Wrap grey yarn around the fork about 20 times and then cut it off from the ball.
- Tie the first piece of yarn around the wrapped yarn and make a double knot. Slide the bundle off the fork.
- Repeat, making 5 more small bundles.
- Set one yarn bundle on top of another and use the long tails to tie them together.
- Repeat, attaching one bundle after another until you have a stack of yarn.
- Cut through the center of each pom pom piece.
- Then trim the long pom pom down until it looks like a fluffy cat tail.
- Cut 2 cats ears from grey felt. We recommend stacking 2 pieces of felt together when you cut them so they end up the exact same size and shape.(You can draw the ear with a gel pen or tailor’s chalk first, before cutting, if you’d like.)


Step 4: Assemble the cat
- Here are all the pieces you’ll need to make your cat. In addition to the ears, and the pom poms you’ve made, you’ll also need safety eyes and various sizes of craft pom poms.
- Add hot glue to the top of the body pom pom. Attach the grey head pom pom to it.
- Hold the tail so that it wraps around the back of the cat and see where you’d like to place it. Add a dot of glue where the base of the tail will sit (probably a bit off-center).
- Attach the tail in place and add more glue along it if you’d like the tail to stay curled around the body.Hold the tail until the glue dries.
- Separate the yarn on the top of the cat’s head, making little “trenches” where the ears will go. Glue them in place.
- Then glue two 1 inch white craft pom poms to the front base of the cat for its feet. Place them while the cat is “sitting” so they’ll be properly in place.
- Glue together two 1/2 inch white craft pom poms. Then attach them to the cat’s face, creating its muzzle (or cheeks).
- Cut an 8mm pink pom pom into a triangle shape and glue it between the “cheeks” for the cat’s nose.
- Glue cats eye safety eyes in place.
- Then cut a 2 inch piece of fishing line. Place it on a piece of paper and use a white paint marker to colour it, creating white whiskers.
- Cut 6 smaller sections of the fishing line and poke 3 into either side of the muzzle.(You may want to add a dot of tacky glue to the end of each whisker before poking them in, so they’ll stay in place.)
- Your pom pom cat is complete!


Helpful Tips:
- Don’t have a pom pom maker? You can also make pom poms just using your hand! Check out our how to make a pom pom tutorial for more information.
- Want to make a striped or speckled cat? Check out our pom pom bees and pom pom hedgehog tutorials for details on how to make different types of multi-coloured pom poms!

What can I use as eyes for my pom pom cat?
We used cat safety eyes for our kitties. The larger eyes are 12 mm and smaller ones are 10 mm. You can also use regular black safety eyes or flatback doll’s eyes for your cats.
Other items that work well for eyes include:
- Googly eyes
- Black beads
- Embroidered felt
- Buttons

Do I have to glue the pom pom cat together?
Some glue is recommended, especially for attaching the nose and cheeks. But you can also keep the long tying strings on your pom poms and use those to connect the pieces of the cat together.
Check out our pom pom otter tutorial for how to use the yarn itself to put the cat together.

What scissors are best for making a pom pom cat?
We highly recommend using sharp sewing scissors. They’re a must for making pom poms, in our opinion, as they cut through the many layers of yarn easily.
Regular scissors will work, but it’s a lot harder to use them, and they tend to leave the ends of the yarn looking frayed instead of crisp.

Making these pom pom cats is such a fun way to build your crafting skills while creating something truly adorable. From shaping the pom poms to adding the tiny details, it’s exciting to watch your little cat come to life with each step. It’s the kind of project that feels creative and rewarding without being overly complicated.
These fluffy cats are also perfect for personalizing. Try different colour combinations, expressions, or even accessories to give each one its own unique look. Whether you’re crafting solo or with kids, this is a project that’s just as enjoyable to make as it is to display!
Here’s even more cat craft ideas:


Now available
Low-Mess Crafts for Kids Book
72 cute and fun crafts that kids and parents alike can enjoy. All with as little mess as possible!
Where to buy:
You can purchase Low-Mess Crafts for Kids from Amazon, or wherever books are sold:
Amazon | Barnes and Noble | Books-A-Million | Indiebound | Amazon Canada


Leave a Reply