
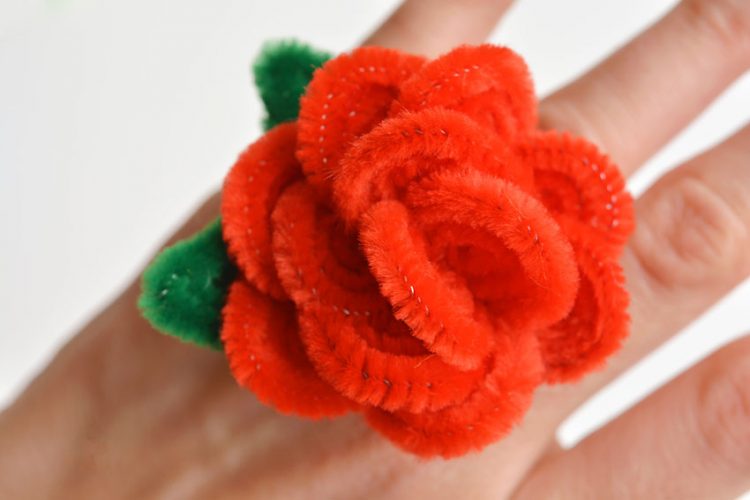
Why buy flowers when you can make a gorgeous pipe cleaner rose that’ll never wilt? This stunning handmade rose has full spiral petals, a leafy green stem, and a surprisingly realistic look — all made from just pipe cleaners, wire, and floral tape. Whether you pop it in a vase, gift it to someone special, or add it to a DIY bouquet, this charming craft is a guaranteed conversation starter.
Making your own pipe cleaner roses is easier than you might think — and it’s seriously fun. You’ll twist, shape, and flatten each petal before building your rose one layer at a time, watching it bloom right in your hands. It’s a relaxing, creative project that’s perfect for older kids, teens, or adults who want a beautiful result they can proudly display.

This post contains affiliate links. If you use these links to buy something, we may earn a small commission at no extra cost to you. This helps support our website and allows us to keep creating fun, free content.
How to Make a Pipe Cleaner Rose
Materials:
- Pipe cleaners (pink & green)
- 12 gauge Wire
- Floral tape
Equipment:
Instructions:
Step 1: Find what you need
- Gather your supplies and materials.


Step 2: Make the large petals
- Connect 3 pipe cleaners, creating 1 long pipe cleaner. Whatever colour you choose will be the colour of your flower (we recommend pink or red).
- Fold the pipe cleaner back on itself about 2-1/2 inches from the end.
- Then curve the pipe cleaner behind itself, leaving 1/2 inch sticking out at the top.
- Continue curving the pipe cleaner around itself, forming an oval spiral.
- When you run out of pipe cleaner, fold the 1/2 inch at the top down to secure that side.
- Then with the end of the pipe cleaner (the part you’ve been wrapping), push it through the center of the oval.Arrange the pipe cleaner so it’s sitting neatly (not too loose and not pulling on the shape, either) and then — if there’s enough left over — fold it back over to the bottom front.

- Optional: Use a hair straightening iron to flatten the petal. Be careful not to leave the iron on one section of the pipe cleaner too long or it could burn.

- Repeat, making 4 more large petals (for a total of 5).


Step 3: Make medium sized petals
- To make a medium sized pipe cleaner, connect 2 pipe cleaners together.
- Repeat the same steps you used for the large petals to make a medium petal. Begin by folding the pipe cleaner back on itself 2 inches from the end, this time.Curve the pipe cleaner around, leaving just over 1/4 inch sticking out at the top. Continue curving the pipe cleaner around itself and secure both ends.
- Flat iron this petal as well, and repeat 4 times, for a total of 5 medium petals.


Step 4: Make the small petals
- For a small petal you’ll only need 1 pipe cleaner.
- Begin by folding the pipe cleaner back on itself about 1-1/2 inches from the end. And then follow the same process to make a small petal.
- Flat iron the petal and repeat 2 times, for a total of 3 small petals.


Step 5: Fold the leaves
- To make a leaf you’ll need 1 green pipe cleaner.
- Fold the pipe cleaner in half, and then twist the pipe cleaner together a couple of times, about 1-1/2 inches from the fold.
- Bend the ends of the pipe cleaner back towards the fold and then open up the folded end.
- Slide one end through the gap and pull it taut.
- Then gather the ends together and twist them twice.
- Bend the ends back in the opposite direction and twist them together at the base, creating the first leaf.
- Flat iron the leaf, and repeat, making 2 more leaves (for a total of 3).


Step 6: Form the sepal
- For the sepal you’ll need 1 green pipe cleaner for each section. Begin by folding one of them in half.
- Bend each end down gently, about 1-1/2 inches from the center, creating rounded folds.
- Then bend the ends back up, making the bottom points even with the center.
- Twist each folded section (“point”) together a couple times at the base (the side where the ends are), and then twist the ends around each other to secure them.
- Flatten with the hair straightener and repeat, making a second one.


Step 7: Put the leaves together
- Cut a 5 inch piece of 16 gauge gardening or craft wire.
- Add a line of hot glue to the “stem” of one leaf.
- Then press the end of the wire into the glue.
- Next, glue the two remaining petals together, so they point to the left and right.
- Attach these leaves to the wire below the first one. Then wrap the wire with green floral tape. (You can secure each end with glue if it doesn’t stick well on its own.)


Step 8: Assemble the flower
- Cut a 12 inch piece of wire for the flower’s stem.
- Curve each of the small petals around your finger, and push the top of the petal back slightly.
- Add a line of hot glue along the side of one petal. Press a second petal into the glue, connecting them.Then add glue to the center of this petal, and press the end of the wire into it. Finally, attach the third petal so they surround the wire.
- Curve each of the medium sized petals in the same way. Then add a dot of glue to bottom center of one of the petals.
- Attach the medium petal to a small petal, lining up the bottom sections.
- Repeat, attaching the medium petals around the flower, overlapping them a bit and spacing them evenly.
- Next, curve all of the large petals. Add glue to the bottom of one and attach it to a medium petal.
- Repeat, attaching all the large petals evenly around the medium ones.


Step 9: Add the sepal and stem details
- Add hot glue around the base of the flower and onto the wire. Place the sepal pieces into the glue, with the “stems” meeting the stem of the flower.
- Attach a pipe cleaner to the base of the wire stem (near the sepal stems) with hot glue and begin wrapping it around.Stop when there’s a bit less than 1/2 the pipe cleaner remaining.
- Bend the wire of the leaves back slightly and add a bit of glue below the curve. Attach the leaves to the wire stem.
- Continue wrapping the pipe cleaner around both stems.
- Then wrap the whole stem (including the pipe cleaner covered part) in floral tape.(Again, attach each end with a dot of glue if it won’t stay in place on its own.)
- Your pipe cleaner rose is complete!
- Now have fun making a whole bouquet of flowers you never have to water!


Helpful Tips:
- Flatten the petals for a more realistic look, but be careful — the pipe cleaner wire can get very hot! Flat irons heat differently, so yours may get hotter than ours. Avoid burning the petals or your fingers.
- Curve each petal gently before gluing to make the flower easier to assemble and give it a more even, natural shape.

Do I need a hair straightener to make a pipe cleaner rose?
A hair flat iron helps flatten and smooth the pipe cleaners so the petals look more realistic, with less fuzz and a crisper shape. It’s not essential, but it gives the rose a more polished finish.
If you don’t have a hair straightener, you can:
- Use the low setting on a clothes iron with a protective cloth or parchment paper between the iron and pipe cleaner pieces.
- Press the petals between the pages of a heavy book. They won’t be as flat, but this still works to an extent.
- Gently press and shape them by hand. They won’t be as smooth, but they’ll still look great!
Remember: flat irons can get very hot, and the wire inside pipe cleaners heats up quickly, so handle with care.

What size of pipe cleaner works best for this pipe cleaner rose tutorial?
For these pipe cleaner roses, we used standard 6 mm thick, 12 inch long pipe cleaners. They’re flexible and easy to fold, but they hold their shape well.
You can also find pipe cleaners in different lengths and thicknesses. 4mm thick pipe cleaners would be ideal for making smaller roses, especially if you cut the length shorter, while 15 mm pipe cleaners would make fuller petals.
Longer pipe cleaners are ideal for making jumbo roses. And if you don’t already have the supplies, you can purchase pipe cleaner flower kits online.

What kind of wire should I use for the stem of my DIY pipe cleaner rose?
We used thick wire from our local dollar store for our pipe cleaner flower. A sturdy 12 to 16 gauge floral or craft wire will also work to support the flower, and they can even be bought pre-cut as floral stems.
If you only have thinner wire, use multiple strands together to create a single stem, giving it extra thickness and strength.
Do I need to use hot glue to assemble my rose pipe cleaner flower?
Hot glue allows for fast assembly of pipe cleaner roses, because it dries quickly and has a strong hold. We like using a low-temp glue gun for this project.
But if you don’t have a glue gun, tacky glue will also work for this craft. It will, however, longer to dry, so you’ll need to work more slowly and hold the petals until they stay in place on their own.

This DIY pipe cleaner rose is such a fun way to craft a forever flower! With individually shaped petals and lots of texture, it’s a beautiful and satisfying project from start to finish. Whether you’re making one for a friend or keeping it for yourself, this fuzzy little rose will never fade.
Here’s even more DIY flower craft ideas:


Now available
Low-Mess Crafts for Kids Book
72 cute and fun crafts that kids and parents alike can enjoy. All with as little mess as possible!
Where to buy:
You can purchase Low-Mess Crafts for Kids from Amazon, or wherever books are sold:
Amazon | Barnes and Noble | Books-A-Million | Indiebound | Amazon Canada


Leave a Reply