Puffy paint is so easy to make and it’s SO MUCH FUN to paint with! It has the coolest, puffy texture that really pops off the page!
RELATED: String Painting

Puffy Paint
All you need is 3 simple ingredients – shaving cream, white glue and food colouring. And in less than 5 minutes you can make super fun, super simple diy puffy paint!
Now that the girls are home for the summer, we’ve been on the hunt for fun and easy crafts to help fill the long summer days. And homemade puffy paint was such a fun experiment for us to try. It ended up with the coolest texture!
In my opinion, this stuff is fool proof. Even if you don’t measure the exact amounts when you make it, you still end up with a really neat 3 dimensional texture!
Check out our video on How to Make Puffy Paint:
*Note: Scroll down for the step-by-step photo tutorial.
Here’s even more fun things you can make with shaving cream:
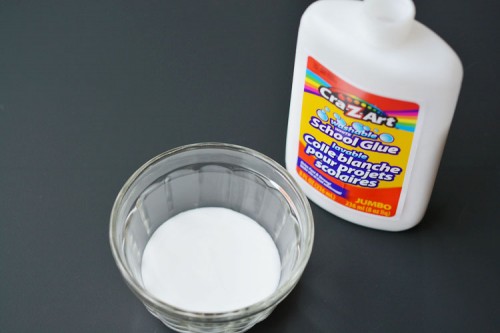
Puffy Paint Ingredients:
The affiliate links below will take you to products on Amazon that are similar to the supplies we used to make this craft. I love that you only need 3 simple ingredients:
I used Barbasol shaving cream from the dollar store, but I’m sure any type would work. And I bought a big bottle of generic white glue from Walmart.

How do you make puffy paint?
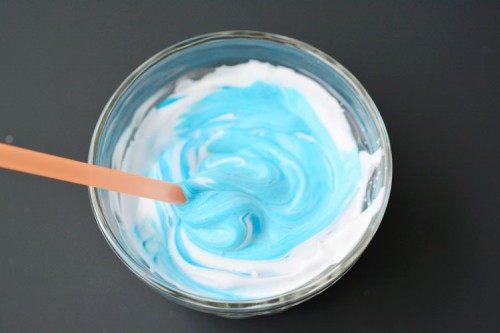
Mix equal amounts of shaving cream and white glue until you have the texture you want. (You can Jump to Recipe at the bottom for the printable recipe.)
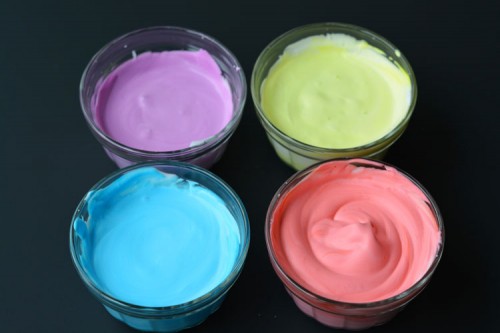
Since I wanted to make a rainbow, we made lots of colours and even made a bowl of plain white for the puffy clouds. As far as painted clouds go, you really can’t get a better cloud texture than this!

What does it look like when it dries?
The puffy paint will loose some of it’s height when it dries, but you’re still left with a super fun 3D texture. And then when it dried, the colours got way darker.
After it dried, the girls kept wanting to poke it with their fingers to feel the texture. None of us could resist the cool foaminess!

How long does DIY puffy paint last?
Homemade puffy paint should be used the same day you make it. Shaving cream loses it’s puffy texture by the next day so if you store it, you’ll basically be left with runny glue.
How long do the paintings made with DIY puffy paint last?
Your paintings should stay pretty fluffy for about a day. After the paintings dry completely, they start to flatten out a little.
Our paintings still had a really fun puffy texture 3 days later, but they weren’t popping off the page as much as on the first day.

Want 4 weeks of easy summer activities already planned?
Our 4-Week Summer Boredom Buster Plan gives you 28 simple crafts, sensory play ideas, outdoor activities, printable challenges, supply lists, and quick backup ideas, all chosen, organized, and ready to use.
See the Summer Boredom Buster Plan
Puffy Paint Recipe
This homemade puffy paint was such a fun and simple craft for the kids to do! With three simple ingredients, you can keep them entertained for hours!
How to Make Puffy Paint
Materials:
- 1/4 cup White glue (any brand)
- 1/4 cup Shaving cream (approximately)
- food coloring
Equipment:
- Straw or popsicle stick
See the craft in action:
Instructions:
- Pour approximately 1/4 cup of white glue into a small bowl or container.
- Add an equal amount of shaving cream to the bowl. Just guess with the amount rather than measuring exactly. It will still work.

- Add a few drops of food colouring to the mixture. Keep in mind, that as the puffy paint dries, the colour will get darker, so don’t be too worried if it looks too light at this point. I added about 10 to 15 drops of food colouring into each of our colours.

- I really didn’t want this stuff on our kitchen spoons, so I used straws to stir them all up. A stir stick or popsicle stick would work well too.
- Repeat the process for as many colours as you’d like. I’m not sure what I did differently to the pink puffy paint below, but it looks like it has a better texture compared to the others. I think it had more glue in it?
- Use a regular paint brush to add paint onto a piece of printer paper. You’ll need to add a generous amount of puffy paint to your brush and “dab” rather than “spread”.
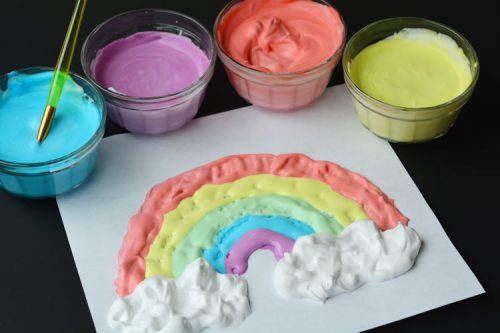

Seriously though, aren’t those clouds amazing?!
After we finished the rainbows, we painted a bunch of balloons.

I started by drawing the strings with black pen, and then generously dolloped a big circle of paint on the end of each string to make the balloons.

When it dried, it had the coolest spongy texture.
This is what it looked like a couple hours later. Still lots of depth!

My girls loved it. They loved mixing all the colours and experimenting with how it looked on different colours of construction paper. The effect was pretty cool on black paper!


I’m definitely going to try adding more glue the next time I make this paint. I’m really curious to see how it changes the texture!
This post was originally published on July 15, 2015.

Here are even more shaving cream activities to try:

Shaving Cream Rain Cloud Experiment


Our book Low-Mess Crafts for Kids is loaded with 72 fun and simple craft ideas for kids! The projects are fun, easy and most importantly low-mess, so the clean up is simple!

Where to buy:
You can purchase Low-Mess Crafts for Kids from Amazon, or wherever books are sold:
Amazon | Barnes and Noble | Books- A- Million | Indiebound | Indigo | Amazon Canada


Leave a Reply