A ghost in a jar is such a cute and easy Halloween craft! Have fun using simple supplies to create an eerie floating ghost. And as a fun surprise, this clay ghost glows in the dark!!
Have you ever wanted a pet ghost?! This fun and unique Halloween decoration is the perfect mix of cute and spooky! So plan a fun crafter-noon and get ready to make your own ghost in the jar.

This post contains affiliate links. If you use these links to buy something we may earn a small commission which helps us run this website.
How to Make a Ghost in a Jar
Materials:
- Glow in the dark polymer clay
- Black polymer clay
- Felt (black and orange)
- Moss
- Mason jar(s)
- Polyester fiber fill (or cotton balls)
- Fishing line (or clear jewelry cord)
- Pony bead (or other bead type)
Equipment:
- Painter’s tape (or regular tape)
Watch the step-by-step video tutorial:
Instructions:
Step 1: Find what you need
- Gather your supplies and materials.


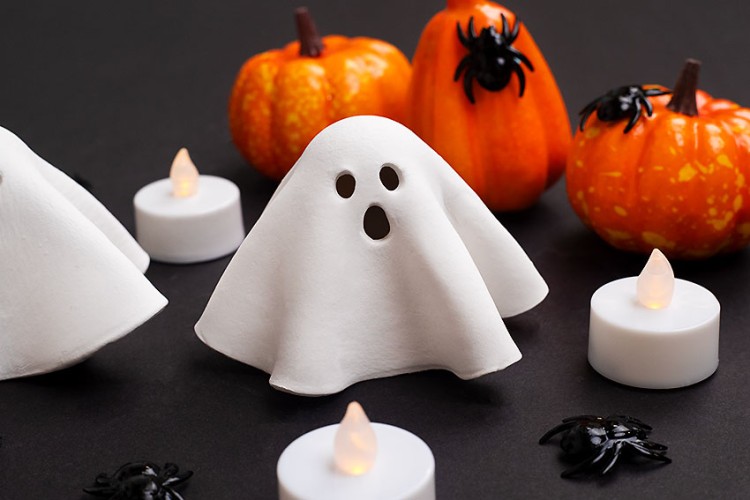
Step 2: Form the ghost shape
- Begin with 1 ounce (half of a package) of glow in the dark polymer clay.Work on a clean surface, such as a baking sheet, piece of acrylic, or parchment paper on top of a silicone mat.

- Condition the clay with your hands, kneading it, rolling it, and squishing it until it’s soft enough to work with easily.
- Use a clay roller to roll out the clay to about 1/4 inch. Try to form a circle as you flatten it.
- Lift up the clay and use your fingers to pinch the sides of the circle, flattening the edges a bit more than the center.
- Begin to bend the edges of the clay slightly, creating ruffles along the outside.
- Push the center of the clay up, forming the draped ghost shape. Adjust the edges until you’re happy with the ruffles and folds.If your ghost doesn’t stay standing on its own you can drape it over a ball of tin foil.At this point, make sure your ghost will fit in your jar and adjust if needed.


Step 3: Add the eyes and bake the clay ghost
- Condition a small piece of black clay. Break it into 2 even pieces and roll each of them between your fingers to form balls.
- Press one of the balls onto the front of the ghost, flattening it a bit to make one of the ghost’s eyes.
- Repeat, adding the second eye.
- Use a nail or another pointed item, like a wooden skewer, to poke a small hole in the top of the ghost’s head (large enough for fishing line to go through).
- Place the ghost on a parchment lined baking sheet and bake in the oven according to package directions.(Our clay recommends 275F for 15 minutes per 1/4 inch thickness.)Allow to cool.


Step 4: Create a mossy base for the jar
- Place the snap lid from the mason jar on a piece of black felt. Use it as a guide to cut out a circle.(You can also trace the lid first with chalk or a gel pen.)Then use the same technique to cut an orange (or another colour) circle of felt.
- Add lines of hot glue to the felt.
- Press moss into the glue, creating a mossy carpet base.
- Grab a bit of poly-fill stuffing. Break it apart into wisps and place it on top of the moss.
- Add the moss covered felt into the mason jar.You can use a skewer or spoon handle to push it flat to the bottom, if needed.


Step 5: Add a hanger to the ghost
- Cut a 6 inch piece of fishing line.
- Thread a clear pony bead (or another type of bead) onto the fishing line and tie it in place on one end.
- Thread the fishing line up through the hole in the ghost, from the inside. The bead will keep the fishing line in place.


Step 6: Place the ghost in the jar and close it off
- Use a hammer and nail to make a hole in the center of the mason jar snap lid.
- Thread the fishing line up through the bottom of the lid.
- Lower the ghost into the jar and place the lid on it.Adjust the height of the ghost so it’s floating in the center of the jar.
- Cut off the excess fishing line and secure the end in place on the lid using tape.This allows you to remove the fishing line later and adjust the ghost’s height.
- Place the orange felt circle on top of the snap lid.
- Secure the lid and felt in place with the mason jar ring.
- Your ghost in a jar is complete!
- Now have fun making more pet ghosts and watching them glow in the dark!(Hint: use a UV light to super charge the ghosts before turning off the lights.)


Helpful Tips:
- Wrap twine around the neck of the jar and attach a label with a fun Halloween message, such as “BOO!” or “Open With Caution!”.
- You can also paint or draw a face on the ghost after it’s baked. Use a Sharpie, a paint pen, or acrylic paint.

What size jar is needed to make a ghost in a jar?
We used 16 ounce (2 cup) mason jars to make our pet ghosts. You can also use a smaller jar if you want to make a smaller ghost (ours are about 2 inches tall).
Jars with cork stoppers look really adorable for this craft! You might also be able to find plastic cloche domes at the dollar store, for a different and dramatic look.
Whichever type of jar you choose, make sure the opening is large enough. You need to fit your ghost in, and be able to reach in and add the decorations.

What type of clay do you use to make a pet ghost?
We made our ghost in a jar with glow in the dark polymer clay. If you can’t find this, you can use regular white polymer clay.
You can also make a ghost from air dry clay. Air dry clay is a bit more fragile than polymer, though, so you may want to set the ghost in the bottom of the jar instead of having it hang.
Or, if you don’t want to use clay to make your ghost, try making a cheesecloth ghost! You can also make a flat ghost by shaping hot glue on parchment paper.

How can I decorate my ghost in a jar?
We had fun creating different accessories and personalities for our ghosts. One of them has a twig wand and is carrying a tiny potion bottle (a jar of glitter). Another is carrying a crystal ball (a marble)!
You can also create a tiny pumpkin or witch’s hat from polymer clay. Cardstock would also work to create the hat.
And make sure to decorate the jar itself! We created an eerie ambience with moss and poly-fil stuffing, but you can also use cotton balls.
Or add more set details, like plastic spiders or little tombstones made from polymer clay or craft foam. The possibilities are only limited to your imagination!


This ghost in a jar is super cute and so fun to make. After all, what says Halloween more than a (not so) spooky spirit trapped in a jar?!
Make sure to keep your little pet ghost contained so he can’t get into any mischief! (But if he’s good you should definitely let him out on Halloween as a special treat!)

Here’s even more Halloween craft ideas:


Our book Low-Mess Crafts for Kids is loaded with 72 fun and simple craft ideas for kids! The projects are fun, easy and most importantly low-mess, so the clean up is simple!

Where to buy:
You can purchase Low-Mess Crafts for Kids from Amazon, or wherever books are sold:
Amazon | Barnes and Noble | Books-A-Million | Indiebound | Amazon Canada


Leave a Reply