These cat Perler beads creations are SO CUTE! Cats themselves are so adorable, and these Perler bead designs are the “purr-fect” craft to celebrate these sweet and sassy animals.
Get inspired and make Perler bead art using our free Perler bead cat templates! (See links below.) Use the colours on our patterns, or design your own! These Perler bead cats are so fun and easy to make, and they make a perfect gift for the cat lovers in your life.

This post contains affiliate links. If you use these links to buy something we may earn a small commission which helps us run this website.
How to Make a Perler Bead Cat
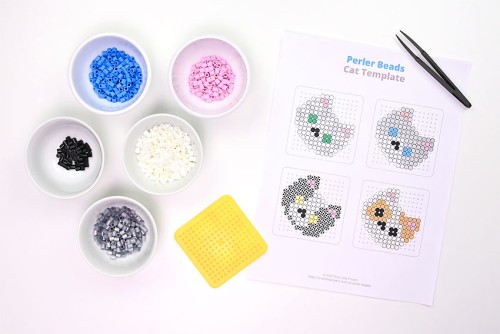
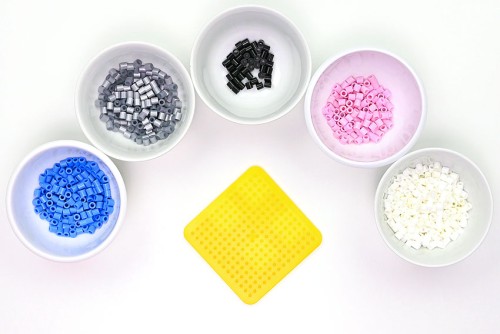
Materials:
- Perler beads (multiple colours)
- Perler beads pegboard (small square)
Watch the step-by-step video tutorial:
Instructions:
Step 1: Find what you need
- Gather your supplies and materials.

Step 2: Make your Perler bead cat on the pegboard
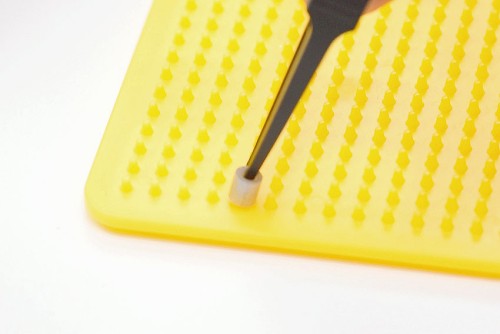
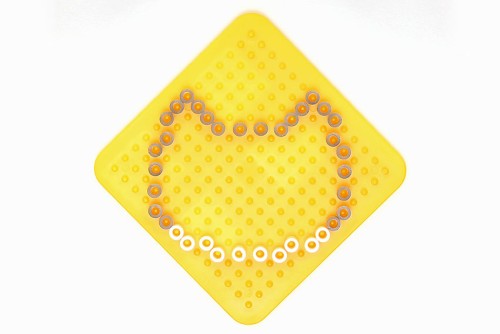
- Set out your small square pegboard on an angle, so it looks like a diamond. We also found it easier to separate out the colours of Perler beads we needed.
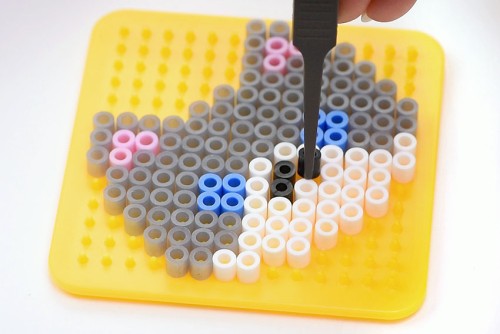
- Optional: Use tweezers to add the Perler beads to the pegboard. Little fingers probably don’t need to do this, but it makes it a lot easier for adults!
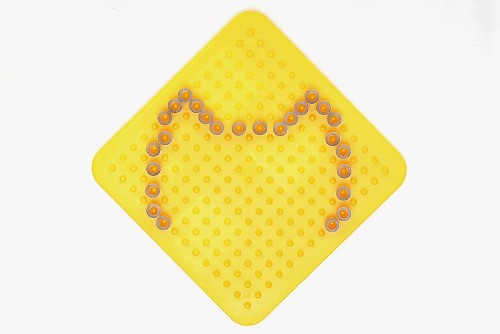
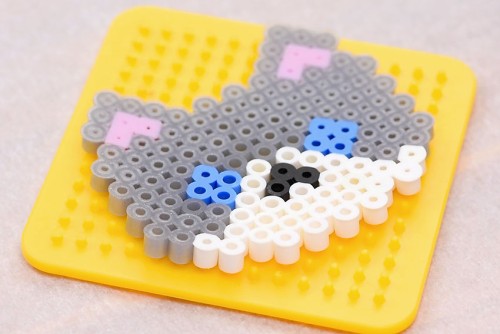
- Follow the template to begin creating the outline of the cat head. Add one Perler bead at a time and continue until you’re finished with the first colour.
- Complete the head outline with the second colour of beads, again making sure to compare to the template.
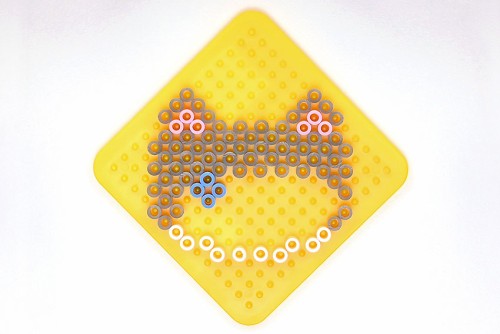
- Add in small details like the inner ears (pink) and the eyes (blue) before filling in the main colour around these beads.
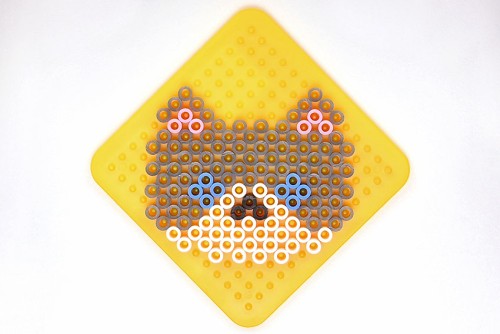
- Continue adding Perler beads according to the template until you’ve filled in the whole cat face.
- Double check your design and compare the cat to the template one last time to make sure it’s exactly how you want it to look.
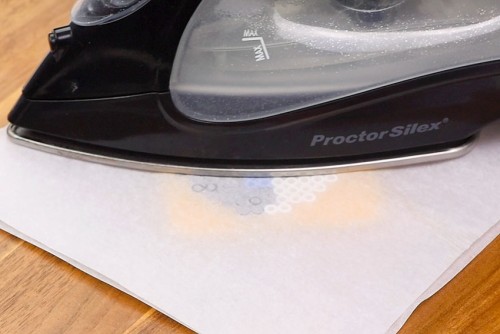
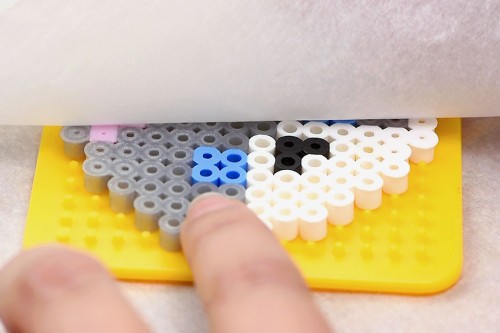
Step 3: Iron your Perler bead cat
- Put the pegboard on an ironing board or a wood cutting board. Place a piece of parchment paper over top of the cat Perler beads.Heat the iron to medium temperature, no steam. Place the iron on the parchment paper and move it around in circular motions for at least 15 – 20 seconds.
- Check the beads to see if they are melted together. Continue to iron for another 10 – 20 seconds, if needed.The beads should be melted correctly when the parchment paper sticks to the beads and needs to be peeled away from them.

- Leave the cat design on the pegboard until it is cool to the touch.
- Your Perler bead cat is complete!
Helpful Tips:
- It’s easier to start with the outline of the cat, and then add the inside details (like the nose and eyes) before filling in the main colour.
- Leave the Perler bead cat on the pegboard until it’s cool to the touch. This will prevent the beads from melting together in the center.

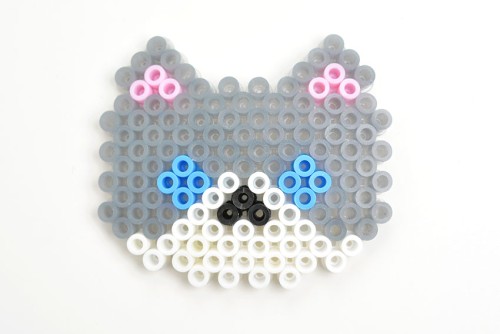
Download our free cat Perler beads templates:
Click on the links below to download our free, printable Perler bead cat templates! The PDF files will open in a new window.
Then simply follow along with the pattern on your device’s screen, or print the templates in colour on 8.5 x 11 (letter size) printer paper.
>>> Cat Perler Beads Template #1 <<<

>>> Cat Perler Beads Template #2 <<<

What are Perler beads?
Perler beads are small plastic beads shaped like a cylinder. These beads are also often referred to as “fuse beads” or “melty beads”.
Perler beads are designed to be melted together. Place the Perler beads on a plastic pegboard to make a pattern of your choice (like a cat!), and then iron the beads together.

How do you melt Perler beads perfectly?
The time needed to melt the beads will differ based on the temperature of your iron. The Perler beads packaging says that 10 – 20 seconds on medium temperature is enough to melt the beads, but we actually needed between 30 – 45 seconds to make our cat Perler beads.
Use circular motions as you press the iron down, and don’t be afraid to lift the iron and parchment paper to check on the progress. The Perler bead cat will be ready when the parchment paper sticks to the beads.

Are you supposed to iron both sides of Perler beads?
It’s totally up to you! We only ironed one side of our cats, because we liked how it looked. If you iron both sides it does give the Perler bead cat more stability, but it definitely changes the look.
You can iron just enough that the beads are fused together, but are still open, or you can keep ironing the back until the beads are totally closed. Experiment with ironing one side, or both, and ironing for different amounts of time to see what you prefer.
What can I do with my Perler bead cats?
These cats are adorable on their own, but there are lots of things you can do with them to make them cute and useful:
- Add a magnet on the back and stick the Perler bead cat on the fridge
- Put a jump ring through the top center to make a cat keychain
- Use a glue dot to attach the cat to scrapbook paper and stick it in a picture frame
- Glue a pin on the back to make a brooch/badge
- Add the beaded cat to the front of a homemade greeting card (be sure to add a cat pun like “Stay paws-itive” or “You’re the purr-fect friend”)

Use one of our 8 free Perler bead templates to make these adorable cats. It’s such a great craft for kids to practice their fine motor skills. Match our colours or come up with your own bright and colourful cats!

Here’s even more bead craft ideas:


Beaded Pipe Cleaner Butterflies

Our book Low-Mess Crafts for Kids is loaded with 72 fun and simple craft ideas for kids! The projects are fun, easy and most importantly low-mess, so the clean up is simple!

Where to buy:
You can purchase Low-Mess Crafts for Kids from Amazon, or wherever books are sold:
Amazon | Barnes and Noble | Books-A-Million | Indiebound | Amazon Canada


Leave a Reply