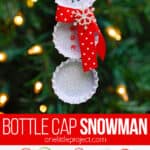
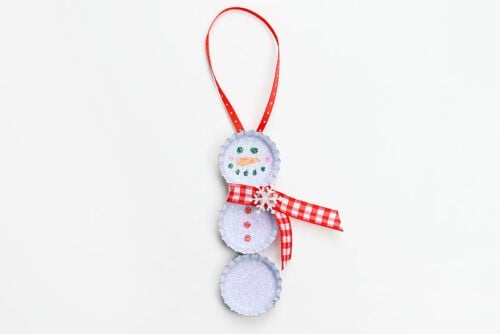
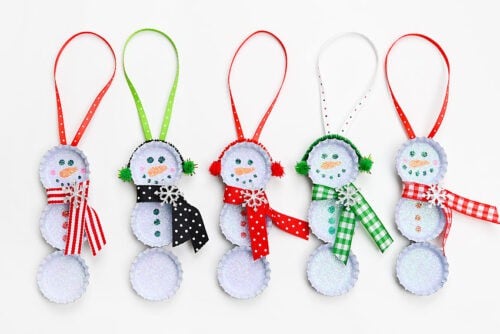
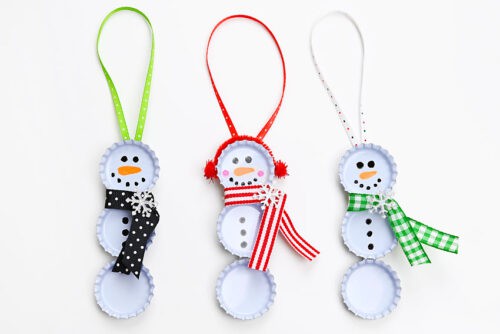
Turn ordinary bottle caps into the cutest little bottle cap snowman ornaments for Christmas! With a bit of ribbon and glitter you can make a whole family of snowmen dressed in festive scarves.
This easy Christmas craft is perfect for kids or adults and adds a sweet handmade touch to your holiday tree. These ornaments are simple, sparkly, and so much fun to create — the perfect DIY for your next cozy crafting afternoon!

This post contains affiliate links. If you use these links to buy something, we may earn a small commission at no extra cost to you. This helps support our website and allows us to keep creating fun, free content.
How to Make a Bottle Cap Snowman
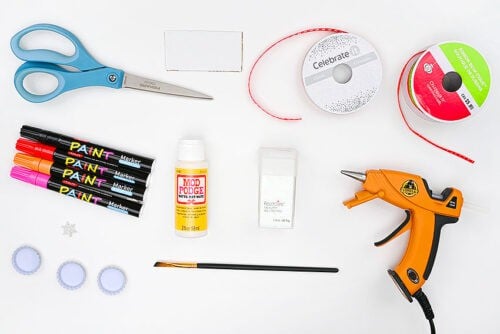
Materials:
- White bottle caps
- Paint markers (black, orange, pink)
- Matte Mod Podge
- Iridescent glitter (fine)
- Scrap cardboard
- Christmas ribbon (1/4 inch wide)
- Small plastic snowflake(s) (15mm)
- Thin Christmas ribbon (1/8 inch wide)
Equipment:
Instructions:
Step 1: Find what you need
- Gather your supplies and materials.

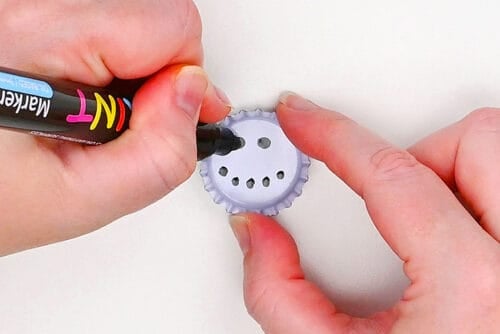
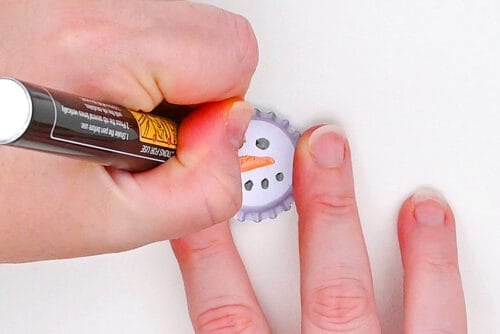
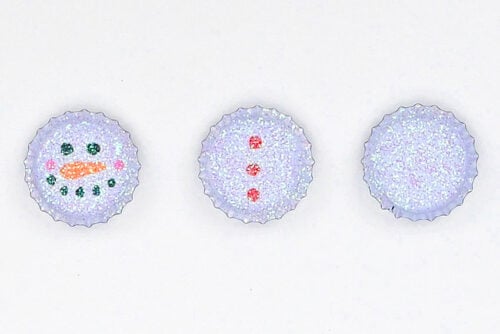
Step 2: Add snowman details to the bottle caps
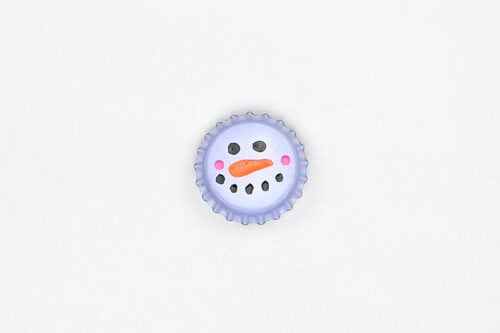
- Use a black oil paint marker to draw eyes and a mouth for the snowman on 1 bottle cap.
- With an orange marker, draw a carrot nose.
- Then make 2 pink dots for the snowman’s rosy cheeks.

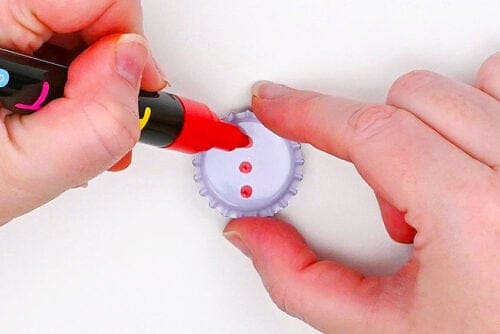
- On a second bottle cap, draw 3 vertical circles for the buttons. We used red to match our snowman’s accessories, but you can also use black.
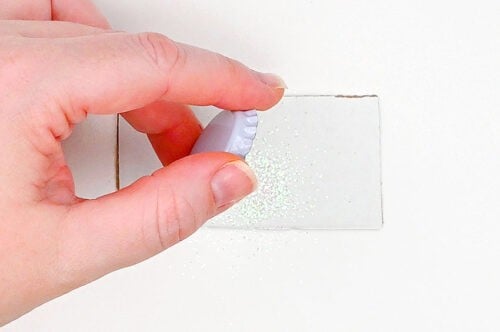
Step 3: Add glitter! (Optional)
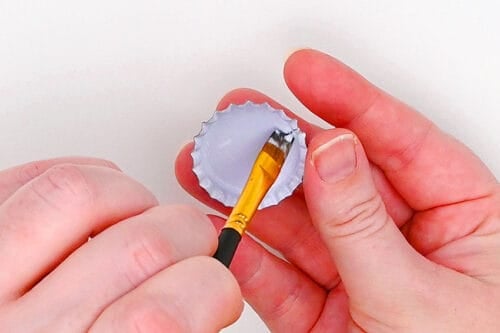
- Use a paintbrush to add a thin coat of matte Mod Podge to the third bottle cap.
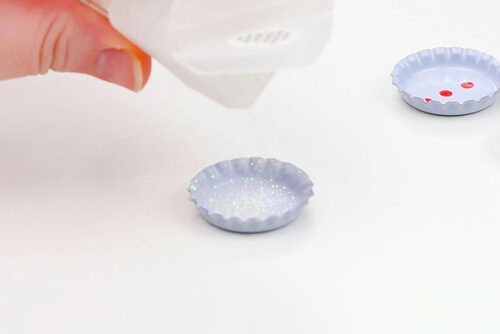
- Add white iridescent glitter into the cap.
- Twist the cap around so that the glitter reaches all sides, and then tap to remove the excess glitter.

- Repeat with the other 2 bottle caps.
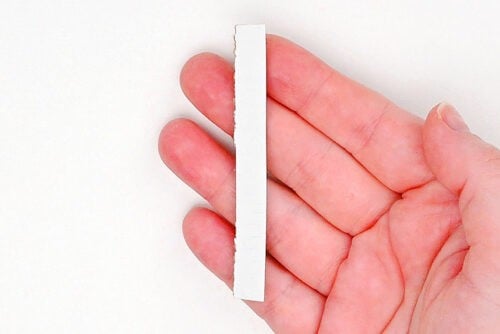
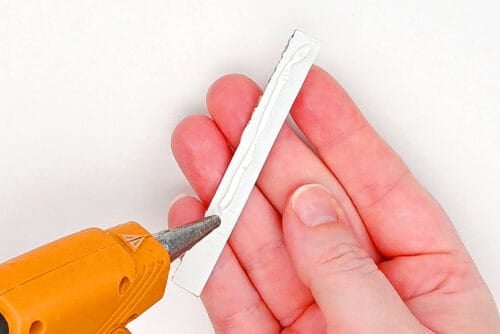
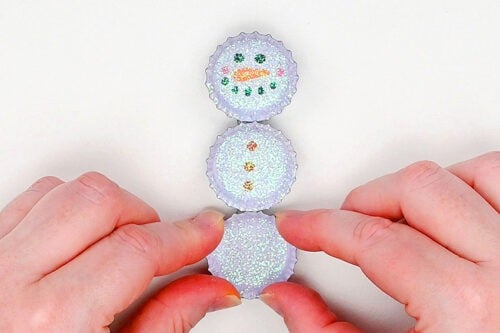
Step 4: Form the snowman
- Cut a thin piece of cardboard, about 3 inches long by just over 1/4 inch wide.(It should almost be as long as the bottoms of the 3 bottle caps combined.)
- Add a generous line of hot glue to the cardboard.
- Place the bottle caps in the glue, setting them as close together as possible.
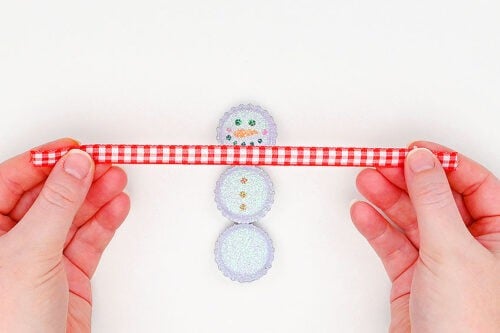
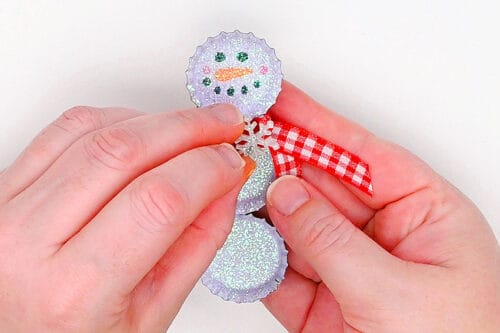
Step 5: Decorate the snowman
- Cut a piece of 1/4 inch wide ribbon about 7 inches long for the snowman’s scarf. A plaid, striped, or polka dot pattern looks really nice.
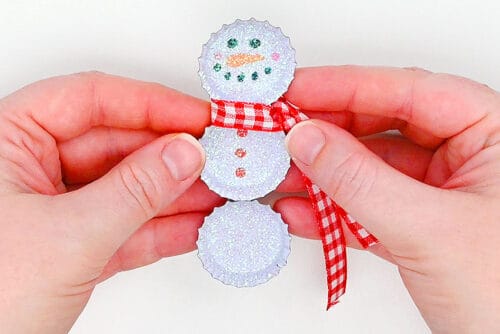
- Tie the scarf between the first and second bottle caps at the side so that the ribbon sits flat at the front.
- Add a bit of glue at the back and front under the ribbon. You can also glue down the top ribbon so the scarf sits nicely.Then cut the scarf to whatever length you’d like.
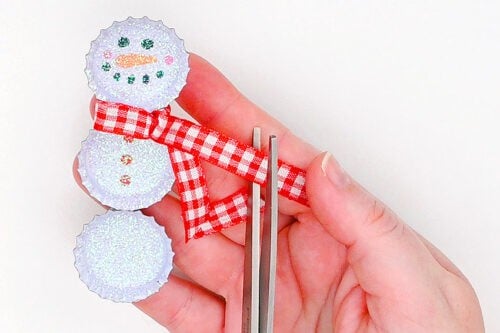
- Add a tiny dot of glue to the side of the scarf (where the ribbons overlap) and place a snowflake accent onto the scarf.
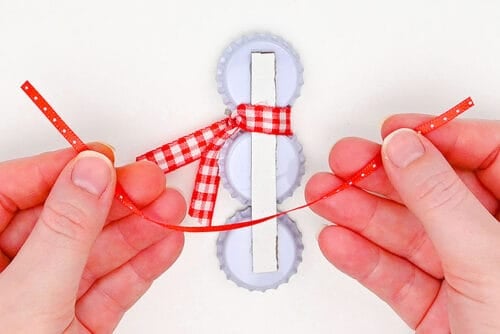
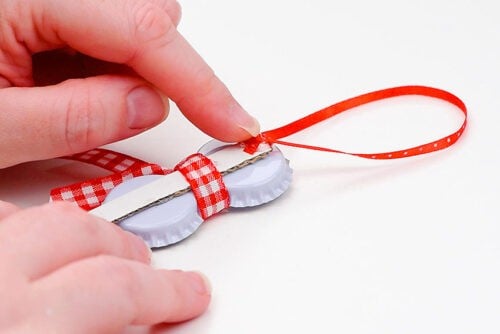
- Cut a piece of 1/8 inch wide ribbon to be 7-1/2 inches long. We chose red polka dot to match the rest of our snowman’s accessories.
- Attach the ribbon to the back of the top bottle cap, creating an ornament hanger.
- Your bottle cap snowman is complete!
- Have fun making a whole family of snowmen with different coloured buttons and scarves.
- You can also skip the Mod Podge and glitter if you’d like a cleaner look.We love the way the glitter makes the other snowmen look perfectly snowy, but it’s also fun how you can see the faces more clearly on these!
Helpful Tips:
- Fixing mistakes: Don’t love how the face turned out or notice that your buttons aren’t centered? Spray the cap with a bit of rubbing alcohol, then wipe the marker off with a Q-tip or paper towel and try again!
- Add some sparkle: Sprinkle glitter over the bottle caps for a pretty, snowy look — or skip the glitter for a cleaner, less messy craft. Without glitter, the faces also show up more clearly on your snowmen.

What’s the best way to draw the details on my bottle cap snowman?
We found that oil paint markers work best for drawing on the caps — even better than acrylic paint markers. Sharpies will work if that’s what you have, but they tend to look a little streaky and the colours don’t show up as deeply.
You can also glue on small rhinestones for the eyes and buttons. Or, if you have a steady hand, you can also use acrylic paint and a fine-tip brush.

Where can I get white bottle caps for this snowman craft?
We found our white bottle caps online, but you can also check local craft stores. If you can’t find white ones, recycle regular bottle caps and paint them beforehand. Spray paint gives the smoothest finish, but acrylic paint with a foam brush works in a pinch.
What can I use to decorate my bottle cap snowman’s scarf?
We used small plastic snowflake embellishments we found online, but you can also use sequins, tiny buttons, or even mini jingle bells for a festive touch. Check the dollar store craft section for lots of fun, inexpensive options!

How do I make earmuffs for my snowman ornament?
Cut a piece of pipe cleaner about 2-1/2 inches long. We matched the colour to the snowman’s ribbon scarf, but a complementary shade works too! Glue a small pom pom to each end of the pipe cleaner, on the side.
Then add a bit of hot glue around the top edge of the snowman’s head. Attach the pipe cleaner around to create cute little earmuffs!

This bottle cap snowman craft is such a cheerful and creative way to add handmade charm to your Christmas tree. With just a few recycled bottle caps, some ribbon scarves, and a touch of glitter, you can make adorable ornaments that sparkle all season long.
They’re fun for kids and adults to make together, and a wonderful way to reuse materials you already have at home. Whether you hang them on the tree, tie them to gifts, or share them as holiday keepsakes, these little snowmen are sure to bring smiles and festive cheer!
Here’s even more snowman craft ideas:
Ping Pong Ball Snowman Tealights


Now available
Low-Mess Crafts for Kids Book
72 cute and fun crafts that kids and parents alike can enjoy. All with as little mess as possible!
Where to buy:
You can purchase Low-Mess Crafts for Kids from Amazon, or wherever books are sold:
Amazon | Barnes and Noble | Books-A-Million | Indiebound | Amazon Canada


Leave a Reply