How to Make Groundhog Shadow Art
Celebrate Groundhog Day with this cute groundhog shadow art project! It’s a simple craft that kids will love! With just a few basic supplies, you can create adorable groundhogs and their playful shadows.
Yield: 1 groundhog shadow art
Cost: $1
Equipment
Instructions
Step 1: Find what you need
- Gather your supplies and materials.

Step 2: Print the groundhog template and attach to paper
- Print a coloured groundhog on white cardstock.Find the link to a free template in the materials list above, or keep reading below the tutorial to find a black and white version of the groundhog. You can colour this groundhog in yourself!

- Cut the groundhog from the printed template. Keep the scrap paper.

- Add loops of painter's tape to the front of the groundhog.

- Press the groundhog face down onto the center of a coloured piece of cardstock. (We used black cardstock.)

Step 3: Colour with chalk
- Colour from the edge of the groundhog onto the black cardstsock, extending out about 1 inch.

- Repeat all the way around the groundhog.

- Use your finger to smudge the chalk outwards, away from the groundhog.

- Repeat all the way around the groundhog. Blow any excess chalk dust off the cardstock.

Step 4: Add the groundhog
- Cut a strip of white cardstock about 6 inches long and 1-1/2 inches wide.You can cut this from the scrap cardstock leftover from the template.

- Fold the paper in half. Add glue tape to one side.

- Attach the paper to the back of the groundhog so the fold is at the bottom.

- Peel the groundhog from the black cardstock and remove the tape loops.Add glue tape to the top of the flap.

- Arrange the groundhog in front of his shadow. Press the cardstock flap into place on the paper.Press forward on the groundhog until he stands in place.

- Your groundhog shadow art is complete!

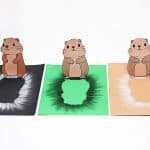
- Change the colour of the base to green for grass or brown for dirt. Make your groundhog some friends using both our free groundhog shadow art templates!

Video
Notes
Looking for more stencil art? Here's a few of our favourites:
Splatter Paint Bat
Northern Lights Chalk Art
Leaf Salt Painting