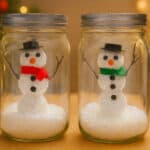
How to Make a Snowman in a Jar
Have fun making this simple snowman in a jar! Keep this easy winter craft out all season long for a little sprinkle of winter magic whenever you walk by.
Yield: 1 snowman in a jar
Cost: $3
Materials
- Styrofoam ball(s)
- White glue
- Fake snow
- Twigs
- Snowman parts (nose and hat)
- Safety eyes
- Green satin ribbon (or other colour)
- Large mason jar (32 ounce)
Instructions
Step 1: Find what you need
- Gather your supplies and materials.

Step 2: Cut the snowball pieces
- To make your snowman you'll need 3 Styrofoam balls for the body, and 1 larger one for the base.(If you can find 3 different sizes for the snowman, that's even better, but we made it work with 2 different sizes.)

- Cut a tiny sliver off the bottom of the head, using a craft knife.

- Then cut small pieces off the top and bottom of both body pieces.

- Cut the large ball in half. Then cut a flat section about 1/2 inch tall. This will be the snowman's base, to help him stay standing.

Step 3: Build the snowman and add snow
- Add hot glue to one of the body pieces, on one of the cut sections.

- Place the ball onto the center of the base.

- Glue on the second body piece, and then attach the head.

- Add a generous amount of white glue to the snowman.

- Use a paintbrush to spread out the glue evenly.

- Sprinkle the snowman with fake snow. Allow to dry.

Step 4: Decorate the snowman
- Cut 2 twigs, each about 3 inches long, for the snowman's arms.

- To connect all of the pieces you'll first want to use a toothpick to create a clean hole in the Styrofoam.Go piece by piece so you don't lose where you made the hole. Here we're making a hole for one of the arm pieces.

- Stick the twig into the hole you made, at an angle, so it points upwards. Then repeat on the opposite side.

- For the snowman's nose we're using a carrot shaped piece that came in a snowman kit.

- Then for the snowman's eyes and buttons we're using the front parts of safety eyes.

- Use the same toothpick trick to make holes and then attach the nose to the center of the face. Add the eyes above the nose, and the buttons in a row on the body sections.

- We're also using a hat from a snowman kit. Add hot glue around the bottom of the brim.

- Then set the hat on top of the snowman's head. Make it nice and straight, or place it at a cute angle.

- For the snowman's scarf, cut a piece of ribbon about 6 inches long. You'll cut it shorter later, but this makes it easier to wrap around the snowman.

- Wrap the ribbon around the snowman's neck and then add a small dot of hot glue

- Connect the other piece of the scarf into the glue and then cut it to whatever length you'd like.

Step 5: Place the snowman in his jar
- For the snowman's habitat we're using a 32 ounce mason jar.

- Slowly lower the snowman into the jar. You'll need to be careful with the arms and bend them in a little as you do so.

- Mix about 2/3 cup Epsom salts with around 1/3 cup fake snow. It doesn't have to be exact -- just make it roughly 2 parts salt and 1 part snow.(You can also just use the fake snow, but the Epsom salts add a nice icy touch.)

- Spoon or pour the snow mixture into the jar. You can use a paintbrush to dust off the snowman's hat if it gets too covered in snow.

- Then close the lid and your snowman in a jar is complete!

Notes
Looking for more mason jar crafts? Here's a few of our favourites:
Ghost in a Jar
Mason Jar Paper Butterfly Terrarium
Snowy Mason Jars