How to Make a Robot Hand
Build a robot hand that really moves using cardboard, straws, and yarn! This fun STEM craft is perfect for teaching kids about how our hands work — all while making a toy they’ll love to play with.
Yield: 1 robot hand
Cost: $1
Equipment
- Paper clip(s) (or yarn needle)
Materials
- Cardboard
- Drinking straws (paper or plastic; 5 colours)
- Smoothie straw
- Yarn (5 colours to match straws)
Instructions
Step 1: Find what you need
- Gather your supplies and materials.

Step 2: Trace your hand and mark the joints
- Trace your hand onto cardboard. A larger, adult-sized hand actually works better for this craft. Try to include the first part of the wrist as well.

- Cut out the cardboard hand.

- Flip the hand over. We'll be working on the inside of the hand. (So for the right hand, the thumb should be on the right.)Place your hand upside-down on the cut-out and mark where the knuckles and joints are (3 on each finger and 2 on the thumb).

- Set a ruler on the marked spots and fold the finger joints down. This helps to create clean folds.

Step 3: Attach straw sections to the hand
- Place a straw on the first finger, setting the top near the edge of the finger.Make a mark on the straw with pencil a little bit above the first joint of the finger.

- Then move the straw down so the marked line is a bit below the first joint.Draw another mark for the next joint, again making it a bit above the marked line.

- Repeat for the third joint of the finger, and then mark a longer section that will go below the finger down to the bottom of the hand on an angle.

- Cut out the sections of the straw and attach them to their respective sections using hot glue.Try to glue them at the same angle, so they look like a straight line with spaces in-between.

- Repeat for the rest of the hand, using a different colour of straw for each finger.

- Cut a section of a larger smoothie straw to fit on the wrist. Glue it in place in the center.

Step 4: Add yarn through the straws
- Unfold a paper clip so that there's only one curved section. This is optional, but it will act like a "needle" to thread yarn through the straws. It makes it a lot easier!

- Choose a colour of yarn to match your colour of straw. Keep it attached to the ball and use the "needle" to pull the yarn down through the top sections of straw.

- Next, bring the yarn through the longer straw section and the smoothie straw as well. Tie a knot in the bottom of the yarn.

- Pull the yarn straight, so that the knot's about 3 inches below the smoothie straw. Then cut off the yarn by the top straw.

- Add a generous amount of hot glue into the top straw section. Make sure the yarn stays in place (you can push it down with the paper clip or pencil, if needed), and allow the glue to cool.

- Repeat, adding different colours of yarn to each finger to match the straw colour.The colour matching is optional, of course, but it easily allows you to identify which finger you'll be moving!

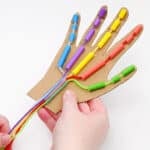
- Your robot hand is complete! Now have fun pulling the strings down to move the fingers.

Video
Notes
Looking for more interactive DIY toys? Here's a few of our favourites:
How to Make a Paper Football
Paper Airplane Launcher
Glow in the Dark Bouncy Balls