How to Make a Groundhog Puppet
Use our free printable template to make this cute and interactive groundhog puppet. You only need simple craft supplies and you'll be putting on a Groundhog Day puppet show in no time!
Yield: 1 groundhog puppet
Cost: $1
Equipment
Materials
Instructions
Step 1: Find what you need
- Gather your supplies and materials.

Step 2: Cut out the puppet pieces
- Print the groundhog puppet template (find the link in the materials list above!) and cut out the pieces.

- Trace the pattern pieces onto cardstock and cut them out.We used the following colours: Brown for the ears, head, body, and arms. Black for the nose. White for the teeth.

Step 3: Make the groundhog puppet
- Attach glue tape to the back of the nose.

- Put the nose in place at the bottom center of the face.

- Use a fine point marker or pen to draw a line on the center of the teeth.

- Add glue tape to the top of the teeth and connect them to the back of the head below the nose.Attach the ears to the top of the head and then connect the head to the flat top of the body.Finally, add the arms so that they go out to the sides and up a bit.

- Attach googly eyes to the head with glue tape or tacky glue.We used glue tape here, but recommend using a small dot of tacky glue for a stronger hold.

- Then add a line of glue tape to the back of the groundhog before attaching it to a paper straw.

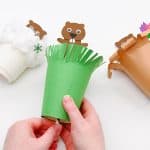
Step 4: Make the groundhog's burrow
- Have an adult use the tip of a pair of scissors to poke a hole in the bottom of a paper cup.

- Place the cup on a piece of green construction paper.

- Wrap the paper around so it's snug around the whole cup.

- Cut the paper so it's even with the bottom of the cup.

- Then cut around the top so that it overlaps the cup by about 1-1/2 inches.

- Unroll the paper and cut a fringe along the top of it, cutting down the 1-1/2 inches.

- Use glue tape to secure the paper around the cup.

Step 5: Add the puppet into its home
- Insert the puppet into the cup by pushing the straw down through the hole.

- Your groundhog puppet is complete!Now hold the straw in one hand and the cup in the other, using the straw to "POP" the groundhog up to see its shadow.

Video
Notes
Looking for more puppet crafts? Here's a few of our favourites:
Wiggly Worm Puppets
Flapping Butterfly Craft
Cotton Ball Sheep Craft