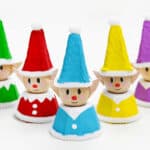
DIY Egg Carton Elf Craft
Make a cute egg carton elf using recycled materials and a few simple craft supplies! This easy Christmas craft is fun for kids and adds a festive handmade touch to your holiday decor.
Yield: 1 egg carton elf
Cost: $1
Equipment
Materials
- Egg carton
- Acrylic paint (green and white)
- Acrylic paint markers (several colours)
- White pipe cleaner(s)
- Extra large wooden bead (30mm)
- Small white pom pom
- Fine tipped black marker
Instructions
Step 1: Find what you need
- Gather your supplies and materials.

Step 2: Cut and paint the egg carton pieces
- Cut a pointed cone section from the egg carton (the part between the cups). Trim the bottom so it's nice and even. This will be the elf's hat.

- Then cut a cup from the carton, again cutting the edge so it's straight. This is the body/jacket of the elf!

- Choose a colour of acrylic paint for the elf's jacket (we chose green) and paint the egg cup.

- Use the same colour of paint for the hat. Allow to dry.

- Once the base paint is dry, use white acrylic paint to add a pointed collar and 2 round buttons on the jacket.Continue the collar so that the whole top of the jacket (the technical bottom of the cup) is white.

- Cut 2 pointed elf ears from the scraps you cut off the egg carton pieces. The inner part of the ear should be curved so they can be glued on the head easily.

- Use acrylic paint or a paint marker to paint both sides of the ears so they match the wooden bead.

Step 3: Decorate the clothing and paint the face
- Wrap white pipe cleaner around the bottoms of the hat and jacket. Twist the ends together.

- Connect the "trims" in place using a thin line of hot glue.

- Then glue a white pom pom on the top of the hat.

- Paint the elf's facial features on a wooden bead or ball. Use white acrylic paint or a paint marker to add 2 vertical oval eyes (you'll add the pupils in later).Make a horizontal oval with red for the nose and use pink to add 2 rosy cheeks. Finally, use a black fine tipped marker to add a smiling mouth.

Step 4: Assemble the elf
- Glue the head onto the jacket and then add the ears to the side of the head.

- Once the white paint has dried enough, use the black marker to add large black pupils. We made our elves looking to the side!

- Finally, add glue inside the hat and attach it on top of the head.

- Your egg carton elf is complete!

- Have fun making them in all different colours!

Notes
Looking for more elf fun? Here's a few of our favourites:
Clothespin Elf Craft
Elf Coloring Pages
Christmas Coloring Pages