
Add a bold burst of autumn colour to your Thanksgiving celebrations with this vibrant turkey chalk art project! Using bright chalk pastels and our free printable turkey template, kids can create a feather-filled masterpiece that’s full of fall charm.
This hands-on craft blends tactile art with simple cut-and-glue steps. Kids will love using their fingers to blend and sweep the feathers outward, bringing each chalk art turkey to life!

This post contains affiliate links. If you use these links to buy something, we may earn a small commission at no extra cost to you. This helps support our website and allows us to keep creating fun, free content.
How to Make a Chalk Art Turkey
Materials:
- Free Printable Turkey Chalk Art Template
- Cardstock (brown, orange, red)
- Black paper (or cardstock)
- Soft pastels
- Glue tape
- Large googly eyes (20mm)
Equipment:
Instructions:
Step 1: Find what you need
- Gather your supplies and materials.


Step 2: Cut out the turkey pieces
- Print our free turkey template! Find the link in the material’s list above.
- Cut out the turkey body and trace it onto brown cardstock. Keep the printed template handy, though — you’ll need it!
- Then cut out the rest of the template pieces. You’ll need 2 feet and a beak from orange cardstock, and a wattle from red cardstock.


Step 3: Colour the turkey feathers
- Add loops of painter’s tape around the outside of the printed turkey template.

- Press the turkey template down onto the black paper, centering it nicely.
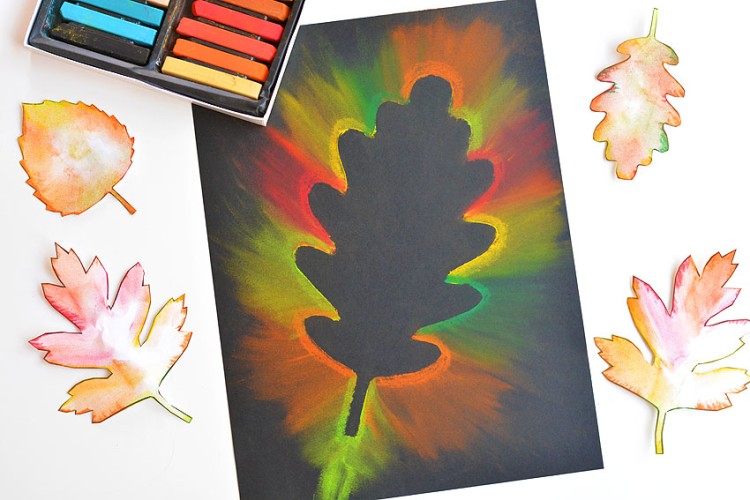
- To add the colourful turkey feathers, use soft pastel to colour from the edge of the template onto the black paper, pressing firmly and extending the colour out about 1 inch.We find it helpful to start at the bottom edge of where you want the feathers to be (about even with the bottom of the wattle).
- Repeat, adding the same colour randomly around the turkey, leaving space in-between.
- Add a second colour to the turkey. How many colours you want to use will determine how wide the bands of colour are and how close you place them.
- Repeat, adding more colours or different shades of the same colour until the top 2/3 of the turkey are surrounded by colour. Then blow off the excess chalk dust.
- Use your finger to smudge the chalk outwards, away from the template. Start by brushing lightly and then repeat if you’d like the chalk spread out farther.
- Carefully remove the template from the paper.


Step 4: Attach the turkey details
- Add glue tape to the back of the brown cardstock turkey body.
- Then attach the feet to the bottom of the body, adding glue tape to the backs of them as well.
- Carefully set the turkey into place, filling the silhouette left by the template.
- Add glue tape to the back of 2 googly eyes and set them in place.
- Then add glue tape to the pointed tip of the wattle, connecting it to the side of the beak.
- Add glue tape to the back of the beak and wattle, and set them in place below the eyes.
- Your turkey chalk art is complete!


Helpful Tips:
- Keep your hands clean between colours: Have a few damp paper towels ready so you can wipe your fingers before switching to a new colour.
- Fix smudges easily: If you get fingerprints or marks on your paper, gently remove them with a Q-tip or soft eraser.
- Work from light to dark: You may want to start blending the lighter chalk colours first, so they don’t get muddied by darker tones.

Get our free printable chalk art turkey craft template:
The link below will take you to our free, printable turkey template! The PDF file will open in a new window. Then simply print the pattern on 8.5 x 11 (letter size) printer paper or cardstock.
>>> Turkey Chalk Art Template <<<

What type of chalk is best for making a chalk art turkey?
Soft pastels (also called chalk pastels) work best for this project. They’re inexpensive, easy to blend, and create bright, vibrant feathers. Blackboard or sidewalk chalk will work too, but the colours won’t be as bold.
Do I have to use my finger to spread the chalk?
Nope! You can also blend using Q-tips, cotton rounds, or a foam paintbrush. Just use a light touch, as these tools can lift more colour easily. If you blend too much, simply add more chalk overtop and try again.

Do I need to seal my chalk art turkey?
Chalk rubs off paper easily, so if you want to display your artwork or keep it as a Thanksgiving decoration, we recommend sealing it.
Use a spray fixative from an art supply store, or even cheap hairspray as a quick alternative. Hold the can about 12 inches away and spray short bursts to lightly coat the paper without soaking it.
If you’re only using the chalk art as a fun, temporary project, you can feel free to skip this step.

This turkey chalk art craft is such a fun and creative way for kids to celebrate Thanksgiving! With chalk pastels, bold fall colours, and our easy printable turkey template, it’s the perfect blend of art and holiday cheer.
Each finished piece is completely unique, full of texture and colour, and they makes a wonderful Thanksgiving decoration or keepsake. Whether you make one at home, in the classroom, or with a group, this project is sure to bring a burst of festive fun to your autumn crafting!
Here’s even more Thanksgiving craft ideas:


Now available
Low-Mess Crafts for Kids Book
72 cute and fun crafts that kids and parents alike can enjoy. All with as little mess as possible!
Where to buy:
You can purchase Low-Mess Crafts for Kids from Amazon, or wherever books are sold:
Amazon | Barnes and Noble | Books-A-Million | Indiebound | Amazon Canada


Leave a Reply