
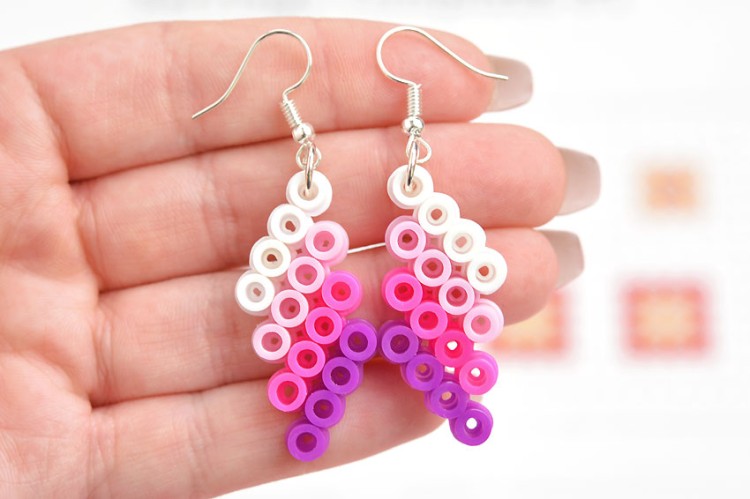
Add a touch of handmade charm to your fall wardrobe with these beaded pumpkin earrings! They’re chic, seasonal, and surprisingly easy to make — perfect for anyone who loves pairing a cute accessory with a cozy sweater.
With just a few beads and some simple techniques, you can whip up a pair of earrings that are both stylish and festive. Whether you’re dressing up for Halloween, adding a little flair to your Thanksgiving outfit, or simply celebrating all things autumn, these pumpkin earrings are the perfect DIY project to try this season.

This post contains affiliate links. If you use these links to buy something, we may earn a small commission at no extra cost to you. This helps support our website and allows us to keep creating fun, free content.
How to Make Beaded Pumpkin Earrings
Materials:
- Fishing line
- 4 Gold jump rings (5mm)
- 4 3mm Seed beads (green)
- 2 Large orange beads (10mm)
- 200 Seed beads (2mm; 2 colours of orange)
- 2 Gold earring hooks
Equipment:
- Needle nose pliers (2 pairs)
Instructions:
Step 1: Find what you need
- Gather your supplies and materials.


Step 2: Add the first beads
- Cut a 3 foot piece of clear beading thread or fishing line.

- Add a 5mm jump ring to the thread and fold the string in half, so the jump ring goes to the center.
- Then add 2 green seed beads onto both strands. Let them fall down next to the jump ring.
- Now add a 10mm orange bead to both strands. This bead should match your seed beads.


Step 3: Add the orange seed beads
- Add 16 orange seed beads to one of the strands.
- Take the end of this cord and bring it down through the large orange bead.The end should be inserted into the bead from the side touching the green beads.
- Pull this strand down all the way, creating the first ridge of the pumpkin.
- Add 16 more seed beads to the same strand, this time using the second shade of orange.Push the end of the thread into the top of the large orange bead, and pull it all the way through.
- Now switch back to the first colour of orange and repeat. Continue alternating the colours until there’s only about 6 to 8 inches left on the first strand.
- Switch to the second strand and continue until you have 12 beaded ridges total.


Step 4: Finish off the earring
- Add 1 more orange bead to one of the strands.
- Tie the strands together in a triple or quadruple knot, making sure everything is secure.(You can also secure the knot with a dot of super glue to be safe.)
- Push the thread ends back up through the large center bead.
- Pull them tight and trim off the excess thread.
- Use pliers to open another jump ring. Place it on the earring’s jump ring and then add an earring hook. Use the pliers to close the jump ring.
- Repeat all steps, making a second earring.
- Your beaded pumpkin earrings are complete!


Helpful Tips:
- Use extra thread for safety: You can probably get away with less fishing line per earring, but having a longer piece makes knot-tying much easier, and it helps prevent beads from slipping off while you work.
- Mix up the colours: Using two shades of orange gives the earrings more dimension. You can also try a mixture of gold and bronze, or make them more Halloween-y by using black and purple!
- Keep your thread tight: Pull the fishing line firmly as you add each ridge. This ensures your pumpkin shape will stay round and full, with each ridge looking the same.

Do I have to use fishing line to make beaded pumpkin earrings?
No — strong beading thread, nylon cord, or even thin embroidery floss can work if that’s what you have on hand. The main thing is to use something sturdy that won’t fray easily and is thin enough to pass through the bead multiple times.
Fishing line is often preferred because it’s clear and very strong, but if you’re careful with your knots, other options will hold up just fine.

Can I turn this beaded pumpkin design into something other than earrings?
Absolutely! This beaded pumpkin works great as a stand-alone charm. You can attach it to a keyring, add it to a bracelet as a seasonal accent, or string a few together to make a festive necklace. They even make cute little zipper pulls for backpacks or purses — perfect for adding a touch of fall flair to everyday items.

What size are these beaded pumpkin earrings?
The pumpkins themselves measure about 3/4 inch wide by 3/4 inch tall, making them small and lightweight enough for everyday wear. With the earring hook included, they hang down about 1-1/2 inches in total.
How can I customize the size of these DIY beaded earrings?
To make smaller pumpkins, use a smaller center bead and reduce the number of seed beads on each ridge. Just make sure the center bead’s hole is still large enough for the thread to pass through at least 8 times.
For larger statement earrings, go with a bigger center bead and add more seed beads to each ridge. Just remember to cut a longer piece of fishing line at the start so you have enough to work with.

These beaded pumpkin earrings are the perfect blend of festive and fashionable, making them a go-to accessory for fall. Handmade jewelry always feels extra special, and with their bright orange sparkle and cozy pumpkin shape, these earrings are sure to get compliments wherever you wear them — from Halloween parties to Thanksgiving dinner.
Here’s even more DIY jewelry ideas:


Now available
Low-Mess Crafts for Kids Book
72 cute and fun crafts that kids and parents alike can enjoy. All with as little mess as possible!
Where to buy:
You can purchase Low-Mess Crafts for Kids from Amazon, or wherever books are sold:
Amazon | Barnes and Noble | Books-A-Million | Indiebound | Amazon Canada


Leave a Reply