How to Make a Q-Tip Skeleton
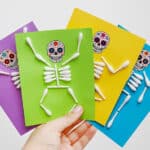
Make an adorable Q-tip skeleton using our free printable skull template and simple supplies like cotton swabs, glue, and cardstock. This easy Halloween craft is perfect for kids and adds a fun, not-so-spooky touch to your seasonal decor!
Yield: 1 Q-tip skeleton
Cost: $1
Equipment
Instructions
Step 1: Find what you need
- Gather your supplies and materials.

Step 2: Cut the paper and Q-tips
- Cut a piece of coloured cardstock into 4 quarters. We'll be using 1/4 of the page.

- To make your skeleton you'll need about 8 Q-tips.

- First cut the cotton bud (the fluffy tip) off one end of the Q-tip.

- Then repeat on the other side, so you have 2 buds and a stem (the plain center section).

- Cut up the rest of the Q-tips. You'll need 2 stems and 8 buds to make your skeleton. You'll also want to cut 4 Q-tips in half to create 8 stems with buds.NOTE: You can also use a full page of cardstock and use full size Q-tips instead of cutting them. This will be easier for younger kids.

Step 3: Glue the skeleton to the page
- Add a thin line of tacky glue to a stem section.

- Place the stem vertically for the skeleton's spine. Then add the second stem horizontally below the spine, creating the pelvis.

- Use 4 stems with buds to create the legs and feet. Place the first sections bud up, for the hips, and the other 2 the opposite direction.

- Glue 8 buds to the spine, 4 on either side with the buds facing out, creating the rib cage.

- Then use 4 stems with buds for the arms, gluing 2 on either side.

Step 4: Add the skull template
- Print our free sugar skull template (find the link above!) and cut out one of the skulls.

- Add a thin layer of glue to the back of the skull (or use glue tape) and set it in place.

- Your Q-tip skeleton is complete!

- Now have fun making more skeleton crafts with different colours of paper. You can create all kinds of fun dancing positions for the skeleton to be in!

Notes
Looking for more skeleton and skull crafts? Here's a few of our favourites:
Bag of Bones
Felt Sugar Skull Pattern
Paper Plate Day of the Dead Mask