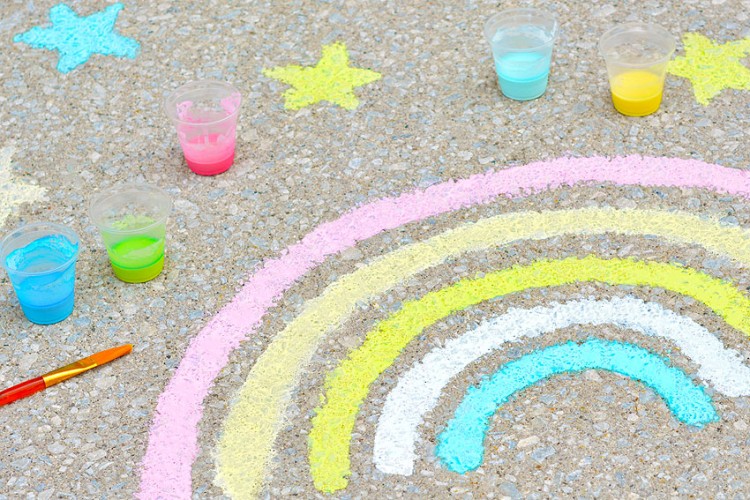
Learn how to make sidewalk chalk using our detailed step-by-step guide! DIY sidewalk chalk is SO EASY to make. You only need 3 simple ingredients – and one is water! It’s such a fun and creative summer activity!
This easy DIY sidewalk chalk recipe is great for encouraging art skills and creativity, while also increasing your kids outdoor time. Choose your favourite colours and shapes and make your own chalk for non-stop summer fun!

This post contains affiliate links. If you use these links to buy something we may earn a small commission which helps us run this website.
How to Make Sidewalk Chalk
Materials:
- 1/3 cup Cold water
- 1-2 Tablespoons Liquid tempera paint
- 2/3 cup Plaster of Paris
Equipment:
- Large disposable cup(s) (1 per colour)
- Jumbo popsicle stick (1 per colour)
- Plastic spoon (to scoop the plaster)
- Ice cube stick mold (or silicone mold in shape of choice)
Watch the step-by-step video tutorial:
Instructions:
Step 1: Find what you need
- Gather your supplies and materials.


Step 2: Make the chalk mixture
- Pour the cold water into a large (12 to 16 ounce) disposable cup.
- Add the paint into the water.You can measure the paint or just eyeball it, like we did after our first batch. You want the colour to be quite dark in the water, since it will lighten up a lot once the plaster is added.
- Use a large popsicle stick to stir the paint into the water, mixing well.
- Add the Plaster of Paris into the coloured water 1 little bit at a time.Allow the plaster to sink into the liquid before adding more. Don’t stir yet.
- Repeat until you’ve added all of the Plaster of Paris. Then use the popsicle stick to stir slowly and gently.Continue until everything is well combined, with no white spots remaining.


Step 3: Pour the chalk mixture into a mold
- Pour or scoop the mixture into a clean and dry mold.
- Use the popsicle stick to ensure there aren’t any air bubbles at the bottom of the mold, and to smooth out the tops as best you can.It’s okay if the mixture overflows the molds a little bit. When you remove the chalk the excess will crumble away.
- Repeat, filling as many spots of the mold as you can and allow to dry/harden.This can take anywhere from a few hours to 24 hours (read more about this below).


Step 4: Demold the chalk
- Carefully remove the chalk from the mold. Push up on the bottom gently.If your mold is fully silicone you can stretch the mold out a lot easier.

- Continue pushing up until you can cleanly remove the chalk from the mold.
- Your DIY sidewalk chalk is complete!Repeat, making as many colours as you’d like.
- Now have fun drawing outside, making all kinds of cool designs!


Helpful Tips:
- Plaster of Paris is quite safe to work with, but you still want to be responsible. Wear gloves if your skin is sensitive and consider wearing a dust mask and eye protection. Be sure to wash away any wet plaster from your skin right away.
- Make your own sidewalk chalk in all your favourite colours! But remember to make white chalk as well if you want to draw clouds to go along with your rainbows and suns.

What type of paint do you need to make DIY sidewalk chalk?
We recommend using tempera paint. It creates a sidewalk chalk that has an almost “creamy” feel to it when you draw, similar to a pastel. We also recommend using vibrant neon or flourescent shades of tempera paint. These colours show up a lot better on the pavement.
You can also use acrylic paint if that’s all you have. Even though acrylic paint isn’t washable, like tempera is, it still washed off our sidewalks without any issue. If your driveway or sidewalks are light in colour or are especially porous, test a small area first to make sure it doesn’t stain.
Is DIY sidewalk chalk easy to clean up?
To keep the cleanup really simple, we like to use disposable cups and utensils when making the sidewalk chalk. Make sure you wipe out your molds before washing them to remove any flakes or chalk residue. You don’t want any of the plaster hardening in your sink drain.
We found that our sidewalk chalk washed away really easily outside. You can spray a garden hose over the drawings to remove them or wait for a rain storm to clean it up.

What molds are best for making DIY sidewalk chalk?
We love the look of the ice cube stick molds that we used – they mimic the look of school chalk! But you can also use silicone molds in a variety of shapes. How cute would it be to make chalk in the shape of butterflies or hearts and stars?!
A mold that’s fully silicone will make it a lot easier to remove the chalk without breaking it. If you’d like to move the chalk while it’s drying, place the silicone mold on a baking sheet to give it some support.

How thick should the Plaster of Paris mixture be?
Well… we had very mixed results with how thick the mixture got. Our theory is that the pigment of the paint changes the consistency, but we’d love if anyone could provide us with an actual scientific answer.
Some of our mixtures were thin enough to pour nicely, while others were like a thicker concrete mixture that needed to be scooped. Yet both of these consistencies created nice pieces of chalk, so don’t worry if your mixture looks a little different than ours. Just make sure there aren’t any air bubbles at the bottom of the mold, for the nicest looking sidewalk chalk.
How long does this DIY sidewalk chalk recipe take to dry?
Again, we had really varied results. Some of the chalk was firm and dry within 1 to 2 hours. Others stayed soft for a long time and required 24 hours in the mold before removing.
We’re not sure why the drying time was so different for our different colours and batches (humidity levels? the colour of the paint?), but again, the chalk seemed to work out really well no matter the drying time. We recommend leaving the chalk in the mold at least overnight to be safe.

Learn how to make sidewalk chalk in any shape and colour you want. Sure, you can buy sidewalk chalk at the store, but why buy it when you can get creative and make your own?!
This summer craft is a lot of fun to make and to use. And with only a few ingredients you can make colourful, custom chalk pieces that are perfect for decorating sidewalks, driveways, and patios!

Here’s even more outdoor summer craft ideas:


Our book Low-Mess Crafts for Kids is loaded with 72 fun and simple craft ideas for kids! The projects are fun, easy and most importantly low-mess, so the clean up is simple!

Where to buy:
You can purchase Low-Mess Crafts for Kids from Amazon, or wherever books are sold:
Amazon | Barnes and Noble | Books-A-Million | Indiebound | Amazon Canada


Leave a Reply